This report shows a high-level summary of your assessment items; move between the tabs to see specific properties of the summary.
For details on this report, see Management Reports/Hazard Assessment Items Summary Report.
Use the Scoreboard report to quickly gain an overview of the current state of your facility, and then to drill down to more detailed data. With this report, you can quickly see the most urgent tasks and the estimated costs of resolving them. You can then decide which items you will immediately address and which you need to postpone.
For more information, see Scoreboard reports.
For a particular location, this report is handy for viewing your hazard assessment items, samples, and lab results in one view. Use this report when you need details about a location's assessment item, sampling, and lab results.
For example, suppose a moving crew lifted a large shelving unit into the ceiling of a particular room causing a large quantity of crumbly, white material to fall and coat the surrounding furniture and workers with dust. It’s an older building known to have asbestos in various locations. Since you know the room number, you can quickly obtain details about the content of its ceiling tiles, when they were last tested, an so forth. If you have already surveyed the building and documented analysis the results, there will be no need to retest the material. This will eliminate the cost of sampling and testing, and eliminate the potentially greater cost of down-time while waiting for test results.
To use the report, first, in the left pane, you must select a site, building, floor, or room for which you want to see assessment items. If you wish the space hierarchy list in the left pane to show only items with a certain property -- such as rooms whose assessment items have a Friability of Yes -- set the appropriate options in the filter console at the top of the screen and click the Show button.
The system displays the assessment items for the selected space hierarchy. For each assessment item, use the View button to see further details about the assessment item in a pop-up window. If you want to examine multiple assessment items at once, you can horizontally scroll to see this same information. You can also select the Samples and Lab Results buttons and the system will move you to these tabs on the report. From the Samples and Lab Results tab, you can use the View option to see the specifics of these items. The Results Summary provides, in one pane, all the lab results substances found for the selected site, building, floor, or room.
If problems are found and you need to take action, you can use the Doc button to present this information in a Word Document that you can share with others involved in the decision-making process. Additionally, the Results Summary tab enables you to sent the data to an Excel document.
For information, see Management Reports/Hazard Assessments by Location Drilldown.
Like the "Hazard Assessment Items by Location" report above, this report is handy for viewing your hazard assessment items, samples, and lab results in one view. However, this report is organized by project, rather than location.
If you have implemented activity items (service requests and action items) as part of your hazmat project, use this report to review them.
Select one or more projects, and then use the filter to control the activity items included in the report. Two filter options are particularly important:
The Summary Report tab presents total costs of your activity items. If you have recorded your cost data with action items and service requests, you will find this report's summary cost fields handy for reviewing your estimated baseline costs, estimated design costs, and actual costs
Click on any cell in the report, and you move to the Activity Items tab, which presents the details of the activity items contributing to the selected cell. Scroll right to see all of the data for an activity item. Scrolling right also enables you to access the DOC button for exporting the activity item data, organized by project, to a Word document.
Managing hazmat project may require a lot of communication: communication with abatement agencies, labs, inspectors, government agencies, internal personnel, and other contractors. Additionally, you may have several notes or documents that you need to track.As various personnel work on a hazmat project, they can create communication logs and associate them with action items, assessment items, and the overall project. Use this report to see all of your communication log items for one or multiple projects. You can filter the data by various fields, such as communication types (such as, show only items pertaining to budgeting) or date range. Use the DOC button if you need to list the communication logs in a Word document.
With this report, you can graphically see on a floor plan drawing the rooms that have assessment items for a particular project.
First, in the left pane, you must select a project. Next, select the building or floor for which you want to see this project's assessment items.
If you wish the report to show only entities with a certain property -- such as only buildings whose assessment items have a Friability of Yes, or buildings are in the process of being inspected (Status is INSPECTION)-- set the appropriate options in the filter console at the top of the screen and click the Show button. Setting the filter will produce more meaningful results.
If you select a building, the system shows its details in the top pane and the assessment items for this building in the bottom pane.
If you select a floor, the system shows the floor plan drawing, highlights the rooms that have assessment items, and displays these assessment items in the bottom pane. You can click the box on the left side of any assessment items in the bottom pane to highlight the corresponding rooms in red.
This report is similar to the above report except that it shows all assessment items for the selected building and floor, not just assessment items for a particular project. In the left pane, drill down through the space hierarchy to a particular building or floor.
If you select a building, the system will show its detailed information in the top pane and the assessment items for this building in the bottom pane. If you select a floor, the system shows the floor plan drawing, highlights the rooms that have assessment items, and displays these assessment items in the bottom pane.You can click the box on the left side of any assessment items in the bottom pane to highlight the corresponding rooms in red.
Note that this report shows assessment items for all projects; use this report to understand the location of all hazmat issues.
Use this report, if you would like to directly access your floor plan drawings without drilling down the hierarchy or if you would like to see multiple floor plans at once.
In the left pane, choose one or more floors. The system displays the floor plans and highlights the rooms with assessment items in the floor plan drawings. The lower pane lists the assessment items. You can click the box on the left side of any assessment items in the bottom pane to highlight the corresponding rooms in red.
Showing multiple floor plans at one time is handy for hazmat issues that might vertically penetrate the same area of a building. For example, suppose there was a leak of a vertical pipe and you later found mold in one floor's rooms near the pipe in question.You might want to view this same area on multiple floors to see if these same areas have mold assessment items. You can quickly and graphically see the potential effects of the leak.
With this view, you can highlight on a floor plan drawing:
Abatement workers, inspectors, and field assessors can use this report and its drawings to find the areas that they must visit. Use the DOC button to generate a paginated report that includes the highlighted drawings and assessment item records.
Follow these steps to work through this view:
| Items to Highlight on Drawing | Rooms Tab | Hazards Tab | Samples Tab |
| Rooms | Click a room to highlight the room | Click an assessment to highlight the room where the assessment is located |
Click a sample to highlight the room where the sample is located |
| Hazards | Click a room to highlight all drawn hazard areas in the room | Click an assessment to highlight the area drawn for the hazard |
Click a sample to highlight the drawn hazard area where the sample is located |
| Samples | Click a room to highlight all drawn sample locations in the room | Click an assessment to highlight all drawn sample locations for the assessment | Click a sample to highlight the area drawn for the sample’s location |
With this report, you can drill down through a building map to floor plans with assessments and then review various properties of the rooms with assessment items.
First, select one or multiple buildings in the left pane. On the ESRI map, the system indicates the building's location. Graphically seeing the locations on a map of your buildings with hazmat issues might help you spot trends. For example, do buildings located in the same city have similar hazmat issues?
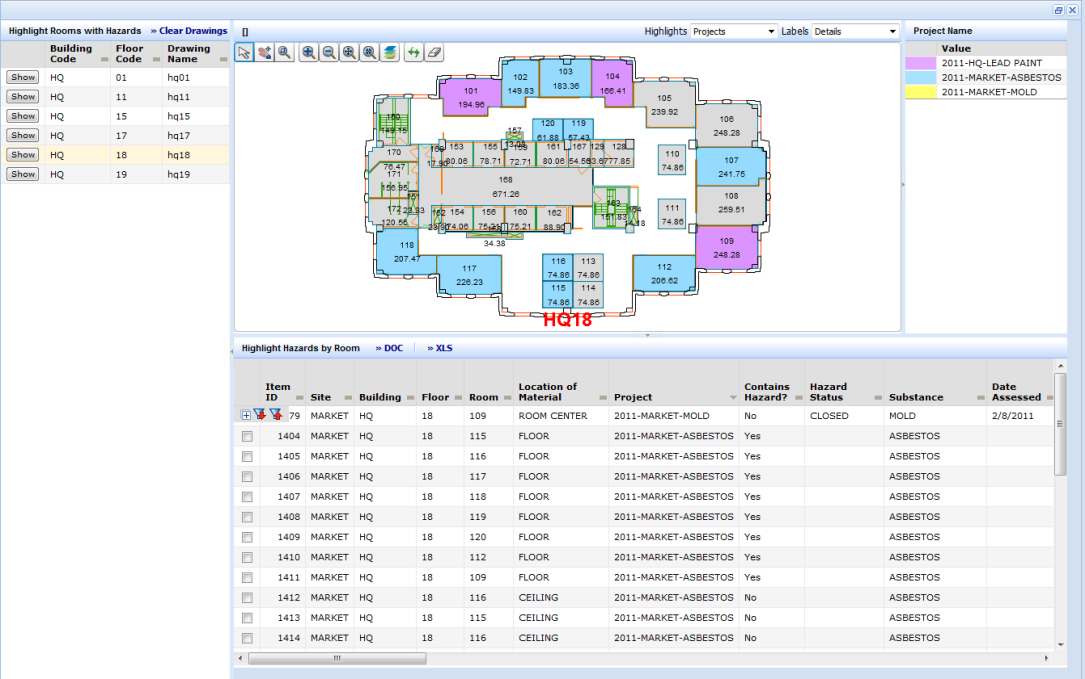
Once you finish reviewing the map, on the map, click on the building for which you would like more information about its hazmat items. The system opens the "Highlight Rooms with Hazards" window. You may wish to maximize this window so that you can more easily work with it.
From the right pane, choose one or more floor plan drawings for which you wish to review hazmat items. The system displays the floor plan; beneath the drawing, it lists the he assessment items for this floor. The system highlights the rooms with assessment items, according to the hazardous substance project containing assessment items for this room. The far right panel lists a key so that you know how highlight colors map to projects.
When you have finished viewing these floor plans, choose the Clear Drawings button and the system closes them. You can then choose another floor plan to display.
Note that when you choose a floor plan drawing, the system highlights it according to the hazardous substance project containing assessment items for this room. Once you review the project highlight information, you may require more information about the rooms with assessment items. You have a few options: