After approving a project, you can create funding scenarios as part of your evaluation process. Funding scenarios enable you to examine a variety of funding options before deciding on how to allocate funds. You may also want to create funding scenarios while you are considering whether or not to approve a project.
You create funding scenarios by working through the following two tasks:
Before you create a funding scenario, you first create a scenario code using the Add or Edit Scenario Codes task. This scenario code creates the scenario that you can then add costs to using the Plan Scenario Costs task.
To add a scenario code:
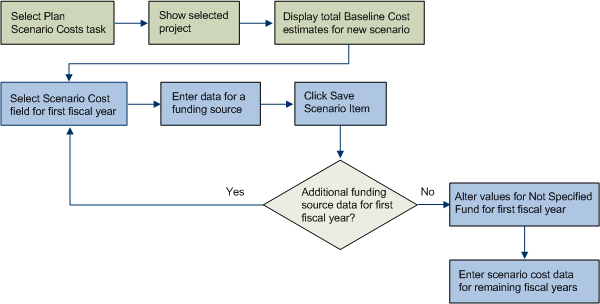
After creating scenario codes, you can use the Plan Scenario Costs task
to view your total baseline cost estimates and create your scenario
costs. The diagram below illustrates the process that you use to plan
scenario costs. For information on the database tables used in the Plan
Scenario Costs process, see the Plan
Scenario Costs Tables topic.
Each Baseline Costs field displays the total for all action baseline estimates that you have entered for a project by fiscal year. The baseline costs data is a useful reference while entering your scenario cost values. For more information on creating action baseline estimates, see the Estimating Baseline Schedules and Costs topic.
After reviewing baseline costs, you enter scenario costs data, which consists of funding data that you enter. For each fiscal year, you can enter cost information for one or more funding sources. Scenario costs are associated only with a scenario. They are not actually allocated to a fund unless you choose to copy a scenario while you are completing the Allocate/Allocate Funding task.
Note 1: When you select a project, the system displays the total baseline costs estimate based on data from all actions that have values defined for baseline cost estimates and the Date Planned For field. The baseline cost estimate fields and Date Planned For field can be defined in the Request/Add or Edit Actions task.
Note 2: When Scenario Costs are first displayed, these costs are set to 0.00 and are allocated to the Not Specified Fund. When you add a funding allocation to another funding source, the amount does not affect the amount allocated to the Not Specified Fund. You can change the amount allocated to the Not Specified Fund by editing this fund's allocation.
Note 3: If you later apply a funding scenario to a funding allocation, the Scenario Costs values will be applied to the funding allocation. The Baseline Cost values will not be transferred.
To add scenario cost information:
Note: The baseline costs are based on the baseline estimates that you created for your project actions. The system sums the costs (the “Cost - Est. Baseline” (Cap.) and “Cost - Est. Baseline (Exp.)” values) that you have specified for all action items in the project by the year specified in the "Date Planned For" field. Initially, each fiscal year's Scenario Cost amount is set to 0.00 and is allocated to the "Not Specified Fund".
The Edit Scenario form presents a table from which you can edit scenario costs.
The Add or Edit Scenario Item dialog appears.
Note: The Select Program Fund dialog appears when you click the select value button next to the Funding Source field. The Select Program Fund dialog displays remaining funds for each funding source based on current funding allocations for approved projects (not scenario allocations).
To view all funding source information within a given scenario, use the Evaluate Scenario Funding task. For more information, see the Evaluate Scenario Funding topic.