(Show Contents)
ARCHIBUS Smart Client
ARCHIBUS Web Central
Defining Highlight Patterns
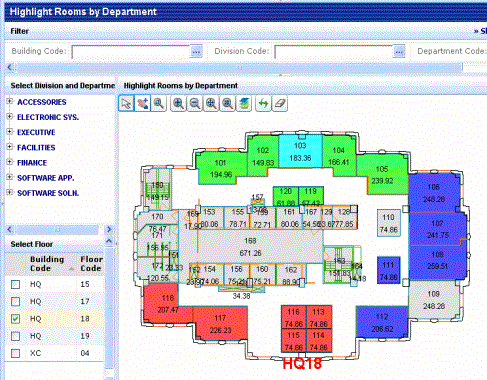
Some reports highlight items on drawings to show the item's relationship to the values in a database table. For example, the Highlight Rooms by Department report shades each room on the drawing with a color or pattern indicating the department assigned to it. To determine department to which each color refers, mouse over a highlighted color and receive the department assignment.
Similarly, you can define highlight patterns for room categories, room types, room standards, group standards, employee standards,and leases, and then highlight rooms,groups, and suites according to these assignments. Queries such as these enable you to visually see the properties of the rooms, groups or suites of a particular floor. Highlighted entities appear on (Flash drawings) or in paginated reports.
You can choose various types of highlight patterns: solid color fills, black and white , and color hatch patterns. You can also choose gradient patterns for paginated reports.
The AutoCAD Highlight Pattern Field
Note: This topic covers defining highlight pattern values using both the Web Central and Smart Client environments. The topic notes differences in the two environments.
To highlight items in reports by criteria such as department or division assignment, you must define the highlight pattern in the table's . For example, the below image shows that a solid fill color highlight is assigned to the Operations & Maintenance department; rooms assigned to this department will be highlighted by this color.
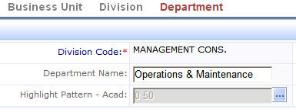
When a highlight pattern is defined, the field displays the number color or the hatch pattern properties. For example, the above image shows the AutoCAD color number of the solid fill highlight assigned to this department. If a hatch pattern is defined, the field shows the name of the hatch pattern as text (for example, ABOXES), as well as the hatch pattern's angle and spacing (for example, “ABOXES 0.0 120.0”).
Non-web views in Smart Client follow a slightly different behavior. If a color is defined, these views display the color. Click on the cell, and the cell displays the properties of the color as text. For hatch patterns, the non-Web views display the hatch pattern properties as text, as do Web Central views.
Accessing the Set Highlight Pattern dialog
Both Smart Client and Web Central present the Set Highlight Pattern dialog for defining the properties of the highlight patterns. To access this dialog:
- In Web Central, or in a Web view displayed in Smart Client, click on the ellipses button for the AutoCAD highlight pattern field.
- In a non-Web view displayed in Smart Client, click on the small triangle icon in the lower right corner of the cell. (If a solid color highlight pattern is defined, you will first need to click on the cell to have the system redisplay the image of the color with text listing the color properties.)

The Set Highlight Pattern dialog provides the same options, regardless of whether accessed from Web Central or Smart Client.
Choosing the Type of Highlight
As mentioned, there are a few types of highlight patterns available. Consider the primary ways in which you will distribute your highlighted drawings. For example: are highlighted drawings displayed on screen? are they printed on color or non-color printers? are they used in paginated reports?
Below are some general guidelines:
- Solid fill – These are the easiest to see on floor plan drawings.
- Black and White Hatch – If printing is a priority but you don't always have access to a color printer, consider using black and white hatch patterns. If you assign all the supplied hatch patterns, you can create additional hatch patterns by changing the angle or the scale of an existing pattern.
- Colored Hatch – You may want to combine colors and hatch patterns to show a hierarchical relationship. For example, all departments within the same division can be the same color, but each department can have a unique hatch pattern.
- Gradient – If your primary output is paginated reports, you may want to use gradients, which transition from both from light to dark and from the first color to the second color. Gradients give a blended-color effect of a surface with light on it.
Hint 1: You should define a unique highlight style for each record, so that the queries use a unique pattern to identify each set of items.
Hint 2: If a record does not have a value for its AutoCAD highlight pattern field, queries ignore asset symbols assigned to this owner and do not highlight them.
Setting a Solid Fill Highlight
- Access the Set Highlight Pattern dialog box by clicking on the AutoCAD Highlight Pattern field, as described above.
- Select Solid as the Highlight Style.
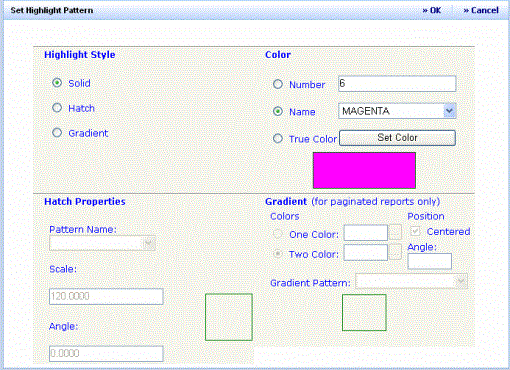
- There are a few ways to specify the color of the solid fill.
- You may choose a color from the Name option. The system completes the sample box with this color and also completes the Number option with the color's number.
- If you know the AutoCAD number of your desired color, enter it in the Number option. When you click OK, the program updates the sample box with the color of the entered number.
- If you need a larger group of colors to choose from, select True Color and then click Set Color. The program displays a pop-up with samples of many colors. Choose a color from the pop-up..
- Click OK in the Set Highlight Pattern dialog box.
Note: In Smart Client, only the True Color option is active.
Setting a Hatch Pattern
- Access the Set Highlight Pattern dialog box by clicking on the AutoCAD Highlight Pattern field, as described above.
- Select Hatched as the Highlight Style.
- Set the Color option, as described above. If you don't want to have colored hatch patterns, set Color to Black.
- In the Hatch Pattern section, enter the following:
- Pattern Name: Choose one of the standard AutoCAD hatch patterns, such as Zigzag or Cross.For more information on the AutoCAD standard hatch patterns, consult your AutoCAD documentation, or AutoCAD’s HATCH command.
- Scale: If you want to display the hatch pattern at a scale other than the drawing’s scale, enter the desired scale in this option. This is handy if you wish to create different-sized versions of the same pattern. For example, if you are running out of black and white hatch patterns you can change the scale from the default value so that it appears larger or smaller than the default pattern, thereby creating a new pattern.
- Angle: If you want to display the hatch pattern at an angle other than the hatch pattern’s default angle, enter the angle degrees in this option. As with Scale, setting this option is convenient for creating multiple versions of the same pattern.
- Click OK in the Set Highlight Pattern dialog box.
Setting a Gradient
Remember, gradients are only applicable for paginated reports. If you set a gradient pattern, it will show as gray on Flash drawings. You cannot assign one pattern for Flash drawings and another pattern for paginated reports.
When defining a gradient, you choose a gradient pattern and the two colors between which the pattern will smoothly transition.
- Access the Set Highlight Pattern dialog box by clicking on the AutoCAD Highlight Pattern field, as described above.
- Select Gradient as the Highlight Style.
- Do not complete the Hatch Properties or Color options.
- In the Gradient section, enter the following:
- One Color -- Choose the first color of your gradient from the pop-up list of colors.
- Two Color -- Choose the second color of your gradient from the pop-up list of color. The system will create a highlight that smoothly transitions between these two colors.
- Gradient Pattern -- Choose one of the defined patterns, such as Curved or Linear.
- Angle-- Specifies the angle of the gradient fill..
- Centered? -- Specifies a gradient display that is symmetrical. If you do not select this option, the gradient fill is shifted up and to the left, creating the illusion of a light source to the left of the object.
- In the dialog, the system shows the pattern of the gradient that you selected. Note that the sample swatch does not include your chosen colors, but uses standard colors to show the selected gradient pattern.
- Click OK in the Set Highlight Pattern dialog box.
Note: In Smart Client, you cannot set the Gradient options.