(Show Contents)
Enabling Document Management for Drawings
As an ARCHIBUS Administrator, use these procedures to enable the Document Management for Drawings feature. The Smart Client enables the Document Management for Drawing features on a per-project basis so that all users connected to that project will manage drawings with the same consistent set of procedures.
Deployment Type: Enterprise and SaaS
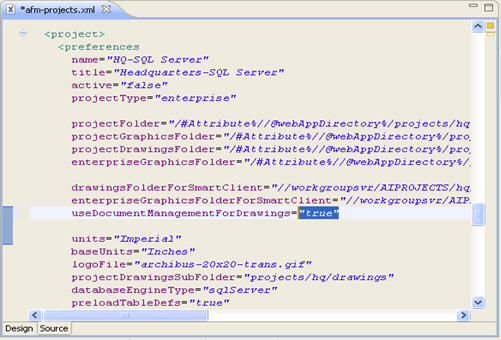
- Change the value of the
useDocumentManagementForDrawings preference to true in the afm-projects.xml file on the Web Central server, and then restart the server.
- Notify the CAD specialists that they must sign out, then sign in to the Smart Clients.
- After Document Management for Drawings is enabled, CAD specialists may wish to change the default location to which the program checks out drawings for editing on their local machines. To do so, they must:
- Sign in to Smart Client.
- Choose the Preferences command on the ribbon toolbar.
- Set the Local Drawing Files Folder to their desired location.
Deployment Type: Workgroup
- Start the Smart Client program (full installation), press the Projects button, press the New Project button or the Edit button, select the “Use Document Management for Drawings” option, click OK, and restart the server (by pressing Stop, then Start).
- Sign out, then sign in to the Smart Client.
- Notify CAD specialists that they must sign out, then sign in to their Smart Clients.
- The “New/Edit Projects” dialogs will have a "Document Management for Drawings" option, for which they can specify to use or not use this feature.
- After Document Management for Drawings is enabled, CAD specialists may wish to change the default location to which the program checks out drawings for editing on their local machines. To do so, they must:
- Sign in to Smart Client.
- Choose the Preferences command on the ribbon toolbar
- Set the Local Drawing Files Folder to their desired location.