

If you are performing lease and real estate business functions, you typically do not need a space inventory at a room level of detail, since you are not performing the day-to-day operational functions around the room. You may, however, need a suite-level inventory; for example, if you intend to perform chargeback to tenants based on suite area, you will need to develop a suite inventory.
Prerequisite:
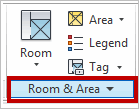
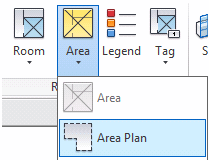
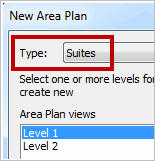
To generate a suite-level inventory of your building, you will need to return to the use of Area Plans and Area objects – not rooms. To do this, you will need to:
To generate a new Suite Area Scheme and Suite Area Plan:


As with Internal Gross Areas, when working in these types of Area Plans, there are a number of additional Area Types that become available. For the purposes of generating Suite Areas, any area type other than Exterior Area or Store Area may be used. A detailed breakdown of how the different Area Types associate with each other follows.
Note: These rules apply only to boundary lines that were automatically placed by Revit or by creating boundary lines from the “pick lines” option in the Draw panel. If you manually sketch Area Boundary Lines, the associations listed below no longer apply.
|
Rentable Area Scheme Types |
||
| Area Type | Selected Bordering Area Type |
Measurement Rule |
|
Building Common Area |
||
| Building Common Area | Building Common Area, Office, Store |
Area Boundary measured from wall centerline. |
| Building Common Area | Exterior, Major Vertical Penetration | Area Boundary measured from wall face bordering Building Common Area. |
|
Office Area |
||
| Office Area | Building Common Area, Office, Store |
Area Boundary measured from wall centerline. |
| Office Area | Exterior, Major Vertical Penetration |
Area Boundary measured from wall face bordering the office area. |
| Exterior Area | ||
|
Exterior Area |
Exterior |
Area Boundary measured from wall centerline. |
| Exterior Area | Store |
Area Boundary measured from wall face bordering Exterior Area. |
| Exterior Area | Any other areas | Area Boundary measured from the wall face bordering the other area. |
|
Floor Area |
||
| Floor Area | Office, Store or Building Common Area | Area Boundary measured from wall face bordering other area. |
| Floor Area | Exterior, Major Vertical Penetration | Area Boundary measured from the wall face bordering the floor area. |
| Floor Area | Floor Area | Area Boundary measured from the wall centerline. |
|
Major Vertical Penetration |
||
| Major Vertical Penetration | Major Vertical Penetration | Area Boundary measured from the wall centerline. |
| Major Vertical Penetration | Exterior |
Area Boundary measured from the wall face bordering the Major Vertical Penetration area. |
| Major Vertical Penetration | Any other area (except Exterior) | Area Boundary measured from the wall face bordering the other area. |
| Store Area | ||
|
Store Area |
Major Vertical Penetration, Floor |
Area Boundary measured from the wall face bordering the Store area. |
| Store Area | Exterior | Area Boundary measured from the wall face bordering the Exterior area. |
| Store Area | Building Common Area, Office, Store | Area Boundary measured from the wall centerline. |
Note: Area Boundary Lines can cross over each other as needed, but they should not be drawn one on top of the other. If you do this, you will receive a warning from Revit that your boundary conditions might not behave correctly.
Once all Area Boundary Lines have been placed, you can start to add Areas to the model.
Note: As Areas are placed (or at any time during the lifecycle of the model), you will have an option of going to an Area’s properties and changing the Area Type, so that Revit can start automatically manipulating the Area Boundary Lines that were generated from the “Pick Lines” option with walls.
The next step ti to create chargebacks based on the suite you are leasing to tenants.
See Creating Chargeback Based on Revit Suite Areas.
| Copyright © 1984-2014, ARCHIBUS, Inc. All rights reserved. |