Open topic with navigation
Move Management
Setting Up an Employee Group Move
Before creating move scenarios, you set up an employee group move
project. In this project, you specify all of the
employees that you want to move.
After you set up and request an employee group move, you can create move scenarios.
See the Move Scenario Planner Overview topic for more information.
Note: You can use the Develop Move Scenarios feature only with employee group moves. You
cannot use this feature with other types of moves.
Requesting a Group Move
You request a group move if you want to move multiple employees, assets,
or rooms at one time. The first step in requesting a group move is to create the project. Group moves are always associated with a project.
After you have created a group move project, you can add moves to the project (see Adding Employees, Assets,Rooms, and Actions to the Move) and you can optionally create using the Develop Moves Scenarios task.
To request a group move:
- Select the Move Requestor/Request
a Group Move task.
- Enter values for
the Project Code (unique identifier for the project), Project Description, Department Contact, Requested
Start and End Date fields. The Department Contact receive email notifications of changes in the move status.
- Click the Go to Next
Step button.
The Step 2: Edit Data and Request tab appears. The data that you entered is displayed,
along with additional fields that have been filled in for the Department Contact.
- Edit data on the
Edit Group Move form as necessary and click the Save button.
Note: : It is important to save your changes before adding moves
to your move project.
To add employees, assets, rooms, or actions to the group move project:
- To make additions or deletions to the
group move project, select one of the following tabs in the bottom section of the
Edit Group Move form:
- Employee Moves (to review or edit the employees being moved)
- New Hires
- Employees Leaving
- Equipment
- Assets (to review or edit both tagged furniture or equipment)
- Rooms (to move the contents of a room)
- To add a single employee, asset, equipment, or room to the move project, after selecting the appropriate tab, select Add Move. The Add (Employee/New Hire/Employee Leaving/Asset/Equipment) Move to Project form for the selection appears:
- Select the employee, asset, equipment or room to be added to the move project.
- Enter a requested move date for the employee or item.
- Optionally, enter a description of the move.
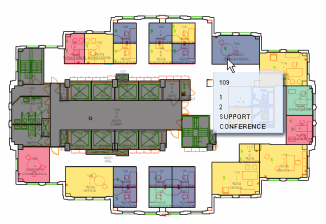
- If you are entering the move to location, first select the To Building and To Floor from the select value lists. Then, you can do one of the following to select the room:Select a room from the room select value list by selecting the select value button for To Room field. Select the Vacant Only check box to have the select value room list show only vacant rooms.Click Show Drawing and a popup window shows the drawing. Click on the room in the drawing to select it. When you click on a room, the popup dismisses and the To Room field now has that room number. Note: When you mouse over a room in the drawing, a tooltip shows room information to help you make your selection:
 .
.Note: Alternatively, you can develop different scenarios for room assignments, and then evaluate these alternatives to select the scenario that best suits your needs. You can then use the Update Move Project command to automatically fill in the move destination with the room assignments from the selected scenario. See Move Scenario Planner Overview.
- To include tagged furniture or equipment assigned to an employee or room in the move request, ensure that the Move Equipment Assigned to Employee? and Move Tagged Furniture Assigned to Employee? check boxes are selected. If these check boxes do not appear on the move request form, the employee or room being moved does not have any equipment or tagged furniture assigned to them.
- Repeat step 2 to
add additional employees/assets to the project move list.
- To add a group of
employees from the same division or department to the move at one time, select the Employee Moves tab, and then select the Add Multiple button. The Add Multiple form appears.
- Select from the following values to identify the employees you want to move:
- From Division
- From Department
- From Building
- From Floor
- Enter a requested move date.
- Optionally, enter a To Building and To Floor for the employees.
Note: Alternatively, you can develop different scenarios for room assignments, and then evaluate these alternatives to select the scenario that best suits your needs. You can then use the Update Move Project command to automatically fill in the move destination with the room assignments from the selected scenario. See Move Scenario Planner Overview.
- Click Add Employees. All the employees that meet the criteria you entered now appear on the project
move list.
- To edit a single
item on the project move list:
- Click the Edit icon that appears to the left of the item.
The Edit Move tab for the selected item appears.
- Enter the Move Date for the Item.
- If needed, edit additional move information.
- Click Save to save your changes.
- To edit multiple
items on the project move list at one time:
- Select the items that you want to edit on the project move list.
- Click the Edit Multiple button.
The Edit Moves spreadsheet appears.
- Edit values in the spreadsheet and click Save to save your changes.
- To delete employees, assets, or rooms, select the appropriate tab (Employee Moves, New Hires, Employee Leaving, Equipment, Assets, or Rooms), select the check box for the move and click Delete.
- To add actions, select the Actions tab. See
the Adding Move Actions topic for
more information.
- After adding all moves to the project, click Request to
request the group move, or click Save to save changes to a move that has already been requested.
If you click the Request button, the move status is changed to Requested. You can create move scenarios when the group move project has the status of requested.
Note: Once the move has the status of Requested, it can no longer
be withdrawn. Notify the move coordinator if you want to withdraw a move
that you have requested.
| Copyright © 1984-2014, ARCHIBUS, Inc. All rights reserved.
|