Running the Package and Deploy Wizard for Enterprise Deployments
If you have an enterprise deployment, your procedure has several different considerations that distinguish it from the workgroup deployment:
- Your database and application server are often on different servers.
- You often have changes to the ARCHIBUS applications that you wish to preserve.
- You often have other extensions besides My Favorites and dashboard files that you wish to preserve.
- You prototype your changes on a staging server before you copy them to the production server.
To use the wizard, you will run it twice:
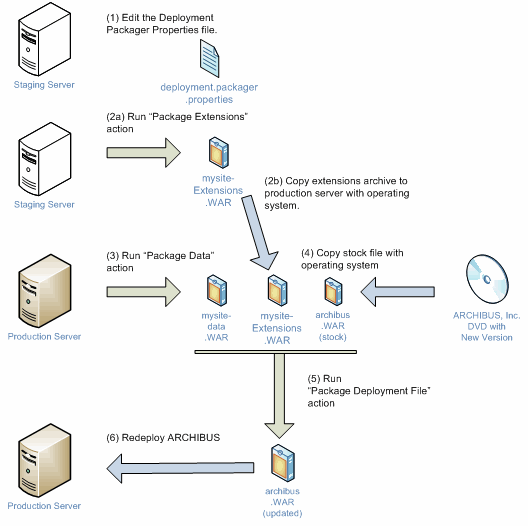
The diagram below overviews the process and the procedures follow.
Prerequisites
- Back up your files: The wizard sequence merges your project, application, and configuration data. Therefore, it is important to back up the following workstation files, before running the wizard:
- \archibus\schema
- \archibus\projects
You do not need to back up your project database data (Sybase, SQL Server, or Oracle data) if they are running on a separate database server, as the upgrade process does not affect the database server.
- Copy the newer ARCHIBUS Web Central distribution file, the
archibus.war, file from your product DVD or download to the production server to replace the older version of archibus.war.
Staging Server Procedure
To package extensions:
- First run the wizard on the staging server. Select System Administration/ARCHIBUS System Administration/System Administrator/Package and Deploy Wizard .
- Verify Backup: Back up your data and click Next.
- Specify Deployment Type: Choose Enterprise Deployment and Staging Server and click Next.
- Specify Update Type:
- If you have changed many ARCHIBUS applications, select the “Core only” update type to preserve all of your application changes.
- If you have changed one of the stock ARCHIBUS applications, select the “Core and Specific Application Domains” option. Select the domains in which you have *not* made changes, that is, select the application domains that you *do* wish to upgrade.
Click Next.
- Preserve Data: The wizard will list the project locations it finds in your active projects in your projects list (
\config\afm-projects.xml). If this list is incorrect, stop the wizard, and correct your projects list. You can do so by editing the afm-projects.xml file directly, or by using the Smart Client Projects dialog to edit the project list. Click Next.
- Preserve Extensions: If you have created additional extensions that do not reside in the subfolders that hold the stock ARCHIBUS applications (that is, extensions that are not beneath the
\schema\ab-products folder), then use the Add Folder action to add those folders so that they will also be preserved. Click Next.
- Package Deployment: Click the Package Deployment File action to create a new
my-site-extensions.war file.
- Copy this
mysite-extensions.war file to your production server. Place it in the same folder containing the archibus.warfile.
Production Server Procedure
After performing the staging server procedure, run the Package and Deploy Wizard on the production server.
- Verify Backup. Back up your data and click Next.
- Specify Deployment Type. Choose Enterprise Deployment and Production Server and click Next.
- Verify Archive. Select Yes-Next to indicate that you have updated your
archibus.war distribution file to the one from the newer version of ARCHIBUS.
- Specify Update Type. Make the same selections that you did for the staging server, and click Next.
- Preserve Data. The wizard will list the project locations it finds in your active projects in your projects list (
config\afm-projects.xml). If this list is incorrect, stop the wizard, and correct your projects list. You can do so by editing the afm-projects.xml file directly, or by using the Smart Client Projects dialog to edit the project list. Click Next.
- Package Deployment. Press the Package Deployment File action to create a new
archibus.warfile.
You can now redeploy ARCHIBUS using the updated archibus.war file. The following sections provide instructions for redeploying when running Jetty, Apache Tomcat, Oracle WebLogic, or IBM WebSphere.
Redeploying When Running Jetty
To redeploy when running Jetty:
- Stop your application server.
- Stop your database server.
- Back up the database stored under \projects\hq\data before deleting the contents of the ARCHIBUS folder.
- Delete all files beneath the
\ARCHIBUS subfolders except for the WAR files and the projects folder.
- Use WinZip to unzip the
archibus.war file beneath the \ARCHIBUS folder.
- Copy the database to
\ARCHIBUS\projects\hq\data from the back-up location defined at Step 3;
- Restart your database server and your application server.
Redeploying when Running Apache Tomcat
If you are running Tomcat Web server, redeploy using the following steps:
- Stop your application server.
- Delete all files beneath the
\ARCHIBUS subfolders except for the WAR files.
- Move the war file that was created to
\\tools\\tomcat\webapps.
- Restart Tomcat.
Redeploying when Running IBM WebSphere
To redeploy when running WebSphere:
- Stop the archibus application running on your application server;
- Copy or move the generated a
rchibus.war file from the \ARCHIBUS folder to another folder;
- Uninstall the archibus application using the WebSphere Administrative console;
- Install the new archibus application using the WebSphere Administrative console. For instructions, see Installing ARCHIBUS Web Central with IBM WebSphere.
- Start the ARCHIBUS application.
Redeploying when Running WebLogic
To redeploy when running WebLogic:
- Stop the ARCHIBUS application running on your application server.
- Copy or move the generated
archibus.war file from the \ARCHIBUS folder to another folder.
- Create the ear file using the WebLogic management console. For instructions, see Installing ARCHIBUS Web Central with Oracle WebLogic.
- Uninstall the ARCHIBUS application using the WebLogic management console.
- Install the new ARCHIBUS application using the WebLogic management console. For instructions, see Installing ARCHIBUS Web Central with Oracle WebLogic.
- Start the ARCHIBUS application.
| Copyright © 1984-2014, ARCHIBUS, Inc. All rights reserved.
|