Upgrading Workgroup Deployments Using the Deployment Packager Actions
A workgroup deployment:
- Uses the default Jetty application server that installs with the ARCHIBUS setup program.
- Runs the database server and the application server on the same workstation.
If you have a different application server, a different database server, or, if you divide or cluster your application or database servers, see Running the Deployment Packager Actions for Enterprise Deployments.
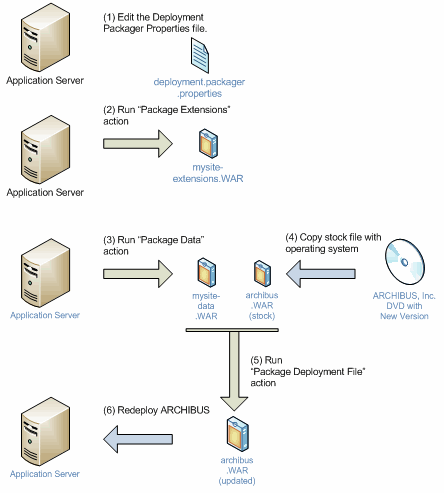
Flowchart of the Workgroup Upgrade Process
The following flow chart shows the process for deploying a new version of Web Central, including updated core and updated applications, without losing any extensions (new or altered views and workflow rules), or the production user data (users’ My Favorites, and graphic files).

Procedure
Note: The following procedure is for advanced users who prefer to directly run the deployment packager actions rather than using the Package and Deploy Wizard. Using the wizard is the simplest way to upgrade. See Using the Package and Deploy Wizard.
To upgrade a workstation deployment to a new version of ARCHIBUS Web Central, do the following on your application server:
- Back up the server: Run your usual backups on your application server and database data to guard against any errors in creating the packager preferences or in compressing the Web Archive (WAR) files.
- Edit the application-update.properties file: Edit this file to reflect the location of your extensions and project data. See Editing Your Application Update Properties.
- Package Extensions: Select the System Administration/System Administrator/Package Extensions action. Click the Start Job action to run the Package Extensions action. This action creates the mysite-extensions.war file.
- Package Data: Select the System Administration/System Administrator/Package Data action. Click the Start Job action to run the Package Data action. Use the Package Data action to back up your database and data files to the
mysite-data.war file.
- Copy the new stock ARCHIBUS deployment:
- Copy the stock archibus.war file from your upgrade DVD to one of the following locations. The folder location depends on your application server and operating system.
- Copy the license file: If you have been issued a new license file (
afm-licenses.xml), copy it to your \archibus\config subfolder to ensure that it is part of your new deployment file.
- Package Deployment: Select the System Administration/System Administrator/Package Deployment task. Click the Start Job action to run the Package Deployment action. This action merges the mysite-data.war and the mysite-extensions.war into the stock archibus.war file. This creates an updated archibus.war file that contains all the files needed to re-establish your application server.
You can now redeploy ARCHIBUS using the updated archibus.war file. The following sections provide instructions for redeploying when running Jetty, Apache Tomcat, Oracle WebLogic, or IBM WebSphere.
Redeploying When Running Jetty
To redeploy when running Jetty:
- Stop your application server.
- Stop your database server.
- Back up the database stored under \projects\hq\data before deleting the contents of the ARCHIBUS folder.
- Delete all files beneath the
\ARCHIBUS subfolders except for the WAR files and the projects folder.
- Use WinZip to unzip the
archibus.war file beneath the \ARCHIBUS folder.
- Copy the database to
\ARCHIBUS\projects\hq\data from the back-up location defined at Step 3;
- Restart your database server and your application server.
Redeploying when Running Apache Tomcat
If you are running Tomcat Web server, redeploy using the following steps:
- Stop your application server.
- Delete all files beneath the
\ARCHIBUS subfolders except for the WAR files.
- Move the war file that was created to
\\tools\\tomcat\webapps.
- Restart Tomcat.
Redeploying when Running IBM WebSphere
To redeploy when running WebSphere:
- Stop the archibus application running on your application server;
- Copy or move the generated a
rchibus.war file from the \ARCHIBUS folder to another folder;
- Uninstall the archibus application using the WebSphere Administrative console;
- Install the new archibus application using the WebSphere Administrative console. For instructions, see Installing ARCHIBUS Web Central with IBM WebSphere.
- Start the ARCHIBUS application.
Redeploying when Running WebLogic
To redeploy when running WebLogic:
- Stop the ARCHIBUS application running on your application server.
- Copy or move the generated
archibus.war file from the \ARCHIBUS folder to another folder.
- Create the ear file using the WebLogic management console. For instructions, see Installing ARCHIBUS Web Central with Oracle WebLogic.
- Uninstall the ARCHIBUS application using the WebLogic management console.
- Install the new ARCHIBUS application using the WebLogic management console. For instructions, see Installing ARCHIBUS Web Central with Oracle WebLogic.
- Start the ARCHIBUS application.
See Also
Upgrading Only the Web Central Core
| Copyright © 1984-2014, ARCHIBUS, Inc. All rights reserved.
|

