Ouvrir la rubrique avec les liens de navigation
Use the Process Meter Readings task to import data that provides meter readings (in kWh) by date and time. You import this data either manually or using the Data transfer action. This data is stored in the BAS Data - Clean Numeric table. The data must then be processed before it can be reported on.
Inputting data by data transfer
The Process Meter Readings view contains a standard DATA action to enable transfer of data to the BAS Data - Clean Numeric table. To access the DATA action:
At times, you might want to enter data by hand. This is more likely if data collection is infrequent, such as once per month.
To input a single data reading,
The Clean Data section now shows data for that data point.
The Edit Clean Data form appears..
Note: If you enter a non-zero Consumption value, the Processing Status will automatically be saved as Manual. This will prevent the Consumption value from being overwritten when the data is processed. If ever you wish to revert to automatic calculation of the Consumption value, reset the value to zero and change the status to “Not Processed.” See Editing a Data Reading.
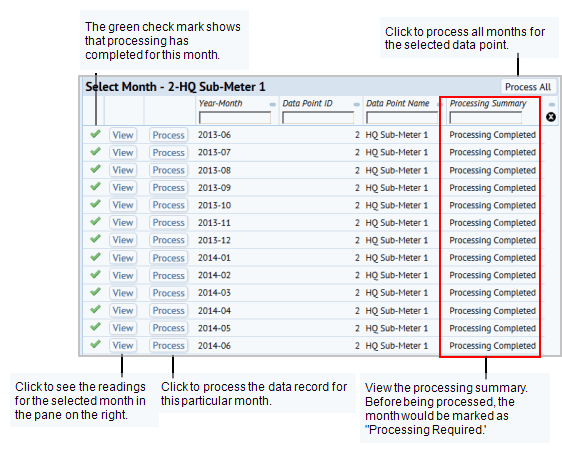
The Select Month grid in the bottom-left pane displays each month of data with a Processing Summary of ‘Not Processed’ or ‘Processing Completed’ for that month. A green check mark indicates that the data has been processed successfully.
When new data is imported into the BAS Data – Clean Numeric table, either manually or by data transfer, the month in which that data occurs will have a Processing Summary of ‘Not Processed.’ You can then choose to Process the data by one of three methods.
Upon saving a new or edited data record or deleting a record, the Processing Summary of each affected month is reset. This is to ensure that any changes made to the data that affect final reporting of aggregates are flagged for reprocessing.
Data anomalies are any conditions that are suspiciously high or low. Anomalies can include negative deltas between readings that are commonly the result of meter “flips” that occur when the meter’s counter reaches its maximum value and starts again at 0.. If negative values are not truly anomalous, as might be the case when you sell some energy back to the utility provider, then you should set the negative consumption value manually following the procedure described above. See Inputting data by hand.
After data processing occurs, the application marks negative values as anomalies. You can examine these anomalies, and edit them as needed.
Note: Other anomalous conditions may exist, for example, suspiciously high or low (but non-negative) values can be identified via inspecting data in the table or examining chart reports.
Processing a specific month’s data for a Data Point does the following:
Note: Hourly aggregates are only computed for data that is less than a year old, as a safe guard against prohibitively long processing times, and because most strategic decisions with interest in hourly data will focus on recent data.
A data point refers to a meter. You enter data points and the specific area (measurement scope) the meter covers. The measurement scope may be a single floor of a building, or it could be an entire building. Alternatively, the measurement scope could be a single piece of equipment.
To define a meter:
The Define Meter, Measurement Scope and Link to Vendor Meter form appears.
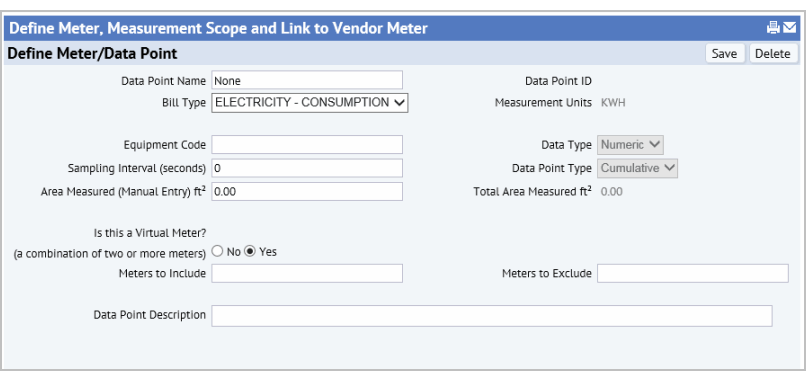
Data Point Name: Enter a name that identifies the meter.
Bill Type: Select ELECTRICITY – CONSUMPTION or ELECTRICITY - POWER
Equipment Code: Enter the equipment code for the meter if you have entered the meter as one of your equipment assets.
Sampling Interval (seconds): Enter the interval at which the meter takes measurements. You enter this for your reference.
Area Measured (Manual Entry). Manually enter the area covered by the data point when you do not want to use a measured area calculated by the system. If this area has a value, it is used in place of the calculated area.
Is this a Virtual Meter? Select Yes if this data point represents a combination of two or more meters. Otherwise, leave this to No.
Meters to Include / Exclude: If this is a virtual meter, select the Meters to Include and the Meters to Exclude from the lists.
Data Point Description: Enter a description that describes the purpose of this meter, such as" Meter reads to correspond with utility bills."
The Measurement Units defaults to KWH for Energy / Consumption meters, or KW for Energy / Demand meters, as these are currently the only supported measurement units.
The Data Point ID is system-generated.
The Define Measurement Scope form appears.

Zone: Code: A particular area on a floor that is covered by this meter. Zones are associated with your critical facility systems. Clicking on the Zone Select Value button opens a dialog which allows you to select an existing zone or add a new zone to the Zones table.
Equipment Code: If this meter is measuring energy consumption or demand for a piece of equipment, select the Equipment Code by selecting from the list. When you select equipment, its location is filled in for you.
Otherwise, select the Site / Building / Floor / Room to describe the location for this meter.
When the form is saved, the total usable area for the location you select is saved in the Area Measured field of the Data Point. If you have not entered a value for the Area Measured (Manual Entry), then the Area Measured is used.
The form expands to show the Link Meter with a Utility Vendor's Meter section.

Vendor Account Code / Vendor Code. Select the vendor and the vendor account that this meter is associated with.
Vendor Meter ID: Select the Vendor Meter ID used by the utility company. EDI feeds contain this Vendor Meter ID field .
You can edit information for data points by clicking the pencil edit icon in the row for the data point in the Select Data Point grid. For example, you can change the Sampling Interval, or Area Measured.
At times, you might determine that the computed consumption value does not appear realistic, and may wish to edit the Consumption value by hand.
To edit a data reading that has been previously inputted by hand or by data transfer:
The Edit Clean Data form appears.
| Copyright © 1984-2016, ARCHIBUS, Inc. Tous droits réservés. |