Registering assets into the ARCHIBUS inventory system -- either as you receive them or registering those that already exist at your site -- is important for ensuring that the assets are properly accounted for. With the ARCHIBUS mobile solution, you can go out in the field and inventory your assets. Sites will find this app convenient for registering assets right as you receive them on the loading dock.
With the Asset & Equipment Registration app, you can:
This topic has the following sections:
Note: The Asset & Equipment Registration mobile app works in conjunction with Web Central's Asset Portal, Asset Management, or Enterprise Asset Management applications. Your site should have a license for one of these application so that mobile users can access the equipment inventory developed in Web Central and upload changes to it using the Asset & Equipment Registration mobile app.
As you work with the Asset & Equipment Registration mobile app, you will notice that the app includes a bar code icon next to some fields. Since inventory managers often tag items with metal or plastic bar code tags whose lines represent a unique alphanumeric value, you can scan this bar code with the mobile device to facilitate searching and data entry
Use the bar code field to:
For more information, see:
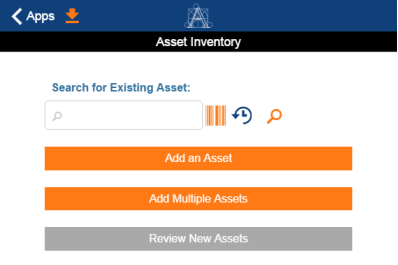
The first screen of the mobile app presents a form for searching for existing records.
If you are entering a new asset, search to make sure that the asset does not already exist. If the asset has a bar code tag, you can tap the bar code icon on the mobile app and capture the bar code. The mobile app converts the bar code value to an alphanumeric value and displays it in the search box.
If you want to run previous searches that you already entered, click the icon next to the bar code. The system presents a list of your previous searches from which you can select a search. See Searching, Filtering, and Sorting.
If the system discovers that a record of this value already exists, it presents a message to inform you.
If the system does not find a record with this value, you can proceed to the steps to add new assets.
Note: When you use the search feature, you are actually searching for records on the server; you are not searching records that have been downloaded to the mobile device. Therefore, the server must be running in order for the Search command to access it.
Note: Your site will determine how you should complete the Status field. You might want to wait to set it to "Out of Service" when you are initially registering the items and then changes this value to "In Service" when the items are delivered to staff.
Note the Missing status. Typically, when entering new items, you will not need this value. However, when adding assets in an ad hoc manner, you may require the Missing value. For example, suppose a craftsperson has a work order on a piece of lab equipment and finds that it is not in the inventory; he can use the app to add it into inventory. In the process of gathering the info, the lab manager mentions several other items that may not be in the inventory. The craftsperson would search the inventory and add in all items not in the inventory. One of items mentioned may be missing from the lab, and so could be entered with a status of Missing.
Note: If you downloaded only one site or building, the system will automatically complete the Site Code and Building Code fields with the downloaded value. Otherwise, you can complete these fields by choosing from the list of sites and buildings that you did download.
Inventory managers and facility managers often receive many assets at once and need to enter them into the system. For example, they might receive a shipment of new PCs at the receiving dock and need to register them into the system. You can set up common data for more efficient data entry; additionally, if you are not scanning bar code tags, you can set up a numbering system.
Set Inventory Method to specify how you want to create multiple assets:
| Set Inventory Method to this ... |
... and the system ...
|
|---|---|
| Bar Code Scanning | After you complete the common data, moves you to the Add Equipment form. Complete Equipment Code by typing a value or scanning the bar code of the physical item. When through with the form, tap Next to process the record and enter the next value. When you have completed all records, tap Done and the system displays the new records in the Asset Inventory List form. |
| Incremental Values | generates new records based on the start number and numbering pattern you define. The system displays the generated records in the Asset Inventory List form. |
Whether you are defining number patterns or entering value manually or by scanning bar codes, you must set Total Count to indicate the number of items you expect to enter with this information.
On the Common Asset Data screen, complete as many fields as applicable for the set of assets you are going to add. For example, in the below image, all of the assets to be registered are of the same type (A-PC), will be used by the same department, and will be located on the same floor. When you create the records, the system will complete these fields with the common values. When you deliver each PC to its employee, you can enter the specific values, such as the room where the item will be located and the employee who will use it.
Enter as many of the common fields as appropriate for your business operations. For example, if you are entering a variety of items at one time to be used by several departments but located on the same floor, you can enter just the Site, Building, and Floor fields. You can always edit your generated records to supply more information.

| Field | Value |
|---|---|
| Get Last Number |
To generate the next sequential number, tap this option and the system queries the server to find the highest number in inventory. The system displays this value in this field and updates Start Number with the next sequential value. For example, if the highest number of the inventory on the server is 1001, tap this option and the system completes Get Last Number with 1001, and sets Start Number to 1002. Since the command is querying the server, be sure that you have synced your work and uploaded any records created. If you have not synced, when the system queries the server, it will not include your very latest set of entries in its search. This field is displayed in orange to remind you to check the existing values in the database server. |
| Start Number |
If you complete Get Last Number, the system will complete this field with the next sequential number. If you do not want to work from the last number, enter the value from which you want the system to start numbering records. For example, if you set this to 100 and set no other options, the system will generate records 100, 101, 102, and so on. If you enter a value that does not end in a numeral, when the system creates records it will add 000001 to the provided value so that it can increment it. For example, if you enter "AAB" as the start number, the system will generate records AAB-000001, AAB-000002, and so on. |
| Prefix |
If you want to use Get Last Number and want to find a number beginning with a specific letter or number, enter it here. For example, enter "A" here and tap Get Last Number and the system will find the highest number beginning with "A", such as "AHU-198". Enter "1" and the system will find the highest number beginning with "1", such as 15678. If no match is found, then the next number is the prefix plus 000001. |
Tap the check mark and the system generates the records and displays them in the Asset Inventory List. You can now edit the records or complete and sync, as described below.
Note: If you set a numbering pattern, the system immediately generates the records when you tap the check mark on the Common Asset Data form. You do not complete this step.
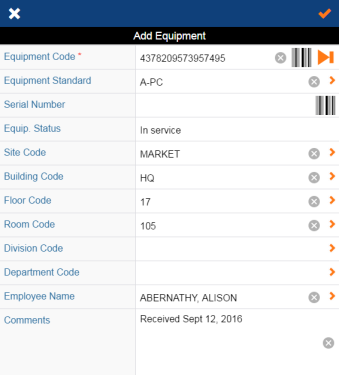
If you are entering values or scanning bar codes, the system presents the Add Equipment screen, pre-filled with the values you set on the Common Asset Data screen. You can edit these pre-filled values if desired.
Complete Equipment Code either by typing a value or scanning the bar code on the item. Complete other fields as desired, and choose Next to process this record and enter the information for the next record.
Note that the bottom of the screen keeps a count of the number of records you have created so far. For example, in the above screen, the user set Total Count to 56 on the Common Asset Data screen and is now completing the first record of this set. If you find that you actually have fewer items to enter than you indicated in Total Count, you can tap the Cancel button to cancel the process. Tapping Cancel cancels the numbering process; the records that you created so far in the session are saved and are not affected by canceling.
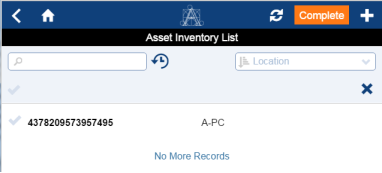
When through, the system moves you to the Asset Inventory screen, which lists the new records. You can now edit the records or complete and sync, as described below.
Whether you registered your assets by
the system brings you to the Asset Inventory List, where you will see all records created since the last sync. From here, you can edit any record created in this session by tapping on it and completing the Edit Equipment form.
Note that the app does not include a button for deleting records. If you create a record and later decide that you do not need it, you must upload it to the server when you sync. You can then delete the record using Web Central. To help you remember to delete the record in Web Central, you can enter a comment before uploading.
At any time while working with the app, you can review the list of records that you created and make changes if necessary. You will especially want to do this before syncing, which uploads your new records to the server.
You review assets from the Asset Inventory List. There are a few ways to access this screen:
To review your assets:
When you have finished entering, reviewing, and optionally editing entered items, you can complete and sync.
From the Asset Inventory List:
saves changes into an intermediary table (the eq_sync table) without modifying the Equipment table and removes the records from the device.
| Copyright © 1984-2018, ARCHIBUS, Inc. All rights reserved. |