On an inventory drawing or a layout scenario drawing, you can create a proposed occupancy scenario by placing employees and teams on the floor plan using the Enterprise Move Management / Move Scenario Planner / Develop Move Scenario task / Plan Move Scenario tab. With this step, you are experimenting with different locations for employees and teams and storing this experimental assignment as an occupancy scenario. You can create multiple occupancy scenarios and determine the best one to implement, and then update the move project with the move details of making this scenario happen.
For example, you might have created a layout scenario in CAD that has a new configuration of the space, such as converting conference rooms and storage space into additional cubicle space. You can now create an occupancy scenario that places employees or teams into this proposed configuration. Alternately, you can work with an inventory drawing and its current space configuration, but place employees in different rooms. When you experiment with occupancy scenarios by placing employees and teams in rooms, the scenario stores the employee and team assignments in the Employee Move Scenarios (mo_scenario_em) table.
This topic has the following sections:
Before creating your occupancy scenario and placing employees and teams in rooms, you can update the move scenario to ensure that the move scenario is using the most up-to-date move project information.
To update the move scenario:
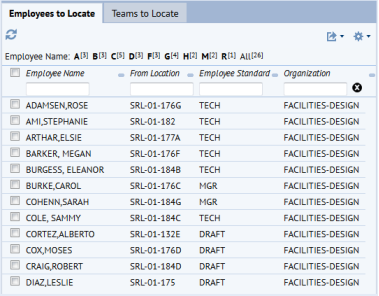
The Plan Move Scenario tab's Employees to Locate panel lists the employees in the move project who need to move. These are the employees assigned to the move order.
The Plan Move Scenario tab offers a few different ways to place employees in rooms, as outlined in Step 2, below.
As you make moves with the following methods, you might choose a room that is already at capacity or that is over capacity. In these cases, the system will warn you and ask if you want to proceed. If you choose to continue, ARCHIBUS will place the employee in the desired room.
Load the layout (inventory drawing or layout scenario drawing) to which you want to move employees. To aid in the understanding of the current space assignments, set the highlights and labels to show current departmental assignments, personnel assignments, occupancy, and so on. For example, highlight the floor by department to see the departmental assignments specified in the layout scenario. For information, see Plan Move Scenarios: Set the Display of the Layout.
If you know the rooms to which you want to move employees, follow these steps.
You may wish to work directly with the floor plan by dragging an employee from one room to another. You can do this only for employees assigned to a move but not yet assigned to a new room. Employees part of the move but not yet assigned to a new room (a "to" location) exist in a room if:
If an employee is already assigned a new room (that is to say, does not meet either of the above conditions), then to reassign it, you must first move the employee back to the Waiting Room.
To move employees by dragging:
The Waiting Room has the same list of employees as listed in the Employees to Move panel. Use the Waiting List when you want to drag and drop employees into locations.
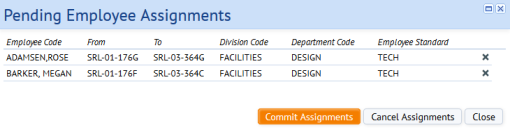

Note the following about placing employees in rooms:
A floor plan labeled with Employees shows two things:
To visually distinguish Case 1 from Case 2, employee labels show in green text if they were:
Once these employees’ assignments are committed, they no longer show in green text; they appear just like other employees on the floor.
If the move project calls for moving teams, the Teams to Locate panel lists the relevant teams. You assign rooms to the teams in a similar manner as above.
Since teams represent groups of people, you may want to move them to an open area that can hold multiple people. For information on typical team space, see Team Space Floor Plans. Team areas can overlap or cross departmental boundaries; there is no restriction to assigning team space with relation to departmental space.
To assign teams to rooms, for the desired team, you choose the Assign button. This puts you in assignment mode.
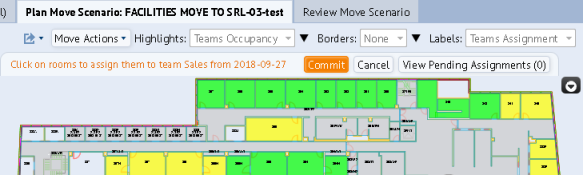
Assignment mode activates several features in the drawing:
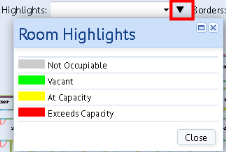
| This highlight color ... | ... means the room is ... |
|---|---|
| Green | Vacant |
| Blue | Available |
| Yellow | At Capacity |
| Red | Exceeds Capacity |
| Grey |
Not Occupiable A room that already contains a team assignment is considered Not Occupiable and is unavailable for selection. |
You can review these colors by accessing the Room Highlights key from the tool bar. Note: The legend only shows categories of rooms that exist on that floor.
Although the system highlights rooms according to capacity to provide you with a guide, you are not prohibited from assigning teams to only available or vacant rooms. You can assign teams to:
To assign rooms to a team:
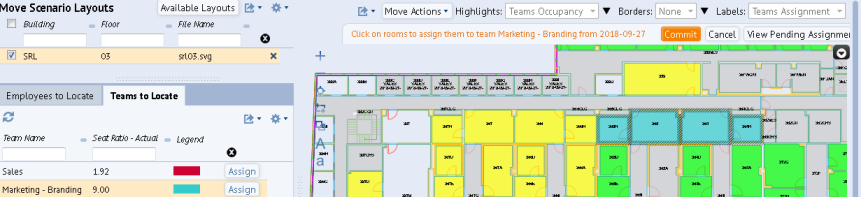
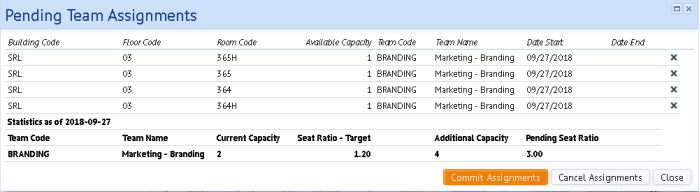
When you are through selecting rooms, review the rooms that you have selected to assign to the specified teams and commit the change.
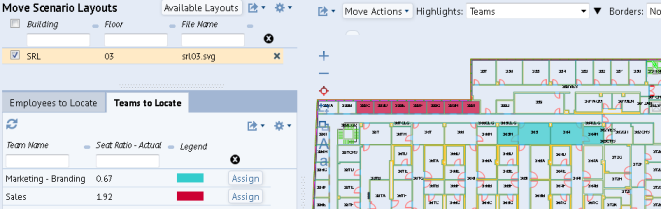
You may want to copy an occupancy scenario from one layout to another. This is handy if the layout has been updated such that the layout that was originally used is no longer valid, and the employees were placed on the initial layout before it was changed.
Or, you may want to transfer occupancy from a layout scenario to an inventory floor, once the layout scenario is approved, changes merged, and the inventory floor is recataloged and republished.
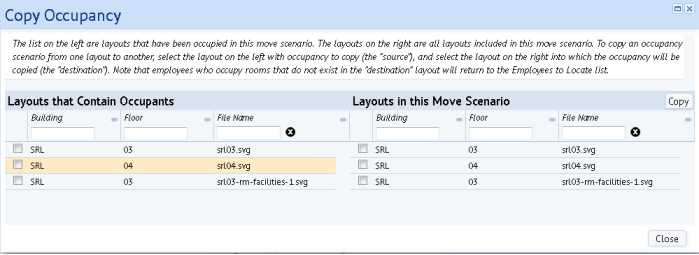
The Copy button copies the occupancy from the selected layout in the "Layout Used in Occupancy Scenarios" panel to the selected layout in the "Layout in Move Scenario" panel. Access the Copy Occupancy form from the Move Actions menu.
Note that the Copy features is designed to copy to a layout scenario drawing. If you try to copy occupancy to an inventory floor, then the command will do this, but inserts records into the Employee Move Scenarios table (mo_scenario_em) where there exists rooms in the Rooms table for the occupancy scenario being copied, AND removes the "placeholder" mo_scenario_em record if it exists.
The Copy command does the following:
UPDATE mo_scenario_em SET filename = <filename from selected layout used in move scenario> WHERE filename = <filename from selected layout used in occupancy scenario> AND <the room is valid in the new layout>
UPDATE mo_scenario_em SET bl_id, fl_id, rm_id, filename = NULL WHERE filename = <filename from selected layout used in occupancy scenario> AND <the room is NOT valid in the new layout>.
With your occupancy scenario created, you can now Review Occupancy Scenarios and Make Changes as Needed
See also:
| Copyright © 1984-2018, ARCHIBUS, Inc. All rights reserved. |