Ouvrir la rubrique avec les liens de navigation
Quick-Start / Building Operations
Manually Adjusting the Parts Inventory - Quick-Start
As a Quick-Start user, after entering your parts into the system (Define Parts task), the next step is to run the Adjust Inventory task. When you run this task, the system calculate the Unit Cost - Average for the part (used to calculate costs for parts associated with work requests), and the Quantity Available (used to track the status of part estimates and the quantity understocked for the part).
You run the Adjust Inventory action:
- When first using Quick-Start to have the application perform the calculations for your existing parts inventory. This is described in the Getting Started section below.
- When new parts are received as part of an order
- When parts are consumed that were not recorded as part of a work request.
- When rectifying your physical inventory with your electronic inventory when a survey shows that they are out-of-sync.
- When transferring parts between storage locations.
Getting Started - enter your inventory
As a Quick-Start user, you enter your existing inventory by using the “Add as Newly Received” action, and entering the price that you originally paid for the parts. Although, in this case, the parts aren't actually "newly received", using this action is a simple way to enter the part into the system and establish the average cost for the parts. The application uses this average cost to summarize costs for parts associated with work request.
When you run the Adjust Inventory action (Add as Newly Received as the Inventory Action). this action adds the part to the default location if it has not already been added for the part.
To adjust the inventory:
- Choose the Adjust Inventory task; the system presents the Manual Inventory Transaction form
- Enter the following:
Part Code -- Select the part for which you want to adjust inventory. You select from the parts you defined using the Define Parts Inventory task.
Quantity (each) -- Enter the number of parts that you have on hand. You can do a physical count, or you can estimate this number.
Price: Enter the price you paid per part.
Units of Issue: Select the units in which this part is issued for work.
Inventory Action: Select Add as Newly received.
To Storage Location: This defaults to the 'Main' storage location. When you save the record, the part is associates with the 'Main' storage location.
- Click Save.
Calculations
When you run the adjust inventory action, the application calculates the Unit Cost - Average and the Quantity Available for the part.
- Unit Cost - Average: This cost is used to summarize costs for the parts associated with work requests. When you close work requests, this cost is applied to the number of parts used. You can see these summarized costs in the Cost Analysis Dashboard.
- Quantity Available:
Is updated. When you run the Adjust Inventory action using the Add Newly Received Action, the application populates the Quantity Available field on the Define Parts form with the quantity you enter. This occurs whether or not you have entered a Physical Count Qty. The system will then update the Quantity Available as you reserve parts for work requests by subtracting the reserved parts from the Quantity Available.Updates both overall inventory and inventory for specific locations. The Quantity Available is updated in the Parts Inventory table that tracks all your parts, and in the Parts in Storage Locations table that tracks all parts by their location. Having both of these quantities enables you to track parts by where they are located, so you can assess inventory by location and transfer parts to the locations where they are needed.
Quantity Understocked. The Quantity Available is used to calculate the Quantity Understocked . The number of parts needed for all unreserved estimates for the part is added to the Minimum to Store and then subtracted from the Quantity Available to get the Quantity Understocked.
When you reserve parts for work requests, the part status is assigned based on the Quantity Available for this part.
Tip: After adding inventory as newly received for a part, if you go to the Define Parts task and select this part, you see that the system has calculated its Quantity Available. You can also view the Quantity Understocked from the Define Parts Inventory task. As you reserve parts for work requests, the application updates this value.
Additional Inventory Actions
When you close out work requests, the system automatically deducts the used for the work request from the parts inventory. However, sometimes you may need to manually update the inventory. To do so, you can run the Adjust Inventory action to make changes to the inventory. This is typically necessary in the following situations:
- You have purchased new parts that you want to add to the inventory.
- You have used parts without tracking these parts on a work order. You need to deduct these parts from the electronic inventory.
- You have assigned too many parts to a work order, closed out the work order, and now realize that you did not require all parts and need to return the parts to inventory.
- You have surveyed your actual inventory and found discrepancies between your electronic and actual inventory.
- You need to transfer parts from one storage locations to another.
Inventory Action: Here are the Inventory Actions you can run when adjusting inventory:
- Add as Newly Received - Adds the specified part quantity to the Quantity Available field in the Parts Inventory table and calculates a new average cost for all parts (Unit Cost - Average), applying the entered price to only the new quantity. Use this task to establish your inventory, and then to add new parts as they come in.
- Disburse -- Subtracts the specified part quantity from the Quantity Available field in the Parts Inventory table; in the Inventory Transactions table, posts the cost to the specified account.
- Return Unused -- Adds the specified part quantity to the Quantity Available field in the Parts Inventory table; in the Inventory Transactions table, posts a negative cost to the specified account. Use this option to correct part quantities for closed out work orders or errors you make with the above Disburse option.
- Rectify Physical Inventory -- If your physical and electronic parts inventories differ, correct the electronic inventory by entering the number of parts found during a physical survey. The application takes the quantity you enter in the Quantity field and copies that to the Physical Count Qty (pt.qty_physical_count). The application also updates the Quantity Available field in the Parts Inventory table if necessary. with the specified part quantity value. If you have a Quantity on Reserve, the calculation considers this when updating the Quantity Available field.
For example, if you had 20 of a part on reserve, 20 available, and a physical count of 50, the system would update the Quantity Available to 30 (Physical Count minus Quantity Reserved.)
This action also updates the Date of Last Count field.
Note: If you run the “Rectify Physical Inventory” action before you have any existing inventory for a part, then the average cost of those parts will be zero, which will drag down the average cost of any additional inventory you add for that part. For this reason, you should first run the Add as Newly Received action to get started. as described in the above procedure.
- Transfer parts. Move parts from one storage location to another where the parts are needed. When you transfer parts, you can choose to transfer parts that are already reserved for non-completed work requests. This enables the system to update the Part Estimate records. See
- Transferring parts reserved for a specific work request.
Save -- Select this button to process the changes you have made. Once you save your entries, the system updates the inventory and records the changes in the Inventory Transactions table by documenting the date, time, quantity, and type of change.
Transferring parts reserved for a specific work request
When you estimate work, you can reserve parts as part of the estimate. If these parts are in a storage location that is not convenient to the work location, you can transfer the parts to a closer storage location which updates the part estimates for the work request.
To transfer parts reserved for a specific work request:
- Access the Adjust Physical Inventory task.
The Manual Parts Inventory Transaction form appears.
- Enter the following information:
Part Code: Select from the list of parts entered into the system. To add a part that is not on the list, use the Add New action. See Adding new parts as you work
Quantity. Enter the quantity of this part that are being transferred. This number can include a mix of parts that are Available and Parts that are Reserved. When transferring reserved parts, the value of the Quantity field must be greater than or equal to the total quantity selected from reserved parts (see below).
Inventory Action. Select' Transfer.' This action transfers the parts from one storage location to another.
Note: The Price field is disabled when the transaction type is Transfer as the price for these parts has already been accounted for.
To Storage Location: Select the storage location that will receive the parts, such as the storage location of the craftsperson's vehicle or cart..
From Storage Location: Select the storage location the parts are coming from.
The Quantity Available is shown as a reference so you know how many parts are available.
When you select a Part Code and a From Storage Location, the Parts Reservations for Part Code in Storage Location pane appears. The pane shows reservations for the selected Part Code and From Storage Location where the status for the reservation is Reserved.
Note: Parts that are "Not In Stock" "In Stock, Not Reserved" cannot be transferred, so they do not appear in the grid.
- Select the check boxes in the Transfer? column for the part reservations for which you are collecting parts.
As you make selections, the Total Reserved Quantity to Transfer updates to reflect your selections.
Note: You can transfer a mix of parts that are Available and parts that are Reserved by choosing a Quantity in the top pane of the Manual Parts Inventory Transactions pane that is higher than the Total Reserved Quantity to Transfer (sum of the reserved parts you have selected).
- The value of the Quantity field in the Manual Parts Inventory Transaction form must be greater than or equal to the total quantity selected from reserved parts.
- Also, the total quantity to transfer cannot be greater than the sum of the Available and Reserved parts.
- Note that the transfer cannot “unreserve” parts.
- Click Save.
- The system updates the inventory quantities in both storage locations, and updates the Work Request Part Estimate records to the receiving location (for example, the craftsperson’s vehicle / cart.)
- Decreases the Quantity Reserved of the From Storage Location by the quantity of reserved parts that are being transferred.
- Increases the Quantity Reserved of the Storage Location To by the quantity of reserved parts that are being transferred.
- The Quantity value must be less than or equal to the sum of the Quantity Available and the sum of the selected part reservations. If it is not, you will see this error message
- “You cannot transfer more parts than are available”
Adding new parts as you work
When you manually adjust the parts inventory, you select the part you are making adjustments for. If the Part Code does not yet exist in the database, you can add it by clicking on the “Add New” button on the Select Value form accessed by clicking in the Part Code field.
When you add a part using the Add New action, the part is given the "Main" storage location. The Main storage location is the default storage location that is provided with the application. If needed, you can rename this location to reflect the name of your actual main storage location. This is done using the Define Storage Locations task.
To add a new part as you work:
- Mouse over the Part Code field in the Manual Parts Inventory Transaction form, and click the Select Value button (
 ) that appears.

The Select Value - Parts Inventory form appears.
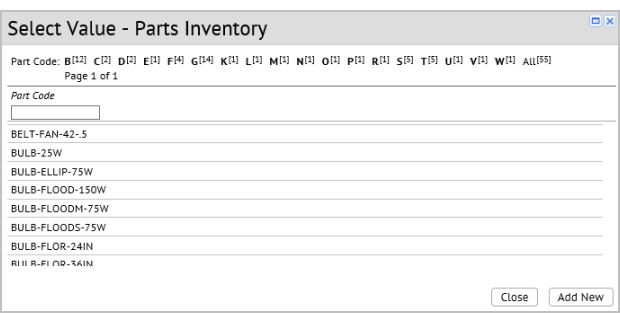
- Review the list of parts. If the part does not exist in the list, click Add New.
The Add New Parts Inventory form appears.
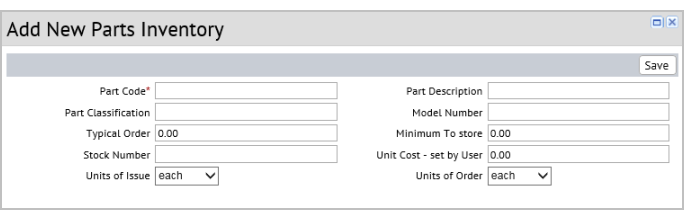
- Enter the following information for the new part:
Part Code: Enter the unique identifier for the part.
Tip: A good practice is to begin similar parts with the same identifier, and then append a unique suffix that identifies the part. For example, all your light bulbs could begin with BULB; you could then create parts BULB-FLOR-75W and BULB-FLOOD-150W to distinguish flood and florescent lights. You could further append the wattage to define specific bulbs.
Part Description: Enter a description to further identify the part. The Description appears in selection lists. For example, enter 150W, 120V, 4000 Hrs., 4 1/2" Dia., Tung to describe a particular florescent bulb.
Part Classification: Enter a value that groups similar parts. Having this value provides a way to search for similar parts.
Minimum to store: Complete the Minimum to Store field with the quantity you would like to keep on hand. You can determine this from the average parts usage over time and the lead time required to receive new parts. When you run the Calculate Inventory Usage action, the program then uses this value to determine the Quantity Understocked value. See Calculate Inventory Usage.
Stock Number / Model Number / Typical Order: Enter this information as a reference for placing orders
Unit Cost - set by User: Enter the typical cost per unit so that the application can calculate the Inventory Value (pt.cost_total) when you run the Calculate Inventory Usage action. The Inventory Value is shown in the Current Parts Inventory report (Operational Reports / Current Parts Inventory). See Operational Reports
Units of Issue/ Units of Order: Select the units in which this part is issued for work, or the units you use when ordering the part. Select values such as: each, dozen, pound.
- Click Save.
The Inventory Transactions Report
Since the electronic inventory is automatically updated by the work order close-out procedure any manual adjustment that you make to the parts inventory should be documented. Run the View Inventory Transactions task to review the Inventory Transactions table, which lists all of the updates manually transacted using the Adjust Inventory action. The transactions are grouped by part and then ordered by date so that you can easily see the transactions for each part.
As this report lists all inventory transactions, you can use it to maintain an historical audit of parts you purchase and their cost. If you find that you are making many manual adjustments, perhaps you need to review your procedures for assigning parts to work orders.
Note that the report displays the Transaction Performed By field. The system completes this field with the user's log-in name to provide a record of who is making manual changes.
| Copyright © 1984-2016, ARCHIBUS, Inc. Tous droits réservés.
|