Typically, a safety manager is responsible for inventorying the products located on a site and entering their SDS information into the system. Recording the SDS information is vital for complying with government regulations and providing a safe working environment.
As you complete the SDS information, you will be required to choose values from validating lists. For example, you may need to select a component chemical, its manufacturer, and its hazard classification. If you find that the system does not offer you the appropriate values from which to choose, you have two possible actions.
While the ARCHIBUS SDS system stores many key characteristics of a hazardous product, it does not store all the information that is found on the SDS issued by the manufacturer. For example, the ARCHIBUS system does not store first aid procedures, storage and handling requirements, fire-fighting procedures, transportation requirements, disposal procedures, and toxicological information. Instead, the ARCHIBUS SDS application focuses on storing SDS data required for sorting, classifying, filtering, and retrieving SDSs, as well as providing summary analytics on the products. This information enables the ARCHIBUS user to search the electronic inventory of SDSs and find the record they need. Once they locate the ARCHIBUS SDS record, they can access the complete SDS with these methods:
If your site wants to track additional SDS details in the ARCHIBUS SDS system, they can customize the forms presented by the Define Materials and Safety Data Sheets (SDS) task.
To add or edit SDS information, select the Hazardous Materials/ Manage Material Inventory / Define Materials and Safety Data Sheets (SDS) task, which presents a tab-based console for entering SDS data. Work through the tabs to enter your SDS information:
The absolute minimum data required for saving an SDS record is the Product Name and the Manufacturer on the Identification tab. However, to be most useful, you would use the Documents tab to check into the ARCHIBUS document system the manufacturer-provided SDS document.
It is likely that there will be hundreds, if not thousands, of SDSs in the system. Even when you are adding a new SDS, it is a good practice to first search for it to make sure it's not already in the system. The Filter console is convenient for finding an SDS or group of SDSs.
In the console, all search criteria have a selection dialog accessed with the [...] button. The selection lists for the three fields shown below are limited to values that are entered for an existing SDS and are present in the SDS table. So, if you are searching for a material and it's not listed in the selection list for Product Name, it has not yet been entered into the system. You can use any of the following fields to see if an existing SDS uses them.
The remaining selection lists are derived from reference data developed in the background data tables. So, even if company XYZ is shown in the Manufacturer selection list, there may or may not be SDSs associated with that manufacturer.
The console search is not case-sensitive. When you enter multiple search criteria, the SDS is shown in the SDS list only if it matches all the criteria you enter. See Using the Filter Console.
For example, suppose the health and safety manager needs to review and update all of the SDSs assigned to a particular floor in a building. The safety manager could enter the building and floor code and click Show at the top of the console. The system displays SDSs matching those criteria in the grid below the console.
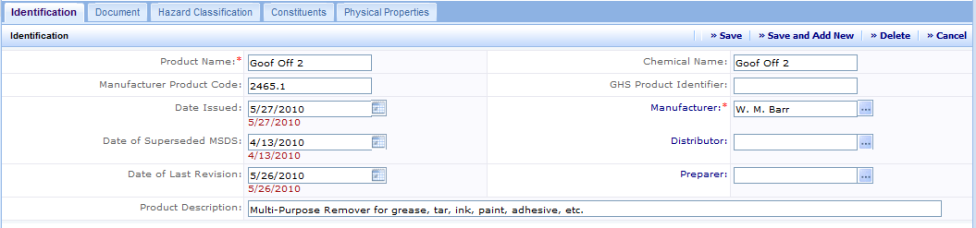
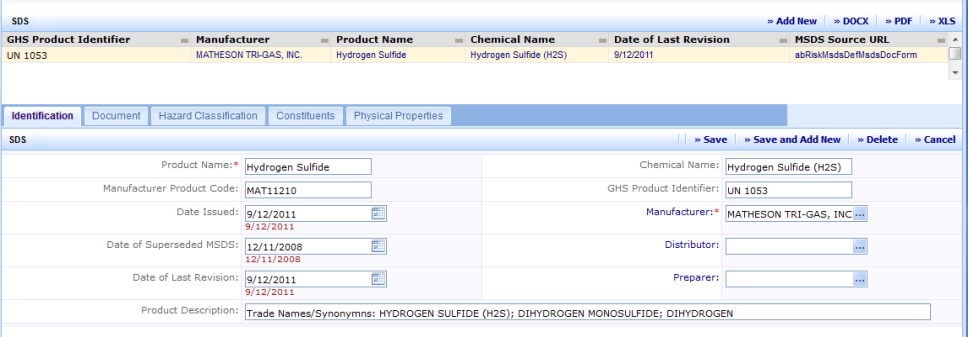
The Identification tab presents basic information about the chemical. All of the data listed in this tab is found in "Section 1: Chemical Product and Company Identification" of typical SDS forms. Each of the fields is described in the table below.
The Manufacturer, Distributor, and Preparer fields (which are all validated by the Companies table) have a special feature that makes entering data more efficient: they include an Add New button so that you can enter a new company directly from this form. If the list of validating companies does not include the company that you need, use the Add New button to enter it and click Save. You can now choose this new record to complete the field. With this quick-add feature, you complete only a few fields. It is a good practice to later go back to the Define Companies task to complete the remainder of the company information.
Enter as much information as you can so that others will be able to find this record when searching for it.
| Field | Purpose |
|---|---|
| Product Name | (Required Field) The name of the product |
| Manufacturer Product Code | A code assigned to the product by the manufacturer. Often there are multiple product codes listed. |
| Date Issued | Date that the manufacturer issued the SDS. |
| Date of Superseded SDS | If this SDS replaces an existing one for this product, the manufacturer indicates the date of the replaced SDS. |
| Date of Last Revision | The manufacturer indicates the date of the last revision. |
| Product Description | Description of the product and its intended use. |
| Chemical Name | If the product is a chemical substance, you can enter the chemical name. In some cases, this may be the same as the product name. For products composed of multiple chemicals, you will have a chance to enter the constituent chemicals on the Constituents tab. |
| GHS Product Identifier | Globally Harmonized System (GHS) identifier |
| Manufacturer | Name of the company that manufactures this product. Validated by the Companies table. |
| Distributor | Name of the company that distributes this product. Validated by the Companies table. |
| Preparer | The company who prepared the SDS. Often, the SDS preparer is the manufacturer, but it might be the distributor or another company altogether. Use this field to document who wrote the SDS. Validated by the Companies table. |
When the data entry is complete, you can use the Save button to save this data and then move to another tab. If you wish to quickly enter only basic information for multiple products at once, use the "Save and Add New" button to save the data and then clear the form so that you can enter a new product.
Note: If your site works with the ARCHIBUS Hazardous Materials mobile app, you may want to create a placeholder SDS record for situations when the auditor finds a material in the field for which an SDS record does not exist. Since auditors cannot create an SDS record from mobile, they need a way of indicating that they found a material that does not have an SDS defined in the system. To address this situation, you can create a placeholder SDS and name it "Undocumented." When auditors find a material in the field for which an SDS does not exist, they can choose the "Undocumented" record, enter quantity and other information that they observe, and use the Comments field to record the product name, manufacturer, and other important information. When the data is uploaded to the Web Central system, a safety manager can search the Environmental & Risk Management / Hazardous Materials / Material Inventory Exceptions report for the "Undocumented" items. They can then create the necessary SDS records to fully document these products and update the "Undocumented" records with the new SDS information.
Use the Documents tab to associate the manufacturer-issued SDS with this product by registering it in the ARCHIBUS document management system. For information, see Using the Document Management System.
Associating your electronic SDS record with the SDS provided by the manufacturer is a vital step. The ARCHIBUS SDS system does not electronically track all the data typically provided by the manufacturer on their SDS. By uploading the SDS document and providing the URL link, you are enabling users to access the complete SDS document.

Since an SDS may exist on line, or was sent to you as a hard copy, there are two ways to associate documents with the SDS:
If the SDS is available on the manufacturer's web site, you can enter the URL in the SDS Source URL field, click Save, and then click the Download button. The system captures the SDS document and stores it in the ARCHIBUS document management system. You will see the document name listed in the Document field. After the download has completed, it is a good practice to select the Show Document icon to verify that the document is accessible.
If you have a paper copy of the SDS, you will need to scan the document and save it electronically (PDF is a common format for saving scanned documents). Other sources of SDS documents might be Word files or text files. Once you have an electronic copy of the SDS, navigate to the Document tab and click on the Check In New Document button, next to the Document field. Browse to the location of the electronic copy of the SDS, fill in the version comments (optional), and click on OK. It is a good practice at this point to select Show Document to make sure the document is accessible.
See Using the Document Management System.
The following are the fields on the Document tab.
| Field | Purpose |
|---|---|
| Manufacturer URL | Enter the URL of the manufacturer. Or, the system automatically completes this if you enter SDS Source URL below. |
| SDS Source URL | If the SDS exists on the company's web site, enter the URL here. |
| Document |
The system completes this when you upload the document. |
With the Hazard Classification tab, you can associate one or more hazard classifications with the product. Since a product can be classified by more than one system (such as by both GHS and a fire protection association), you can enter multiple classifications per product.
When you select the Hazard Classification tab, the system displays all hazard categories assigned to the currently selected SDS.
Click on "Add New" to assign a new category. You can assign the system, class, and category in the hierarchy sequence, or you can go straight to the selection dialog for the category. In this case, when you select the category ARCHIBUS automatically completes the system and class fields based on the category you select.
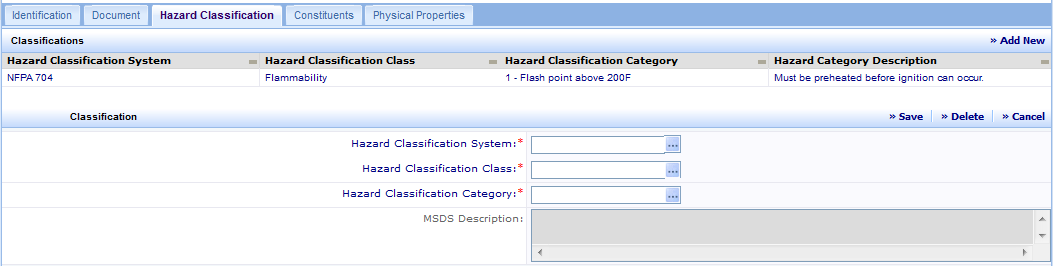
To add new or edit existing classifications, you need to go to the Define Hazard Classifications task under the Business Process Owner - Hazmat process.
| Field | Purpose |
|---|---|
| Hazard Classification System | The identifier for the classification system. GHS and NFPA are examples of systems. |
| Hazard Classification Class | The identifier for the class within the classification system. Flammability is an example of a class. |
| Hazard Classification Category | The identifier for the category within the class. Categories are often a sequence of numbers. |
|
SDS Description |
(Read Only) The description is pulled from the category definition entered when the business process owner defined the category. |
On a typical manufacturer-supplied SDS, the "Composition / Information on Ingredients" section provides information about the chemicals that make up the product being documented in the SDS. Constituent information is needed for chemical inventory reporting and can be very helpful in an emergency situation to determine potential hazards.
Note that in order to add a constituent chemical to the SDS, the item must already be included in the chemical list that is typically maintained with the Business Process Owner - Hazmat/Define Chemicals task. However, the Constituent field has a convenient "Add New" button so that you can add a missing chemical directly from this form. To do so, click "Add New," complete the fields, and click Save. You can now select the new item as a constituent of the SDS.
When you use Add New, only the Constituent and Percentage information is added. To enter additional details for the chemical such as the Tier II Classification or the CAS Number, you would use the Business Process Owner for SDS / Define Chemicals task.
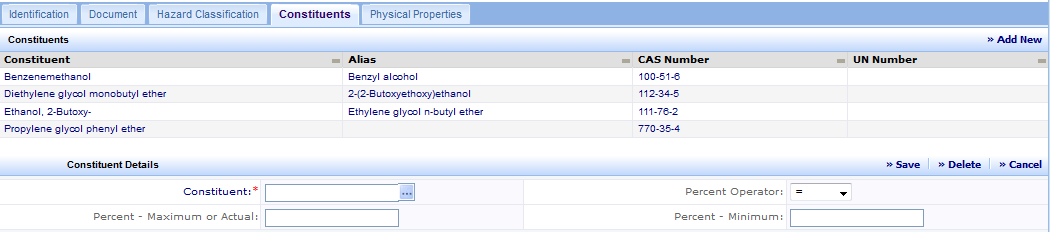
When you first select the tab, it displays the constituents that have already been assigned to the SDS. To add a new constituent, click Add New, and select the chemical from the selection dialog box. You can enter the exact percentage of this component as part of the overall product; for example, if two percent of the product is composed of Florine, enter 2 in the Percent - Maximum or Actual field. In some cases, you may wish to enter a more general amount using the range or the "less than" or "greater than" operators.
| Field | Purpose |
|---|---|
| Constituent | The chemical name of the component ingredient. These selections are defined using the Define Chemicals task. |
| Percent Operator | Choose Range, =, <, or >. |
| Percent - Maximum or Actual | Enter the percentage amount, such as the component is < 5 percent of this product. If you are using the Range operator, this value is your maximum. |
| Percent - Minimum | If using the Range operator, the system displays this field so that you can enter the lower number of the range. |
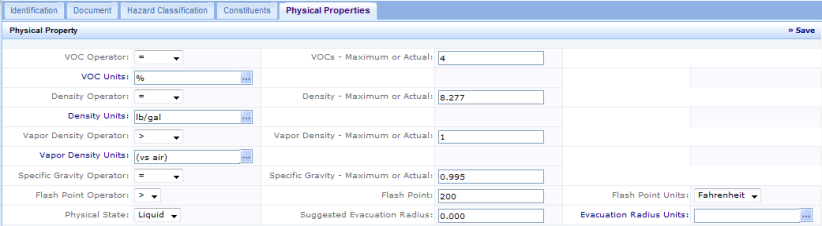
The Physical and Chemical Properties section of a typical manufacturer-supplied SDS contains important information about the physical properties of the product. For a particular property, you can enter its value in the following formats:
Similarly, for some properties, you can enter the units, such as percentage of overall product or pounds per gallon. The exact options depend on the property.
| Property | Fields to Complete | Description |
|---|---|---|
|
VOC |
VOC Operator VOC Maximum (Actual) VOC Minimum VOC Units |
Volatile Organic Compounds (VOCs) are emitted as gases from certain solids or liquids. VOCs include a variety of chemicals, some of which may have short- and long-term adverse health effects. The operator (=, >, <, Range) delineates how to interpret the Maximum or Actual numerical value you enter. If the Range operator is specified, a Minimum value should also be entered. The measurement unit is the unit associated with the numerical values. Choose from %, gallon/liter, or pound/gallon. |
|
|
Density Operator Density Maximum (Actual) Density Minimum Density Units |
Mass per unit volume The operator (=, >, <, Range) delineates how to interpret the Maximum or Actual numerical value you enter. If the Range operator is specified, a Minimum value should also be entered. The measurement unit is the unit associated with the numerical values, such as pound/gallon. |
|
Vapor Density Operator Vapor Density Maximum (Actual) Vapor Density Minimum Vapor Density Units |
The relative weight of a gas or vapor compared to air, which has an arbitrary value of one. If a gas has a vapor density of less than one, it will generally rise in air. The operator (=, >, <, Range) delineates how to interpret the Maximum or Actual numerical value you enter. If the Range operator is specified, a Minimum value should also be entered. The measurement unit is the unit associated with the numerical values. Choose from: versus air, versus hydrogen. |
|
|
Specific Gravity |
Specific Gravity Operator Specific Gravity Maximum (Actual) Specific Gravity Minimum |
A ratio of the mass of a product to the mass of an equal volume of water at 4°C (39°F). The operator (=, >, <, Range) delineates how to interpret the Maximum or Actual numerical value you enter. If the Range operator is specified, a Minimum value should also be entered. |
|
Flash Point |
Flash Point Operator (Range is not offered) Flash Point Flash Point Units |
The lowest temperature at which a liquid can form an ignitable mixture in air near the surface of the liquid. The lower the flash point, the easier it is to ignite the product, and the greater the fire hazard. The operator (=, >, <,) delineates how to interpret the actual numerical value. Units are Kelvin, Celsius, Fahrenheit) |
|
Physical State |
Physical State list |
The normal physical state of the product. Choose from: N/A, Solid, Liquid, Gas |
|
Suggested Evacuation Radius |
Suggested Evacuation Radius Evacuation Radius Units |
The distance recommended for evacuation in the event of exposure or fire. If you enter this distance, you can view the radius highlighted on a map using the SDS Geographic Drill-Down task. The Evacuation Radius Units is the units of measure for the evacuation radius (meter, mile, ft, for example). |
| Copyright © 1984-2019, ARCHIBUS, Inc. All rights reserved. |