An important part of a craftsperson's role in resolving a maintenance issue is updating the Archibus system with details about the jobs they complete. For example, craftspersons must access the Archibus system to put a job on hold, record the hours spent on the job, enter notes about how they resolved the problem, enter the parts used on the job, and so forth.
With the Archibus Maintenance mobile app, craftspersons in the field can use a smart phone or other mobile device to perform everyday tasks that they encounter on the job.
Craftspersons toggle between the following tabs to perform their work.
| Tab | Purpose |
|---|---|
| My Work |
To review the work that is assigned to them. For each job, the work request list includes the escalation date (if any), or the earliest date and time that the work was assigned to the craftsperson. |
| My Requests |
To view and process the work in their queue. This tab shows work assigned to the craftsperson regardless of its status; that is, this tab will show work that is requested, on hold, issued. It also includes completed work not yet uploaded to the server. |
| Approved | To self-assign work (if the facility manager has established this feature). |
| Issued | To process work that is issued. This tab shows work assigned to the craftsperson that has a status of "Issued and in Process." The craftsperson can process work from either this tab or from the My Work tab. |
To access these tabs, the craftsperson clicks on the button (named according to the currently displayed tab) located at the bottom of the screen and to access the list of available tabs.
Following are the main tasks of the craftsperson:
Once maintenance work is approved, the service request system automatically routes work to craftspersons based upon defined procedures. To see the work routed to them, craftspersons move to the My Work tab on the mobile device and run the Sync action, which downloads from the server work that has been routed to them . Since maintenance situations might arise throughout the day, craftspersons can periodically run the sync action throughout the day to see their latest task list.
The system color-codes the jobs based on when they should be executed:
A red dot next to an item indicates that the user should perform a sync.
If they have a lot of assigned work in their queue, craftspersons may wish to search for specific work requests and sort their assigned work requests using the boxes at the top of the screen.
Work requests can be sorted by escalation, location, status, and problem type. For example, sorting by location is useful because craftspersons can look up all their assigned work for a particular location. They can then gather all tools and parts that they will need for the jobs in and near this location and avoid making multiple trips back to the supply room. For more information, see Searching, Filtering, and Sorting.
Craftspersons can search for work requests by entering their search criteria in the Search Work Requests box in the upper left corner of the My Work screen. Craftspersons can search on:
From the My Work list, craftspersons access a list of the jobs assigned to them. They can tap any job and review the description of the problem, priority, location, and other details. If they are not sure the location of the room, they can look it up on the floor plan using the Locate button (the button shaped like an explanation point in the top left of the screen). They can then proceed to the site and get started with the assigned jobs. 
They can use the tabs at the bottom of the screen to review:
Craftspersons may wish to take advantage of the timer to track the time spent on a job using the Start, Stop, and Resume buttons to record time spent on a job. The timer tracks all the minutes that a craftsperson spends on a job and stores the times and other details in work logs. When the craftsperson completes the job, the system totals the hours worked as documented in the work logs. Craftspersons may find it more efficient to use the timer buttons rather than manually track and then enter the time spent on a job.
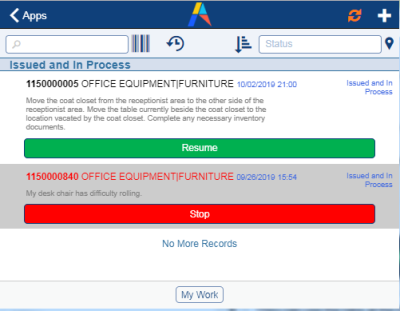
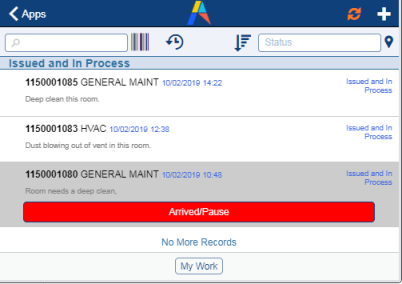
For example, craftspersons can press "Start" at the beginning of the job, and at a later time they can pause the timer and then resume the timer when they return to the job. With these buttons, craftspersons can record their hours quickly and accurately with a simple swipe. For example, in the following image, the craftsperson is assigned two jobs; he has paused one job so the button reads Resume. The second job he is actively working on; when he finishes he can swipe the Stop button.
To get started on a job, the craftsperson clicks the "Start" button on the job details screen. The craftsperson then indicates the type of work (travel, setup, and so on) by choosing the appropriate button and the timer starts.

On the Work List and the Update screens, the app adjusts the buttons as necessary to accommodate the currently-selected button. For example, if the craftsperson chooses "Travel Time" to measure the amount of time devoted to travel, the button on the Work List and Update screens reads "Arrived/Paused" so that the craftsperson can log the time that they arrive. Or, if they choose Work on the above screen, the button on the Work List and Update screen changes to Stop so that they can log when they finish the work.
If they take a break or move to another task, they can stop the timer for this job and then restart it when they resume work on the task. In this case, the button reads Resume.
Once the craftsperson begins logging time on the job, they cannot use the timer for another job until they stop the timer on the current job.
Note that the timer is a tool to help the craftsperson; it is not a designed to validate the time that they worked. Craftspersons have full editing capabilities to manually enter the hours themselves or edit the that the timer recorded, as discussed in Update the system about labor and craftspersons.
When you start work on a job and start the timer, the app prompts you to scan the bar code of the equipment item you are servicing. This scan ensures that you are servicing the correct item. Scan the barcode, and the system matches the scanned barcode to the Equipment Code value in the work request and verifies that they match. If the work request does not have an Equipment Code value, you are prompted to apply the bar code value of the item you just scanned.
If the scanned bar code does not match the Equipment Code of the work request, you have not found the correct item to service. The app asks if you would like to search for other requests that match the scanned barcode.
Directly from the mobile device, craftspersons can record the tools, parts, costs, and other details of the job, either while the job is in process or when it is finished and before they run the Complete action. They do so by using the following buttons, located at the bottom of the screen. When they sync the device, all cost information (labor, parts, and other costs) is uploaded to the Archibus database on the server.

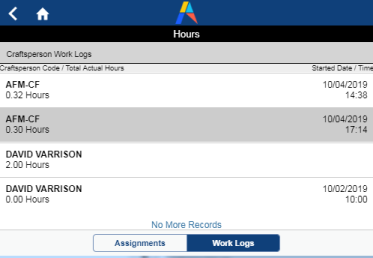
Although the timer records the minutes spent on a job, the craftsperson may need to edit this information or add additional hours. Using the Hours button, the craftsperson can access the work logs for all craftspersons who worked on the job; however, a craftsperson can edit only their own work logs.
Select a work log and you can see and edits its details. For example, the below image shows that AFM-CF used the timer to log work on this job, and the system entered the values in the Time Start/Time End fields. The system updated the Regular Hours field with this information.
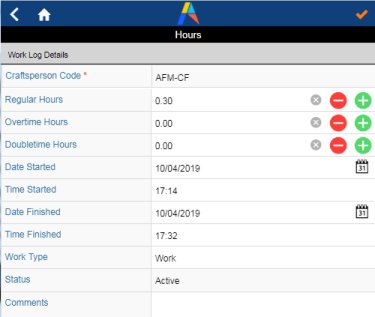
Suppose AFM-CF performed this work at an overtime rate; they could edit Regular Hours to zero and enter the value in Overtime Hours. Similarly, suppose they know that they worked on the job for 15 minutes before starting the timer. They could edit the Start Time value and the Regular Hours value to reflect these 15 minutes. Note that if AFM-CF manually edits Start Time, the Regular Hours field does not update with a new value; Regular Hours must be manually edited as well.
In order to enter Regular Hours, the Craftsperson must have a Work Log to edit. Therefore, if they prefer to not use the timer but simply edit Regular Hours, they must minimally start the timer to generate a Work Log record to edit. They can then enter Regular Hours.
As they use parts to address this issue, craftspersons can tap the Parts button to move to the Parts screen. Depending on practices at the site, the maintenance manager may have already estimated the parts required for the job. With this button, the craftsperson can enter the quantity actually used or add new parts to the job. As they add parts, the form lists the parts at the bottom of the screen.
If craftspersons need to purchase a part in order to complete the job, they can Use the Add Purchased Parts button to enter the part into inventory. When you complete the work request, the system debits the inventory of the parts used; therefore, it is important to enter any parts purchased during a job.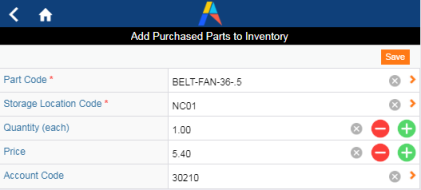
Like parts, the maintenance manager may have already estimated the tools (such as saws, drills, ladders, fans, fork lists) required for the job. If so, the craftsperson can enter the amount of time the tools were actually used. If no tools have been specified, the craftsperson can add the tools that they used. Documenting the tools used on a job is important for tracking the overall use of a tool so that the maintenance manager can plan for maintenance and service on the tool. Like parts, tools that the craftsperson adds are listed at the bottom of the screen.
If the job entails other costs that are not related to labor and parts--such as the cost of a permit--craftspersons can record these by using the Costs screen. Costs can be classified as Administrative, Transport, or General.
While addressing a job or reporting a new one, craftspersons may want to document the damage by taking a picture of the affected area or marking the damaged area on a floor plan. From the Update Work Request screen, the craftsperson can do the following:
When craftspersons sync their devices and upload these documents to the Archibus server, supervisors and other managers will have documentation on the issues and may be able to use these pictures in cost justification or maintenance analysis.
Sometimes, work cannot proceed and a job must be placed on hold.
Note: When placing a work request on hold or when resuming work, craftspersons should be aware that they are not immediately updating the server with their status changes. They need to sync after each action in order for their changes to be uploaded to the server so that the work order system (the SLAs) can process the item and send the item back to the mobile device with its new status. The app places a red dot next to requests that need to be synced in order to determine the next step in the process.
Craftspersons can access the drop-down menu and choose a "hold" status.
| Hold Status | Description |
|---|---|
| Hold for Parts | Awaiting the required parts. For example, the craftsperson needs a specific filter to service an equipment item, but a filter is not available in the supply closet. |
| Hold for Labor |
|
| Hold for Access |
|
Additionally, the craftsperson can cancel the hold status when work can resume on the job. To do so, the craftsperson chooses the "Resume to Issued" option to reset the work's status to "Issued and in Process."
When the craftsperson makes a change in status, the app reminds them to sync by adding a red dot to this item in the job list, as shown in the Review the work queue section above. When the craftsperson syncs the device, the sync action uploads this information to the server. The work request system then informs the requestor that the job is on hold or has been resumed.
If you are using the timer and put a job on hold and then sync, after the sync you will see that the sync has automatically stopped the timer and set the button to Resume. For example, in the below image the user has just synced after putting the job on hold for parts and the system has stopped the timer. You can also choose to stop the timer yourself.

You can also place a job on hold or resume work by using the timer. In these cases, you do not need to use the drop-down menu to set the status; using the timer automatically updates the status.
For example, when you stop work on a job, you have the option to place the job on hold.
You are prompted to enter a comment and the type of hold. Clicking the green Update Status button stops the timer and returns you to the work list where you can sync and update the server with the s On Hold status you selected.

When you are ready to resume work, click Resume and the timer will restart and you will be prompted to update the status. Sync, and the status will be updated to Issued and in Process.
When craftspersons have completed their jobs, they can enter any remaining details about the job as described above in Update the system about a completed or in-process jobs.
They can then and then choose the Complete option from the drop-down menu. Note that if they haven't yet entered the number of hours spent on the job, the system prompts them to do so as part of the completion process.
When they sync their devices and upload the data to the server, the sync action stops the timer (if running) and removes the job from their work list.
If necessary, craftspersons can continue to add costs, parts, and labor information to a completed work request until they actually sync and upload the completed work request to the server.
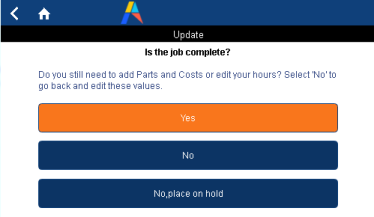
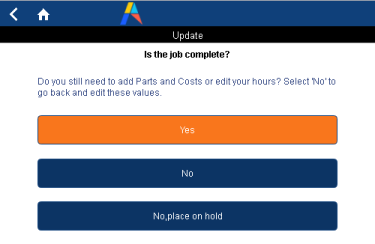
As another option, they can stop the timer. This action prompts them if they want to complete the job, or add more details. If they choose Yes (they want to complete the job), they are prompted to enter a comment and then sync, which updates the status and removes the job from the work list.
Craftspersons with the appropriate permissions can use the Approved tab to access a list of their work team's work that has been approved but not assigned. Craftspersons can pull down and self-assign appropriate work -- taking advantage of their location, their particular expertise, or a gap in their schedule. In order to access this feature, the work team to which the craftsperson belongs must have the Craftspersons Assign Themselves? option in the Work Teams table set to Yes.
Since multiple craftspersons can belong to a work team, multiple craftspersons will see the unassigned tasks in their Approved tab. It is possible than more than one craftsperson will select to self-assign a work request. The first craftsperson to self-assign a job and sync will have the job. If a second craftsperson has self-assigned the job and they sync after the first craftsperson, they will receive a message that the work has already been assigned.
Thus, it is good practice for craftsperson to immediately sync after self-assigning the job so that other work team members know that the job is issued and they don't need to take it.
While in the field performing assigned tasks, craftspersons may notice other work that needs to be done. For example, while completing a task to clean a rug because of water damage, a craftsperson might realize that the walls need to be repaired. In cases such as this, craftspersons can move to the My Work or My Requests screen and tap "+" button to move to the Create Work Request screen from which they can enter a new work request for the required paint job. When reporting jobs, craftspersons can include photos of problem areas and redline floor plans, as described above.
When entering a request, you must specify a location: minimally, you must specify either a site, building, or equipment item. For work outside the building (such as on the grounds or in the parking lot), enter a Site Code and use the Description field to describe the exact location on site. Optionally, you can complete the floor and room.
The craftsperson can create a work request from either the My Work or My Requests tab, as outlined below. If the craftsperson want to complete this job themselves they should enter it from the My Work screen so that the system can immediately assign the job to them; if they cannot work on this request, either because they don't have the skills or they don't have the time, they should report it from the My Requests tab so that the standard SLA system can process the request.
| If the craftsperson creates the request from this tab ... | ... the system processes the request by ... |
|---|---|
| My Work | assigning it to the craftsperson so that it appears in their work queue, bypassing the normal SLA process for assigning requests. The system will immediately show the request in the craftsperson's My Work tab. |
| My Requests | listing it in the My Requests screen with a status of Requested. When the craftsperson syncs, the system submits the request to the server where the appropriate SLA will process the request. |
Note: Work requests created from mobile automatically have their Priority set to 1.
Before they upload requests that they have made to the server, users may want to review requests that they entered and perhaps edit their initial data. Before they sync the device, they can review the list of work they have requested by choosing the My Requests tab. When they sync, the sync action uploads these requests to the server for processing by the maintenance system and the requests will no longer appear on the My Requests tab.
| Copyright © 1984-2019, Archibus, Inc. All rights reserved. |