
The Highlight by Owner commands enable you to view asset symbols on a floor plan drawing according to ownership, such as highlighting rooms according to their department assignment. Highlighting drawings helps you visually check your work, preview how drawings will display on the Web, find any rooms or groups that have not been edited, or any standards or departments that do not have a hatch pattern set. Generating highlighted CAD drawings also enables you to plot out a large-format hard copy of a highlighted floor plan drawing.
The below image shows running a highlight by owner command (Highlight Rooms by Department) from the Navigator and generating a legend of the highlight colors. Rooms that are not assigned a department are highlighted in green and listed as Unassigned in the legend.
This topic includes the following sections:
Note: The Add-In Manager can create custom highlight by owner views using the Auto Lisp API. To see sample views, on the Navigator, select Technologies / User Interface Add-Ins / Drawing Views. For code examples to create these views, see Add-in Manager / User Interface Extensions / HTML5 Drawings / Highlight Assets in System Management Help.
You can invoke the Highlight by Owner commands from either the AutoCAD command line or from Navigator tasks.
Navigator: Select a "highlight by owner" task from the Navigator:
Command Line. The following commands can be invoked from the command line:
| Command Name | Highlight by this Field | Command |
|---|---|---|
| Highlight Vertical Penetration Rooms by Type | Room Type | afm_hvertxstd |
| Highlight Service Area Rooms by Type | Room Type | afm_hservxtype |
| Highlight Suites by Lease | Lease Code | afm_hsuxls |
| Highlight Groups by Department | Department | afm_hgpxdp |
| Highlight Groups by Standard | Group Standard | afm_hgpxstd |
| Highlight Groups by Lease | Lease Code | afm_hgpxls |
| Highlight Rooms by Department | Department | afm_hrmxdp |
| Highlight Rooms by Standard | Room Standard | afm_hrmxstd |
| Highlight Rooms by Category | Room Category | afm_hrmxcat |
| Highlight Rooms by Type | Room Type | afm_hrmxtyp |
| Highlight Rooms by Lease | Lease Code | afm_hrmxls |
| Highlight Rooms by Area Range | Room Area | afm_hrmxarea |
This command highlights rooms according to their size, using a different highlight pattern for each range (less than 75 square feet or meters, between 75 and 150 square feet or meters, greater than 150 square feet or meters). As the program highlights the rooms, it displays in the prompt the range by which it is highlighting so that you can note the value that each highlight color represents. If you want to change the definition of the area ranges, edit the values in the afm_hrmxarea function of AFM_HIGHLIGHT.LSP.
Note that running the highlight by owner commands does not determine the hatch patterns and colors that a query uses to highlight asset symbols. To control highlight patterns, you must edit the database. The predefined highlight by owner tasks work with owner tables that contain AutoCAD highlight pattern fields. By-owner queries use each owner record’s specified highlight pattern to indicate asset symbols assigned to this record.
For example, the Departments table provides the Highlight Pattern - Acad field so that you can associate each department with a highlight pattern. The "Highlight Rooms by Department" query uses these patterns to indicate the department to which each room is assigned. To change these highlights, use Web Central or the Smart Client to edit the AutoCAD highlight pattern field of the appropriate owner table. See Defining Highlight Patterns
If an owner record’s AutoCAD highlight pattern field does not define a highlight pattern, the queries ignore asset symbols assigned to this item. There are cases in which this behavior is very useful. For example, you may wish to highlight rooms according to category, but not include rooms whose categories specify that they are non-occupiable, such as rooms devoted to support space or telecom closets. Accordingly, you would not complete the AutoCAD highlight pattern field in the records for these room categories.
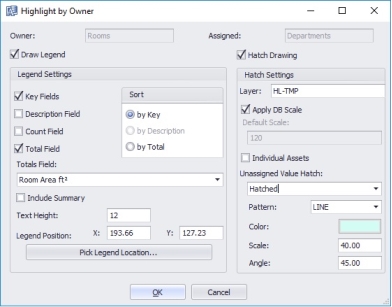
| Hatch Drawing | Select this check box to have the drawing highlight asset symbols by owner. Do not select this option if you want to only quickly draw a legend. If you select this check box, the other hatch drawing selections become active. |
| Layer | Shows the layer on which the program places highlight patterns. The default layer is HL-TEMP. |
| Apply DB Scale | Specify the source of the scale value that is applied during hatching:
|
Sometimes, asset symbols do not have a value for the property by which you are highlighting. For example, you might be highlighting rooms by departmental assignment, and some rooms are not assigned to a department. In this case, you can use Unassigned Value Hatch selections to set a highlight pattern for asset symbols that do not have a value for the field by which you are highlighting. Set these options:
| Unassigned Value Holds |
Complete this with Hatch if you want the commands to highlight asset symbols without assignments. You can then use the Pattern, Color, Angle, and Scale options to set the highlight pattern. If you want the commands to ignore asset symbols without assignments, set this to None. |
When highlighting drawings, you have the option to use the Individual Assets style of highlighting. When you select the Individual Assets option on the Highlight by Owner form, each asset is highlighted individually, instead of grouping hatches that are the same as a single complex hatch. This option makes highlighting more reliable, but slower. Use this option if some highlighting doesn't appear correctly in the drawing.
When you run the highlight by commands, you can select to include a legend in the drawing, and to specify whether or not the asset should be highlighted in the drawing.
Note that this dialog box does not determine the hatch patterns and colors that a query uses to highlight asset symbols. To control highlight patterns, you must edit the database, as described above.
Invoke the desired command, and the Highlight by Owner dialog appears.
| Draw Legend | Select this check box to include a legend that lists the owners and their highlight patterns. When you select this check box, the other legend selections become active. |
| Layer | Shows the layer that the legend is generated on. |
| Key Fields | Check this box to have the primary key fields of the owners included in the legend. |
| Description Field | Specifies whether the Description fields for the owners is shown in the legend. |
| Count | Select this check box to specify that the legend includes a count of the number of assets for each owner. |
| Total Field | Select this check box to include a numeric field in the legend, for example, Area. You select the numeric field from the Totals Field list. |
| Totals Field | Select the numeric field to be included in the legend. This list becomes active if you select the Total Field check box. |
| Include Summary | Select this checkbox to include a summary in the legend. |
| Text Height: | Enter the height to use to display the text in the legend. |
| Legend Position X and Y | Enter the coordinates for the upper right corner for the legend in the drawing. |
| Pick Legend Location | Click this button and the program moves you to the drawing so that you can choose a location for the upper-left corner of the legend block. By default, the drawing selects the upper right corner of the insertion point of an existing legend block. |
| Copyright © 1984-2020, Archibus, Inc. All rights reserved. |