As the inventory parts manager or business process owner for maintenance, you are responsible for setting up inventory procedures to adjust the parts inventory in different locations, and to manage the total stock of parts. You can use the application to monitor the inventory levels at each storage location, and consider this against the need for parts for upcoming and scheduled work requests.
Using the Manage Parts Inventory task, you can manage all aspects of your part inventory, including reviewing all storage location inventories, bulk transferring parts to redistribute them to the locations needing them, creating purchase orders when the part inventory is low, assigning parts to storage locations, and locating parts using a map.
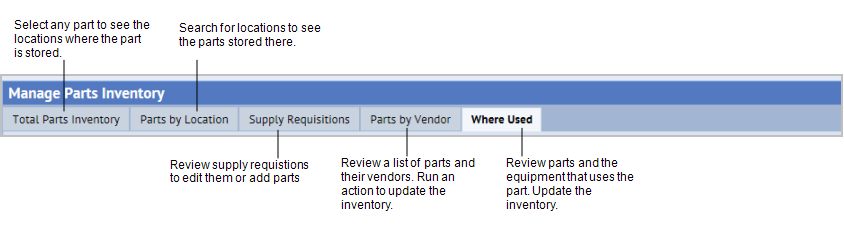
Working from the Manage Parts Inventory task, you access a form with the following tabs:
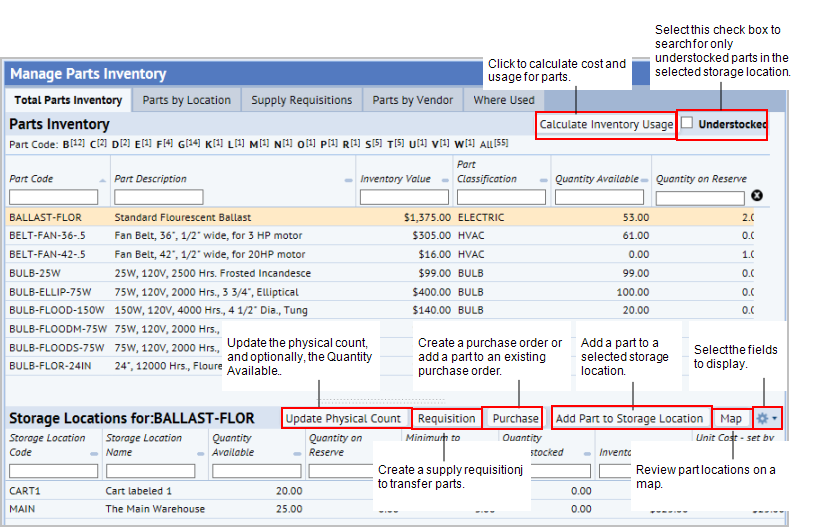
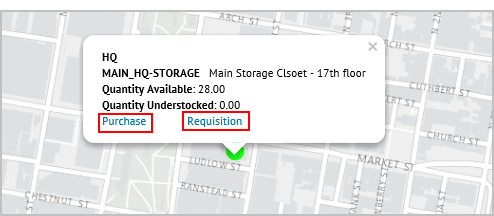
Note: The Total Parts Inventory tab includes the Calculate Inventory Usage action. Running this action is the only way to get accurate values for Understocked Quantity for parts. The values for Quantity Understocked is never automatically updated for any transaction or part usage. Inventory managers can run the calculation from the Manage Parts Inventory view, or the Define Parts view.
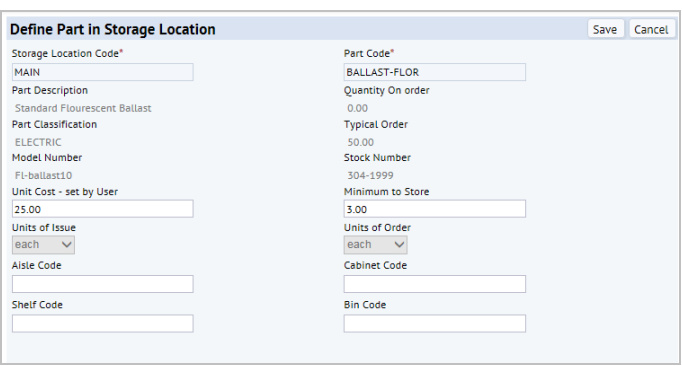
To select the part / location combination you want to work with, you work from the following tabs:
Note: When you work from the Total Parts Inventory tab, you perform actions on one type of part at a time. To perform bulk actions, use the Parts by Location tab.
Note: The only way to get accurate values for Understocked Quantity for parts is to run the Calculate Inventory Usage action. The values for Quantity Understocked is never automatically updated for any transaction or part usage. Inventory managers can run the calculation from the Manage Parts Inventory view, or from the Define Parts view.
Once you have selected a part and storage location to work with, from either the Total Parts Inventory or the Parts by Locations tab, you can perform the following actions:
Note: From either the Total Parts Inventory or Parts by Locations tabs, you can select only one type of part at a time when running the Update Physical Count action.
Select the Parts by Vendor tab to show a report of parts by vendor. The left pane shows a listing of all parts vendors and the right pane shows a listing of all parts supplied by the selected vendor. The report includes key information about each part, including if it is understocked and the average cost usage.
Since craftspersons can update the system with the parts that they used on the job, the Parts pane includes the Calculate Inventory Usage button to ensure the report reflects the latest entries by craftspersons. For information on these calculations, see Calculating Inventory Usage.
You associate parts with vendors using the Define Parts Vendors task.
From the Where Used tab, you can review a list of the equipment that uses a part. The Where Used tab includes the Update Average Part Usage / Year action. This action updates the Average Parts Usage / Year shown on the screen. The Average Parts Usage / Year field is stored in the Equipment Parts table. The Calc. Parts Usage / Year field that is calculated by the Calculate Inventory Usage action is stored in the Parts table. See Calculate Inventory Usage.
To make the association between a part and an equipment item, use the Define Equipment Parts by Equipment task.
When working from the Total Parts Inventory or Parts by Locations tabs, you can select a part, and then assign the part to a storage location using the Add Part to Storage Location action. This assigns the part to that location and creates a record in the Parts in Storage Locations table (pt_store_loc_pt).
When you add the part to a storage location, if the storage location is associated with a room and you have defined subroom locations for the room, you are able to specify the specific cabinet, the numbered shelf, and the bin within the shelf where you store the part. This additional location detail is helpful for quick retrieval of parts, and to facilitate counting the part when doing a survey. You define subroom locations using the Define Subroom Locations task.
The Define Part in Storage Location form for adding the storage location for the part is prepopulated with the selected Part Code, the values for Unit Cost – set by User (pt.cost_unit_std) and the Minimum to Store (pt.qty_min_hand). If necessary, you can modify these values for the new storage location.
If you click on a record in the lower pane of either the Total Parts Inventory or the Parts by Location tabs, you access the Define Part in Storage Location popup form that enables you to edit the Unit Cost -set by user, the Minimum to Store, and the subroom location information.
The Unit Cost - set by User is the typical cost per unit that the application uses to calculate the Inventory Value (pt.cost_total) when you run the Calculate Inventory Usage action. The Inventory Value is shown in the Current Parts Inventory report (Operational Reports / Current Parts Inventory). See Operational Reports.
This form includes the subroom locations fields for aisle / shelf / cabinet / bin. Use these fields to record the specific cabinet, the numbered shelf, and the bin within the shelf where you store the part. You select from the detailed location information you defined using the Define Subroom Locations task. The storage location must be associated with a room to add these subroom locations to it. See Defining Storage Locations for Parts.
From the Total Parts Inventory, or the Parts by Location tabs, you can search for specific storage locations. You can then use the Map button from the Storage Locations pane to see the storage locations on a map.
When you click Map, a pop-up window shows a map of the storage locations that appear in the Storage Location for Part Code list. The map shows a marker for every geocoded building that is associated with a storage locations that contain the selected part. The marker colors represent the status of the selected part in that building
When you click on a marker, a pop-up window displays the Building Code, along with the Storage Location ID, Storage Location Name, the Quantity Available, and the Quantity Understocked of the selected part for each storage location in that building that has a Parts in Storage Locations (pt_store_loc_pt) record for that part.
The popup window also contain links for Purchase and Requisition. These links will close the map window and open the form to add the part to a new or existing supply requisition or purchase order. The form is populated with the selected Part Code and Storage Location.
Copyright © 1984-2020, Archibus, Inc. All rights reserved. |