Defining Rooms
Many Archibus applications require that you have an alphanumeric room inventory. For example, if you are managing maintenance requests, you may will want to associate a maintenance request with a room so that craftspersons know the room to go to, you can bill the room's associated department for the maintenance work, and so forth. You can develop a simple room list using the tasks from the application at hand. Tasks for developing the space hierarchy are often located in the Background Data process of Archibus applications.
You can use the Define Rooms view (ab-sp-def-loc-rm.axvw) to define rooms, as well as sites, buildings, and floors. This view is available in several Navigator locations. The following are the Navigator locations within Space:
- Archibus Cloud / Space / Background Data - Space / Define Locations
- Space / Space Inventory / Room Inventory / Define Rooms
The Define Rooms view operations similarly to the Define Locations view (ab-sp-def-loc.axvw) for developing sites, buildings, and floors. For general information on working with the following components of the Define Rooms view, see these links to the Define Locations view:
- configure fields for the Buildings, Floors, and Rooms tables (proper security required). Fields created with this feature display in the Other Fields section of the Define Rooms view.
Note: If your CAD specialist depicted rooms in a floor plan drawing and linked them to the Archibus database, the CAD specialist may have already completed many of the room fields. In this case, you can use the Define Rooms task to further edit the records. If your site does not develop CAD plans, you can use the Define Rooms task to develop a room list, and your self-service users can work with the Archibus Workplace using a room list only.
Note: When working with the room list in the HQ sample project, you will notice that the list includes many types of areas that you may not consider as rooms. In Archibus, every area on the floor plan is a room: offices, conference rooms, cafeterias, rest rooms, vertical penetrations, circulation area, and so on. Assigning an area on a floor plan a room category determines the type of area it is and whether or not it is occupiable. See Define Room Categories and Room Types.
Developing Sites, Buildings, and Floors
In order to develop rooms, you must first develop the buildings and floors in which they are located (the space hierarchy). Optionally, you can develop the site on which the building is located. You can develop this information using the Define Locations view or the Define Rooms view. For details on sites, buildings, and floors, see Define Locations (Sites, Buildings, Floors).
Developing Room Classification Validating Data
When developing a room list, you may wish to classify your rooms. Once you define these classifications, you can choose these values when completing the corresponding fields of the Rooms table. Archibus offers two methods of classifying your rooms; you can classify your rooms by either or both of these methods:
Developing a Room Plan in CAD
Often, sites wish to have a floor plan with rooms so that they can graphically see the location of accidents, maintenance issues, risk issues, and so forth. In this case, users purchase the Space Inventory application and use the Room Inventory process to develop a room plan and inventory by using CAD to depict their rooms in floor plan drawings. This room inventory and room plan can then be used with other Archibus applications.
For information on developing a room plan, see Draw Rooms.Be sure to save your room plan as an enterprise graphics file so that you can access the room plan in mobile and Web Central.
Once you develop room asset symbols in CAD (which links the boundary lines to Room records), you can use the below method to edit the Room records, if necessary.
Developing Rooms in the Database
Use the Define Rooms view to enter rooms in the database or edit existing Room records.
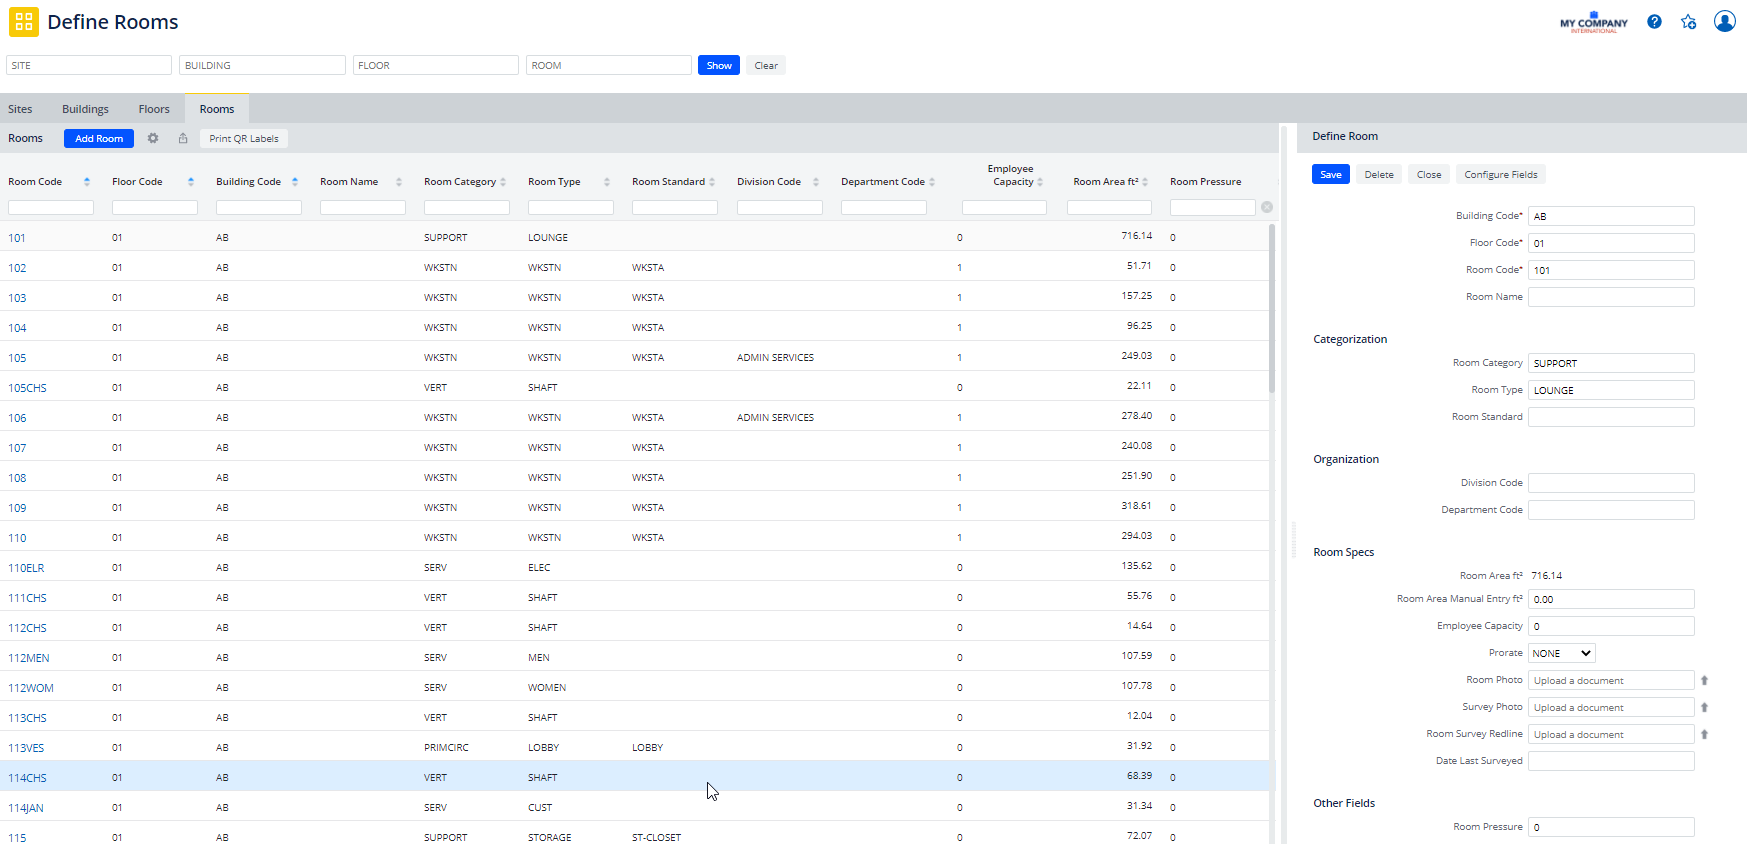
- In the Navigator,
choose the Define Rooms task (
ab-sp-def-loc-rm.axvw). This tasks are available from several locations on the Navigator. - Move to the Rooms tab. If necessary, review the existing rooms using the smart search console.
- Click Add Room.
- In the right pane, complete the following
fields and Save when completed. Minimally, you must complete Building Code, Floor Code, and Room Code. If you are not a space manager and do not know exactly how this room is used or how your site charges for it, you can retain these fields with their default values. Many of these fields are used only by the Space Inventory application, so it is not essential that you complete them if you are not working with that application.
Field Description Building Code The building and floor in which the room is located. The system completes these fields with the values you selected from the drill down list.
Note that if your rooms derived from CAD, you should not edit this information from Web Central. Since the room exists on a floor plan drawing that represents a specific floor within the building, the building and floor assignments should be changed in the CAD environment.
Floor Code From the list of floors for the selected building, choose the floor in which this room is located. Room Code Enter a value, that when combined with Building Code and Floor Code, will uniquely identify this room. Room Name If desired, enter a descriptive name for the room, such as North Conference Room. Categorization Room Standard Choose a room standard to classify this room. Room standards focus on the dimension of the room. See Define Room Standards.
Room Type
Room CategoryTo distinguish rooms as occupiable or non-occupiable, complete these fields by choosing from the existing lists.
See Define Room Categories and Room Types for information on setting up the values from which you can choose
Organization Division Code
Department CodeEnter the division and department to which this room belongs by choosing values from the lists of defined divisions and departments.
See Define Departments for information on setting up the values from which you can choose.
Room Specs Room Area If this room is represented in CAD, the system completes this field with the value from the polyline in the CAD floor plan. You cannot edit this value. This value is used in several area calculations. Room Area Manual Entry If you are creating a room list, enter the size of this room in square feet or meters. To have the system use this value in its area calculations, you (or someone at your site with access to this task) must run the Update Room Area from Manual Area action.
If the room is represented in a CAD drawing, the area is already recorded in the Room Area field and you can leave this field empty.
Employee Capacity Set the number of employees that can be housed in this room. You may want to do this in bulk:
For rooms that have an employee capacity of 1, you can automatically complete this field based on the room type. See Set a Room's Employee Capacity to One Occupant Based on Room Type.
Prorate This field describes how the system charges for the use of this room and is used with the Space Inventory application. Typically, this field should be completed by a space manager who is familiar with operations at your site. If you are not sure how your company charges for this room, leave this field blank. Room Photo Once you save a new record, the system activates this field so that you can upload a photo or other document pertaining to the room and attach it to the record.
Attaching a photo is particularly useful for rooms that are reservable because self-service users running the Archibus Workplace can see the photo of the room when choosing the room they want to reserve. See Uploading and Viewing Documents.
You can upload only one photo or document for each room.
Survey Photo
Room Survey Redline
Date Last SurveyedThese fields are used in conjunction with the Space Occupancy & Survey mobile app. In the mobile app, users can attach photos and redlines of the rooms that they encounter during the survey. Other Fields This section holds additional fields that your site has added to the view using the view's Configure Fields option.
QR Code Room Labels
You can print QR Code labels for your rooms, using the Print QR Code Labels button, located next to the Export icon. For information, see: