Sustainability & Risk / Compliance / Compliance Program Coordinator
Manage your Compliance Requirements
From the Compliance Program Coordinator / Manage My Compliance Requirements task, you can manage requirements for which you are listed as the Responsible Person.
Note: You cannot work with contract terms from this task.

Working from this task, you can:
- Update information for the requirements assigned to you.
- View the locations associated with the requirement. Locate the requirement, click Select in the row for the requirement, and then select the Locations tab.
- Update the Event Status. Having up-to-date statuses entered ensures that reports based on status are accurate.
- Review documents added for the requirement and add new ones.
- Review communication logs added for the requirement, and add new ones.
- If the event status is Completed, Completed-Verified, Closed, Cancelled, Stopped, or Rejected, you cannot further edit the questionnaire. You can review the completed answers. See Completing the Questionnaire in Web Central. Note that you cannot add new questionnaires from this view.
Note: The application prevents non-compliance in the form of performing events early (for example, you cannot perform mandated, periodic inspections or maintenance before it is scheduled). For example, if you manually edit an event and enter a date earlier than the specified date range, the event will not show in the queue of the assignee or in the Compliance mobile app. If a manager wants to allow earlier performance of a task, the correct approach is to widen the gap between scheduled start and date due.
To update requirements
To update requirements:
- Select the Compliance Program Coordinator / Manage My Compliance Requirements task.
- If needed, use the Filter console to locate the requirement.
- Click select in the row for the requirement.
The Define Requirement tab becomes active.
- Several fields are not editable. Update the following information as needed:
- Compliance Level Code: Select the description for the degree of compliance this requirement has achieved. You can generate multiple reports filtered or grouped by the compliance level to target the requirements that put you at the greatest risk of noncompliance. Keeping this selection up-to-date is critical to generating accurate reports.
- Requirement Status: Select the current status for the requirement. The status of a compliance program requirement changes as it passes through its lifecycle. When the Compliance Program Manager creates a requirement, by default, its status is set to Active, but you can change the status to On Hold, Completed, Completed - Verified, or Closed.
- Date Expire/Renewal: Select the date when this requirement (for example, license, permit, or certificate) expires or needs renewal.
Notes: Enter any notes documenting your activity for this requirement.
Reason for Hold: If you changed the Requirement Status to On Hold, you can enter the reason for doing so here.
- Click Save.
To complete a questionnaire
- If needed, use the Filter console to locate the requirement.
- Click Select in the row for the requirement.
- Select the Questionnaires tab.
To update Event Status
As you complete events, you will need to update event status.
- If needed, use the Filter console to locate the requirement.
- Click Select in the row for the requirement.
The Define Requirement tab becomes active.
- Select the Events tab.
The grid shows a list of Scheduled events for the compliance location.
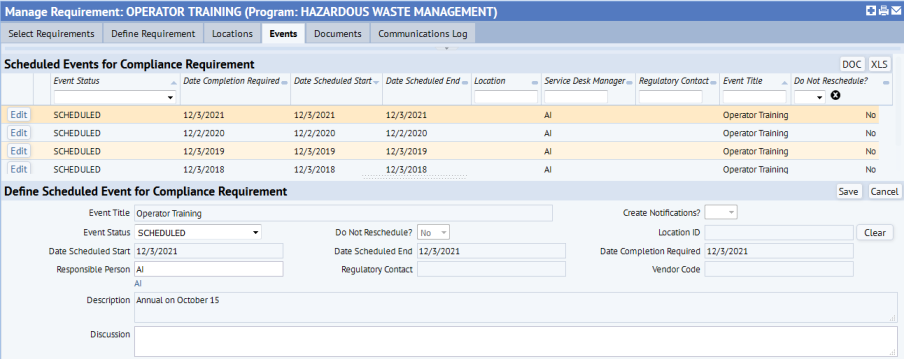
- If needed, use the Filter console to locate the event.
- Click Edit in the row for the event.
- In the Define Scheduled Event for Compliance Locations pane, select the current status for the event from the Event Status list.
- Click Save.
To add a document for a requirement
- If needed, use the Filter console to locate the requirement.
- Click Select in the row for the requirement.
- Select the Documents tab.
- Click Add New.
- Enter the following information
Document Name
Enter a name that identifies the document. Description Enter text that identifies the document to users. The Description appears in selection lists to help users identify the document.
Document Category/Document Type Select a document category and type to describe this document. If you select a category and type for the document, these can be entered as search criteria to help you quickly locate the document. Your Business Process Owner defines the categories and types from which you choose. Document Folder Select a folder for the document so that you can search for it by folder, or locate it by drilling down in a selection list of folders and subfolders. Using Document Folders is especially useful for generic documents, such as best practices, that are not associated with a single record, and that might even be used across applications. However, you can associate any document, even those associated with a specific record, with a Document Folder to facilitate locating it.
Once you drill down to a folder and select it, the field displays the last folder in the path; it does not display the entire folder hierarchy.
Your Business Process Owner defines the folder structure.
Document Author Enter the name of the person who wrote the document, or the name of the organization that published the document.
Document Name Enter a unique name to identify the document. Date Document Enter the date the document was published or written, or another critical date. For example, when adding documents using the Compliance application, you could enter the invoice date, bill date, or the issued date for a permit or license when adding a document. For Health & Safety, critical dates might be the training date, or the issued date for personal protective equipment. When users search for documents using the Date Document From and Date Document To fields, the application selects records for the restriction based on the document's Date Document.
Document Review Group
Select the security group that is allowed to view this document. If you leave this field empty, any user who has access to this task can view the document. Document Notes
Enter any additional notes that describe how this document is used. For example, enter a document abstract, or enter a custom tag that you define to make locating this document easier by entering this tag in the Document Notes field in a Filter console.
Description Enter a description of this document, for example, to describe how it is used. - Do one of the following:
- To save the record and add a new one, click Save and Add New. The record is saved, and the form refreshes by clearing the values you entered so that you can add a new record.
- To save the record, click Save.
- Check in the document: After you save the document information, the Document fields now has the Check In New Document button, an up-arrow next to the Document field.

Click this button to access the dialog to locate and select the document. After selecting the document, click OK in the dialog. See Working with the Document Management System for more information.
After you select the document and click OK in the dialog, the document is stored in the Archibus document management system, and it is associated with the regulation, compliance program, requirement, event, or location you selected.
To add communications logs
- If needed, use the Filter console to locate the requirement.
- Click Select in the row for the requirement.
The Define Requirements tab becomes active.
- Select the Communications Log tab.
- Click Add New.
- Enter the following information.
(missing or bad snippet)
- Do one of the following:
- To save the record and add a new one, click Save and Add New. The record is saved and the screen is refreshed, clearing the values you entered so that you can add a new record.
- To save the record, click Save.
- Associate a document with the communication log
You can add a document for this communication log.
To add a document file, you must first save the record. After you save, the Check In New Document button appears next to the Document field. Use this button to browse for the file. You can then view the document from the record by clicking the Show Document button next to the Document field. For more information, see Using the Document Management System.