Archibus Cloud / Space / Space Manager / Space Console
Space / Space Inventory / Space Manager / Space Console (non-transactional)
Space / Occupancy / Manager / Space Console (non-transactional)
Highlight Rooms in your Floor Plan by One Property
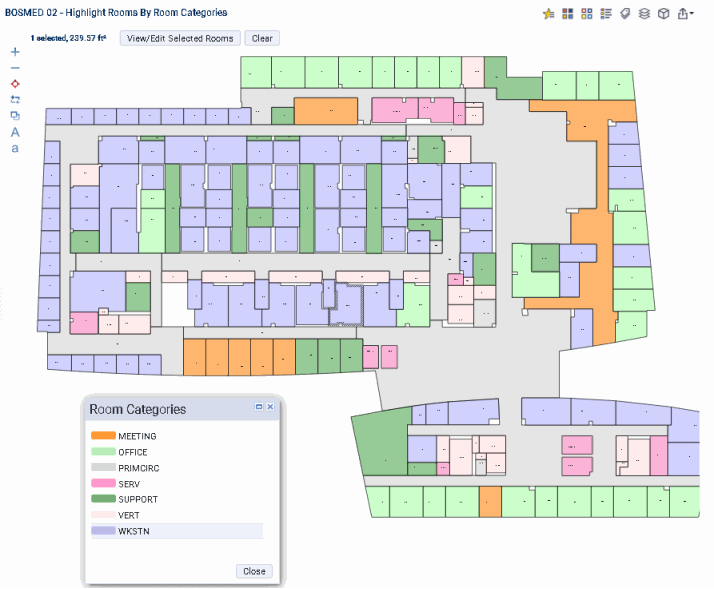
It is often useful to see rooms in a floor plan highlighted by various properties, such as department assignment, vacancy status, or room type. Visually seeing a room on the floor plan, its access to other features of the floor, its adjacent rooms, and so forth, can help you make better decisions about how you use your rooms. The following image shows a room plan highlighted by room category. The legend lets you know the category that each color represents.
The Space Console offers two types of highlights:
- a solid-fill highlight fills in each room with the color associated with the room's value for the property by which you are highlighting
- a border highlight outlines the border of the room with the color associated with the room's value for the property by which you are highlighting
Although both solid fill and border highlights are available, when highlighting by one property it is recommended that you use the solid fill highlight. Use the border highlight when you want to highlight by two properties; that is, highlight by solid fill and then highlight by border highlight to show a second property.
Use the following buttons to access the highlight and legend features.
![]()
Show the Legend for the Highlight Color
To determine the value that each color represents, you must display the legend, using the Legend button. Click the Legend button, and the system displays a legend listing each value and its associated color. You can move this legend to anywhere on the screen, as shown in the above image.
Additionally, for properties that are listed in the Space Console's tabs, you can make this property the active tab in the left panel. For example, you can show the Room Categories tab when the drawing is highlighted by Room Category. You can consult the tab to see the values that the highlight colors represent, as well as see information such as room count or total area for each category.
Procedure to highlight by one property and include a legend
- Load the Space Console and set a filter as desired.
- Click the selection boxes for the drawings you wish to load.
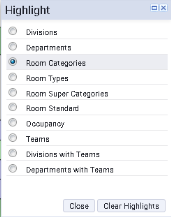
- Set the property for which you want to highlight by selecting the Highlight option in the floor plan ribbon and choosing an option from the list.
- On the floor plans, the system solid-fills rooms according to the colors associated with the values of this property. Areas without colors do not have a value for this property.
- Show the legend by selecting the legend button from the ribbon. Place the legend at your desired position on the screen.
Highlight rooms of a particular value
In addition to highlighting the floor plan by all values, such as all departments or all room categories, you can show rooms of a particular value of the floor plan. For example, you might want to highlight only the rooms of a particular department and then export this floor plan and provide it to the department manager.
To highlight rooms of a particular value, you first select the Highlight option from the ribbon and then select the particular value from the Space Console's tabs. For example, in the below image the user has selected Division from the ribbon's Highlight command and then shown only the Admin Services division by clicking on ADMIN SERVICES in the Organizations tab. The floor plan has highlighted in pink (the color for ADMIN SERVICES) all rooms associated with this division.
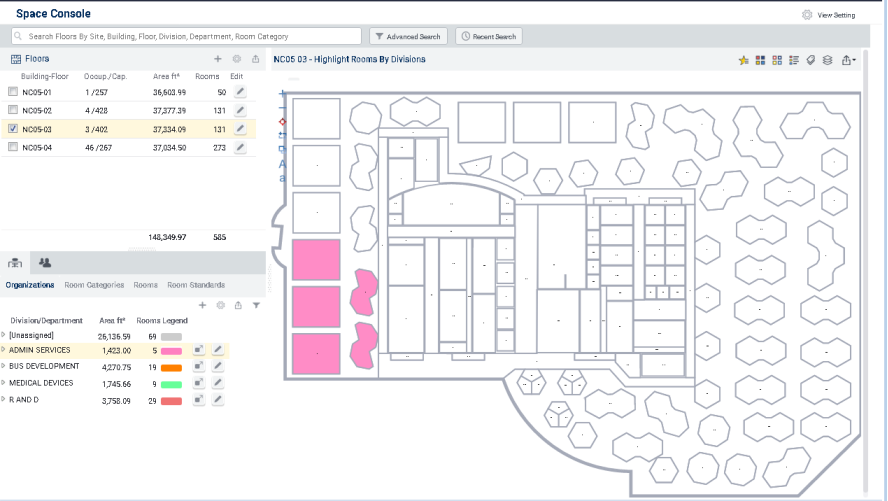
You can select multiple items in the tab to have the floor plan display multiple values. For example, in the above image you could click on BUS DEVELOPMENT to show those rooms along with the ADMIN SERVICES rooms.
If you choose to display a legend, it reflects the selection set. For example, if BUS DEVELOPMENT and ADMIN SERVICES are both selected, the legend shows only these two entries.
To remove an entry from the selection set, click on it. For example, if BUS DEVELOPMENT and ADMIN SERVICES are selected and highlighted in the drawing, clicking on ADMIN SERVICES deselects it and removes the pink highlight from the drawing.
To clear all selections, invoke the Clear Selection command from the Gear icon in the grid. The Space Console removes the selection and returns you to the highlight made from the ribbon's Highlight command.
![]()
Note: You can achieve the same result of highlighting fore one particular value by using Advanced Search. For example, if NC05-03 were displayed and you used Advanced Search to search for the ADMIN-SERVICES division, the floor plan would produce the same highlight as shown above. This is true only is searching on one value; that is to say, if you used Advanced Search to search for ADMIN SERVICES and BUS DEVELOPMENT, the floor plan would not produce a highlight. Likewise, searching on multiple fields does not produce a highlight.
Note: This same behavior applies when working with a border highlight. However, it is recommended to use the solid highlight when highlighting by one property.
Example
For an example of this behavior, review this sequence:
- Load a floor plan, such as NCO5-03.
- In the ribbon, select the Highlight option and choose to highlight by Room Category.
- The floor plan highlights all rooms on the floor plan according to the associated color of their assigned room category.
- In the Details pane, display the appropriate tab that corresponds to your selected highlight. For example, if highlighting by room category, select the Room Categories tab.
- In the appropriate tab, click on a value in the grid, such as the SERV room category. The drawing clears the current highlight (showing all room categories) and highlights just the rooms of the SERV room category.
- If you want to now show another room category on the floor plan, click a second room category, such as MEETING. The floor plan now shows rooms of the SERV (pink) and MEETING (orange) room categories.
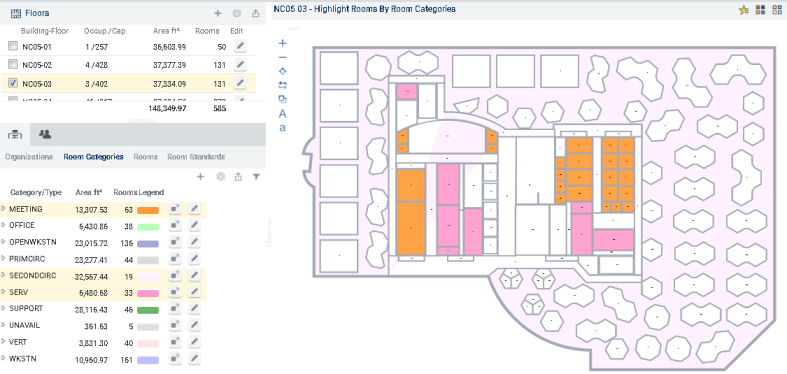
- Display a legend by choosing the Legend button from the floor plan ribbon. Note that the legend reflects your current selection of SERV and MEETING.
- To deselect a selection, click on it. For example, click on MEETING in the grid and the floor plan shows just SERV rooms. You can turn on MEETING again by clicking it again.
- To clear all selections and return to the Highlight by Room Category selection, invoke the Clear Selection command from the Gear icon in the Room Categories tab. The floor plan highlights rooms by all categories.
Next Steps
- You may want to highlight the drawing by an additional property, such as showing department assignments and vacancy status on one query. For information, see Highlight a Rooms in your Floor Plan by Two Properties.
- You may want to provide labels for each room. See Label the Rooms on the Floor Plan.
- For examples of typical one-highlight queries, see Review Rooms on a Floor Plan by Division or Department and Review Rooms on a Floor Plan by Use.
- You may want to export the highlighted floor plan and legend to Word or PDF so that you can share it with others. See Export Highlighted and Labeled Floor Plans to Word or PDF and Export and Print Floor Plans