Smart Client
Setting Drawing Preferences
You can select drawing preferences by selecting Set Up / Preferences from the Ribbon Toolbar.
The Preferences form from which you select user and drawing preferences appears.
Note: The preferences you set from the Smart Client apply to the Extension for AutoCAD, and do not apply to Revit. The one exception is the Update CAD on Grid Change setting, which applies to both the Extension for AutoCAD and the Extension for Revit.
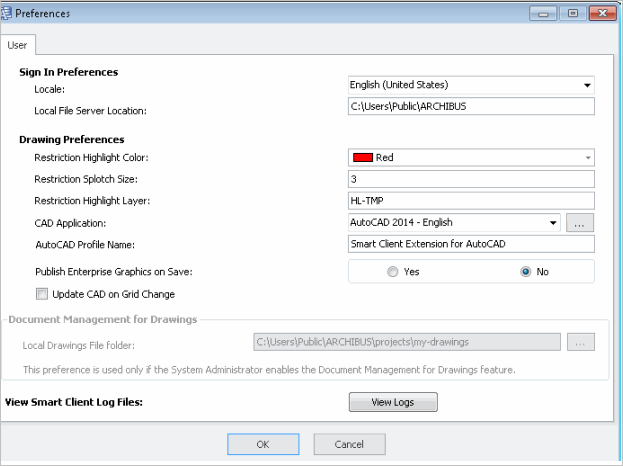
The form presents the following types of preferences:
- user preferences for sign-in. See Setting Sign-In Preferences.
- drawing preferences, which control the behavior of your CAD application
- preferences for controlling Document Management for Drawings. The Document Management preferences are available only if your system administrator has enabled Document Management for Drawings. See Document Management for Drawings.
Both types of preferences are per-user preferences that are applied to the current user only.
Pay particular attention to the CAD Application preference listed below. This determines the drawing environment you will use and is required to access your CAD drawing tool.
Note: This release does not support Layer template preferences. To set these preferences, use the AutoCAD layerstate command instead.
Procedure: Setting drawing preferences
To set drawing preferences:
- Select Setup / Preferences from the Ribbon toolbar.
The Preferences dialog appears.
- Enter your drawing preferences using the following descriptions as a guide, and click OK.
| Option Name | Description | Default Value |
|---|---|---|
| Drawing Preferences | ||
| Restriction Highlight Color |
Select the AutoCAD color to be used when fill-highlighting assets that meet the Archibus restriction. |
The default is Red (255, 0, 0). |
| Restriction Splotch Size |
Enter the size (in feet) of the “splotch” circle placed behind small assets to highlight them in cases where a “fill” type highlight would not be visible. The program uses splotches on any asset that is less than the “splotch” size. Note: The size is always given in feet. The program converts to meters when displaying the splotch on metric drawings. |
Default: 3 feet. |
| Restriction Highlight Layer | Enter the layer of the drawing to use to hold temporary restriction highlights. |
Default: HL-TMP |
| CAD Application | Select the CAD application to use if there is more than one on the workstation. |
Archibus offers the following drawing environments for editing CAD drawings: The environment that you use depends upon the program that you purchased. |
| AutoCAD Profile |
The AutoCAD profile name that Archibus uses when starting AutoCAD from the Drawing List and the Find In Drawing command. If you use the Drawing List dialog from within AutoCAD, the program ignores this preference and drawings will open inside the open version of AutoCAD. |
Default: None |
| Publish Enterprise Graphics on Save |
Select Yes if the program should always publish to enterprise graphics all active drawing publishing rules whenever the drawing is saved. |
Default: No |
| Update CAD on Grid Changes |
Note: This setting applies to both the Extension for AutoCAD and the Extension for Revit. Controls whether changes made in the Smart Client grid are automatically updated in the BIM model or CAD drawing, if currently open. The Smart Client syncs renamed identity fields (for example, the Room Code or Equipment Code) and model-driven values. The Smart Client respects the setting on model-driven values -- those that should always originate from the model -- and does not update those values. If enabled, the following rules dictate if the CAD drawing is updated or not.
|
|
| Document Management for Drawings | ||
| Local Drawings File Folder | If your site is using Document Management for Drawings, you can optionally set this preference to specify the location on your local drive to which the system will check out drawings for you to edit. To remind you of the location to which it will check out drawings, the Check Out dialog displays the path that you set with this option. | C:\Documents and Settings\All Users\Archibus\projects\my-drawings |