The Report Problem form appears.
 , click this button, and select a requestor from the list of employees.
- Remove the selection from Use your assigned workspace location.
- Mouse over the Location row to show the Select Values button , and click the button next to the Building field.
The form to select a building appears. From this form, you can review the available locations. If you want to add a new one, click Add New.
The form to add a new building appears.
- Enter up to 8 letters, numbers, or characters to identify the building. The Building Code is a shorthand way for the system to identify the building.
- Enter up to 25 characters for the Building Name.The Building Name is longer, and can therefore be more descriptive.
- Click Save,
The Building you entered appears in the Report Problem form, and it will be available for selection from now on when you report problems.
Tip: If you want to add a floor or a room, you would follow the same steps a through e above, but you would select the Select Values button for the floor and the room to add each of these.Alternately, you can use the Define Locations task to add locations ahead of time. See Defining Locations
Tip: If you have a floor plan for the location that you have connected to ARCHIBUS, after selecting a floor, click Drawing. The application loads the drawing. Click on a room in the floor plan to select it. See Developing your Space Inventory.
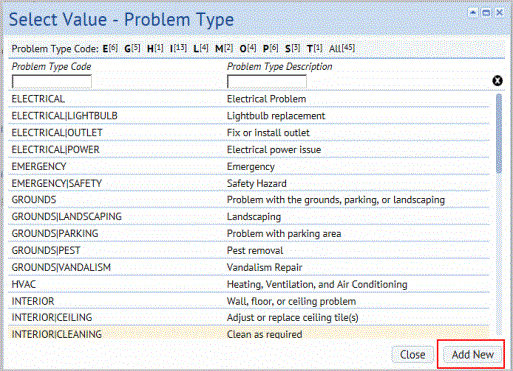
- To see if the problem already exists, click View All Problem Types.
- The Select Value - Problem Type form appears. Problems are reported in two levels, a broad category and then a specific type within that category. This helps to easily locate related problems, and to clearly define the problem. This form lists all problems already defined.
- Select the Problem Type.
The Report Problem form appears filled in with your selection. Your single selection fills in both levels of the problem.
Tip: Although the Problem Type is not required, entering it enables you to generate reports, such as Open Work Requests by Problem Type and Status. You will also have the option of filtering reports, such as Part Usage History by problem types for specific problem types.
Need to add a new problem? Click here for steps.- Description The description provides details on what needs fixing, so that the craftsperson can better understand the problem, and can bring the necessary tools and parts. As you type, any descriptions that have been entered as background data, and that match your typing appear. Click on one of these descriptions to enter it in the form, or continue typing to enter your new description. You can enter a new description by typing, but only descriptions that have been entered as background data are saved for future selection. The Description is required. If you wan to add descriptions that will be available for future selection, see Adding Problem Descriptions as Background Data.
- Problem Types. The application ships with common problems types that you can select when reporting work. If needed, you can add to this list by using the Add New button. Although the Problem Type is not required, entering it can be an easy way to clarify what the problem is, and enables you to generate reports that help you evaluate your work by its type. For example, the Open Work Requests by Problem Type and Status report enables you to review how many work requests are open for each type of problem, helping you evaluate which types of problems are most frequently occurring, and which are creating bottlenecks.
- From the Quick-Start navigation page, select Operations Console.
- From the top of the console, click Report Problem.
The Report Problem form appears.
- In the Problem section of the screen, click View All Problems.
- The Select Value - Problem Type form appears.
- At the bottom of the form, click Add New.
The Add New Problem Type form appears.
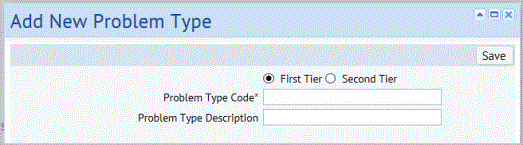
- You can do one of the following:
- To add a new top -tier category for problem types:
- Select the First Tier option button,
- Enter the Problem Code (unique identifier for this top-category problem.)
- Enter the Problem Description ( a fuller description of the work that would fit into this category.)
- Click Save.
- To add a new second tier description for an existing first -tier category:
- Select the Second Tier option button.
- Mouse over the First Tier field, and click the Select Values button .
- The Select Value form appears.
- Select the First Tier for the problem.
- When you make the selection, the Add New Problem Type form appears filled in with your selection.
- Enter the Problem Type Code for the second tier. For example, for a Leak first-tier category, you might enter Toilet. The Problem Type Code is required.
- Enter the Problem Description. This helps users further when to select this problem.
- Click Save.
- To add a new top -tier category for problem types:
- The Report Problem form appears with the Problem Type filled in with the Problem Type you defined.
Click here to see the steps for adding problem types.The application comes with commonly encountered problem types found in the Quick-Start sample data. These Problem Types are preserved even after you have deleted the sample data, so they are available for you to work with as you add your own data. If you find that you need additional problems, you can add them directly from the Report Problem form as you work.
Problems are added as two tiers. The first tier is the broad category that the problem fits into. The second tier is a more specific description. Having two tiers means that similar problems are shown together in the list, so you can readily see all the possibilities when making your selection.For example, by having Leak | Ceiling and Leak | Faucet, you see both choices for describing a leak.
To add a new problem type:
Select from a list:
- Click Select Description.
- The Select Value list of Problem Descriptions appears.
- Select a Description from the list, and the Report Problem form appears filled in with your selection.
- Type the Description.
- Click in the Description box and type your description.
- As you type, any previously entered descriptions that match your typing appear.
- Click on one of these descriptions to enter it in the form, or continue typing to enter your description.
To add a new problem description, see Defining Problem Descriptions.
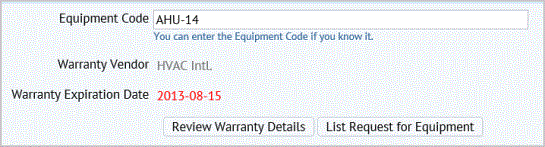
When you select equipment, if the equipment has warranty information entered for it, the warranty vendor and expiration date appear on the screen. You can click Review Warranty Details to see more information, including contact information if it has been entered. If you click List Request for Equipment, a form appears listing any open requests for work for this piece of equipment.
A message gives you the ID number for the work request. You can make a note of it to identify the request, but you can also search for the request by problem type, location, and the date submitted..
The console appears with the request grouped with Approved requests.