The Number form appears.

If the selected Category is a Revit family, and there is more than one family type for that category in the current view, then use the ellipsis button … to the right of the drop down list to select family restrictions. The check box is read-only. If it is unchecked, there are no family restrictions. If it is checked, there are one or more family restrictions enabled.
Note: If there is only one family in the current view, it will automatically be included in the element filtering.
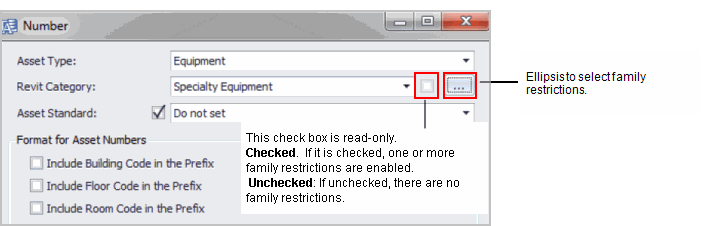
- Click the ellipsis button (… ) to access the Options form for clearing or selecting family restrictions.
- The Options form appears. The form shows all existing families and family symbols for the specified Revit category in the current view.
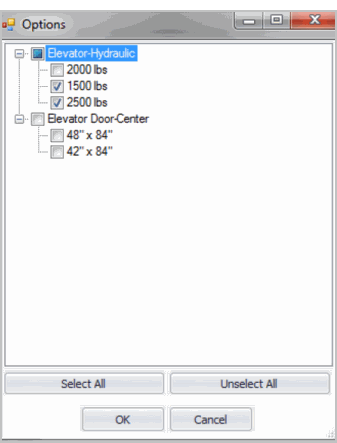
- Select the specific family and family symbol processes. Your selections are used for filtering the Revit elements in the current view that will be allowed to be numbered.
- Click OK. The check box in the row for the Revit Category in the Number form reflects your selections. If you have selected some restrictions, the check box is now selected.
- If checked: Displays only already used Asset Standards for the selected Revit Category. This is the default.
- If unchecked: Displays all possible Asset Standards from the database.
- Select to include the building, floor, or room codes as prefixes for the number, by selecting their check boxes.
- Prefix: Assign a prefix to all numbers. If you specify a prefix of "RM-" and a start number of "0001", the first generated number will be "RM-0001", the second "RM-0002", and so forth.
- Start: Enter the number at which you want to start numbering.
- Suffix: Assign a suffix to all numbers. If you specify a suffix of "a" and a start number of "RM-0001", the first generated number will be "RM-0001a", the second "RM-0002a", and so forth.
- Size: Enter a number to specify how many digits the generated number have. For example, if you enter "1" in the Start field and "4" for this option, the first number will be "0001
- Increment: Enter the increment between numbers. If
you set the increment as "4" and the start number is "0001",
the second number will be "0005", the third "0009",
and so forth.
Notes:
If the Room Code is checked, since the actual Room Code is not known until individual assets have been numbered, the Sample will display <RoomId> as a placeholder for that value.
If the selected Asset Type is 'Room', then the Room Code check box is disabled.
The displayed sample value, which is a concatenation of Building Code, Floor Code, Room Code, Prefix, Start, Suffix, and Size values, is color coded to indicate whether or not the length of the string is greater than or equal; to the maximum number of characters allowed for the selected Asset Type. The color coding is as follows:
Black if the length is OK.
Orange is displayed if the length is too long and the Room Code is included as part of the sample. This is because the actual Room Code is not known before the numbering is processed, and the color coding is meant as a warning. When numbering under this condition, Asset Codes that are valid at the time of numbering will be processed; otherwise, the invalid ones are ignored.
Red is displayed if the length is too long (and the Room Code check box is not selected). The OK button will be disabled as the Asset Codes are > than the maximum length for the selected Asset Type.
- Select Single
- Select Multiple
- Select Rectangle
- Current View