
Once SDS and product information has been entered into the system (using the Define Materials and Safety Data Sheets (SDS) task), you can assign the product to the location within the facility and enter the quantity of product found at this location. Each time that you receive a new shipment of a hazardous product and distribute it to various locations in your building, you can use this task to update each location's quantity information and the date it was received at this location.
Having locations associated with hazardous products can be beneficial in determining potential hazards for emergency response personnel or for planning activities that may take place there. For example, if you are planning to rehabilitate a lab space, it is helpful to know the hazardous products stored in this lab. Also, if you generate hard-copy binders for each location, you will know which SDSs to include in the binder for each location.
If you have the ARCHIBUS Hazardous Materials mobile app, you can periodically survey your facility to check your quantities at each location and upload the field results to the SDS system where you will see them in this view. Similarly, if you are just getting started tracking your hazardous products, you can start your electronic inventory by surveying the facility and uploading the data.
Note: If you have floor plan drawings, you can associate products with locations using the Assign Products to Rooms Using a Floor Plan task. The floor plan-based task is handy for assigning one product at a time, assigning products that do not need to be detailed to the subroom level (aisle, cabinet, bin, shelf), and for graphically showing the location of the product on the floor plan.
This topic has the following sections:
Select the Environmental & Risk Management / Hazardous Materials / Manage -SDS / Assign Products to Locations task.
The view shows a list of products on the left and a list of locations on the right. Each lists includes:
For example, suppose you want to assign the same SDS to three rooms in building HQ, two rooms on Floor 1 and one room on floor 15. Use the pop-up console to select building HQ, select floors 1 and 15, and click Show. Now you can select the individual rooms in the location grid.

With this filter, you can filter by two levels. Suppose that you are assigning liquid nitrogen, and it is manufactured by five different companies. One site might get that product from Manufacturer X and another site uses product from Manufacturer Y. The pop-up filter can be used to find all the liquid nitrogen and you can then select in the Smart Search console just Manufacturer X to make the assignments to location A. Next, you can clear the console filter and select only Manufacturer Y for the location B assignments.
Both the SDS and the Location pop-up consoles provide select value dialogs. If you are unsure what to type in the Smart Search console, you can use the pop-up console to select a value from the list.
You may want to see all the products already entered for a particular location You can do so using the Show Assignments at Selected Locations button. Those assignments will appear in the grid at the bottom of the screen. For example:
Use the SDS consoles to display the SDSs that you want to assign to locations. From this list, select individual SDSs by clicking in the check box next to the SDS. Select all of the displayed SDSs by clicking the select all box in the column heading.
Use the Location consoles to display the desired locations. From this list, select individual locations by selecting the check box next to the location. Select all of the displayed locations by selecting the check box in the column heading. You can locate a product container at any level of the hierarchy -- from site all the way down to shelf. Typically, you will want to document the exact location of extremely hazardous products so that you know exactly where to find them in the event of an emergency. For more information on locations within the room, see Define Subroom Locations.
For example, a printer may use a cartridge that is considered to be hazardous. You can associate the cartridge's SDS with the specific printer within a room by choosing the record listing the printer. The following steps illustrate how to do this using the HQ sample data.
Example steps:
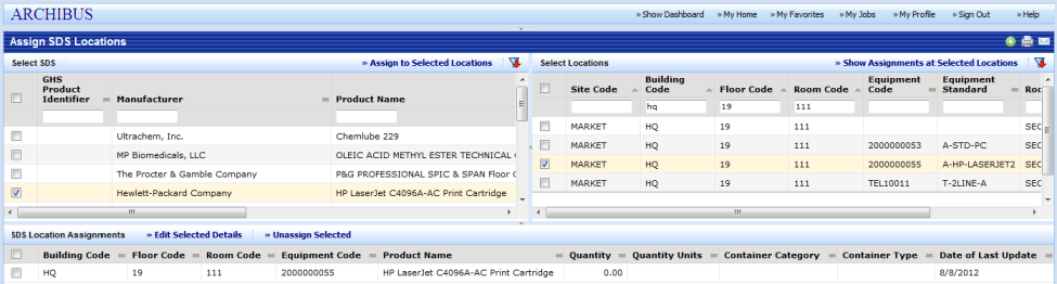
Once you select the SDS and the locations, you are ready to make the assignments. Click Assign to Selected Locations, and the system assigns all of the selected SDSs to the selected locations. This result will be displayed in the grid on the bottom of the form.
Note: If you want an SDS assigned to an entire floor, use the Smart Search console filter to isolate that particular floor; select the check box at the top of the column to select all rooms; then click "Assign to Selected Locations."
After you have assigned the product to one or more locations, you can add details about the product. After you execute step 4 above, the Location Assignment panel (the bottom panel) will list all the locations that have this product assignment. You can now apply the same set of details to all of these records:
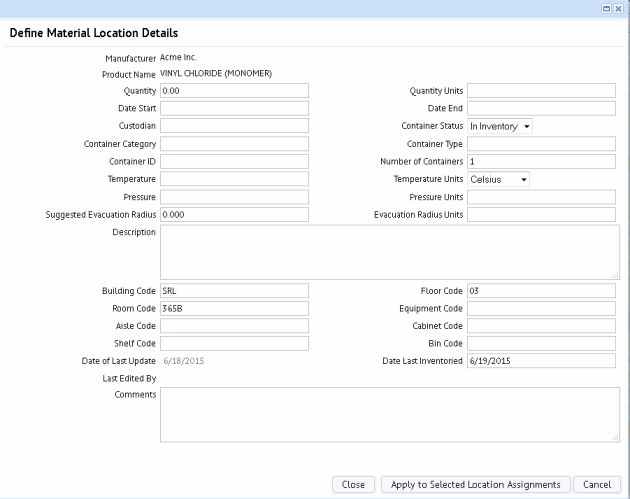
Repeat this process as necessary to record the details for all products at all locations. For example, if all information except Custodian is the same for the product at all locations, you can select all records and follow the above procedure, being sure to leave Custodian blank. You can then go back to complete the Custodian field for each set of records for which the custodian is the same.
Note: It is not possible to assign more than one container type to a location. If you need to segregate the location data by container type, create separate SDSs for each container type and assign each of those SDSs to the location.
Note: There is one caution with this type of multiple assignment capability: it is possible to view dissimilar products in the Location Assignments grid. If you select multiple products that are different, and attempt to edit their details, you will receive a warning.
Note: If you assigned a material to a room using the floor plan, you could specify the location only to the room level. If you wish to specify aisles, cabinets, shelves, or bins you can edit these items using the Define Material Location Details form
Use the SDS consoles to display the products of interest. If needed, refine the selection by selecting individual products (click in the check box next to the SDS), or select all of the displayed products by clicking the check box in the column heading.
Use the Locations consoles to display the desired locations. You can refine the selection by selecting individual locations (click in the check box next to the location), or select all of the displayed locations by clicking the select all box in the column heading.
Display the SDSs assigned to the selected locations by clicking Show Assignments at Selected Locations. Those assignments will appear in the grid at the bottom of the screen. Select the locations from which to remove the SDS and click Unassign Selected.
| Field | Purpose |
|---|---|
| Manufacturer Product Name |
(Read Only) The manufacturer and name of the product. These values come from the SDS. |
| Quantity | The actual quantity of the product stored at this location. |
|
Quantity Units |
The measurement units for the above quantity to be applied to the quantity, such as ounces, grams, or tons. |
| Date Start | Date the product came to this location. The system uses this to calculate Days On-Site in the Chemical Constituent Inventory report. |
| Date End | Date the product no longer at this location. The system uses this to calculate Days On-Site in the Chemical Constituent Inventory report. |
| Custodian | From the Employees table, choose the person who is responsible for taking possession of this particular product and handles any issues related to it. The custodian must have been previously added to the Employees table. |
|
Container Status |
If you use the Hazardous Materials mobile app to survey your materials, you will complete this field as part of the audit process with Disposed, Mission, or In Inventory. If you are not performing an audit, retain the default In Inventory value. |
| Container Category | Category of the container used to store the product at this site. |
| Container Type |
Type of container used to store this product. Note: The quantity associated with the container type together with the number of containers is used to calculate total quantity(volume) for the Chemical Constituent Inventory report. |
| Container ID | If the container holding the substance is identified, enter the identifying value into this field. Note that the Container ID field is a free-form field and is not validated. |
| Number of Containers | Number of containers at this location with the above Container ID. |
| Temperature | Temperature at which the substance will be stored at this location. |
| Temperature Units | Units of measure for the temperature. |
| Pressure | Storage pressure |
| Pressure Units | Units of measure for the pressure |
| Suggested Evacuation Radius | The distance to evacuate in case of emergency with this item. |
|
Evacuation Radius Units |
Units of measure for the evacuation radius (meter, mile, foot, yard). |
| Building, Floor, Room, Aisle, Cabinet, Shelf, Bin | Use these fields to specify the location of the product. For careful tracking of hazardous materials, you may want to specify the specific location in the room using the Aisle, Cabinet, Shelf, and Bin fields. For information, see Subroom Locations. |
| Description | Description of the product. |
| Comments | Enter any additional notes. |
| Date of Last Update |
The system automatically completes this with the day that you update the product location record. If you are using the Material Assessment mobile app to update the data with field results, the system will automatically complete this field with the system date of the mobile device when you sync. Note that this date can be different than Date Last Inventoried because you can update data from the field without necessarily running an audit. |
| Date Last Inventoried | If you are using the Material Assessment mobile app to survey your substances, the system automatically complete this field with the date that you chose as the Inventory Start Date when using the mobile device. |
| Copyright © 1984-2019, ARCHIBUS, Inc. All rights reserved. |