Space & Occupancy Survey mobile app

Conducting Space and Occupancy Surveys

To determine how space is actually being used, discover inconsistencies, and monitor project progress, facility managers conduct space surveys -- site visits in which space auditors in the field note current space and occupancy use.

While in the field, auditors can use the Space & Occupancy Survey mobile app to access and update key space and occupancy information directly from their mobile devices. With the Space & Occupancy Survey mobile app, they can:

Procedure

  1. If they haven't already, the auditor runs the Download Data and Download Plans actions so that they have basic facility data on their mobile device. For information, see Download the Space and Occupancy Inventory to the Mobile Device.
  2. On the mobile device, the auditor drills down through sites and buildings and locates the floor for which they want to generate a survey. The floor plan loads, showing room boundaries and room numbers.
  3. The auditor taps Survey and the system displays the Start Survey button in the upper right corner. The auditor taps Start Survey, and the auditor enters a name for the survey.
  4. The auditor taps the Plan Types button in the upper left corner and scrolls through the list to choose the plan type that the floor plan should display. Choose the Survey plan type so that you can see rooms highlighted by their survey status. For example, in the below image all rooms are highlighted in yellow because they have not yet been surveyed.
  5. The system displays the survey commands in the drop-down menu in the upper right corner of the Rooms Survey screen.

  6. The auditor pulls up the room information for a room that they will visit with one of these methods:
  1. The auditor visits the room, observes conditions, and compares actual conditions to those listed on the form. The auditor can then take the following actions:

    If the room ... The auditor can ...
    matches the data on the device 
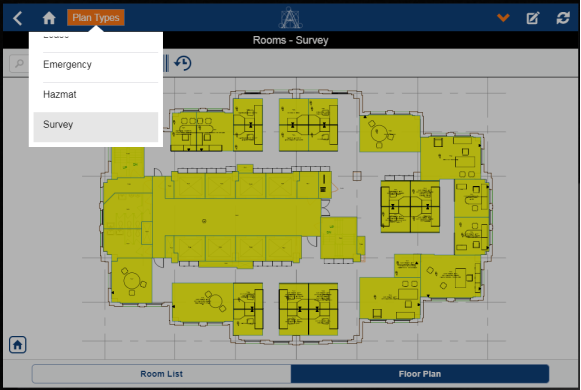
tap Complete in the upper right corner. The system returns the auditor to the floor plan or room list so that they can select another room.
    does not match the data on the device and workspace transactions are not being used make the correction by changing the data on the mobile device. For example, if the room actually has a different capacity or department then recorded in inventory, the auditor can correct the values in the top part of the Room Survey form.
    has a different employee occupancy than listed on the device change this using the Survey Employee section of the Room Survey form. See Surveying Occupancy.
    for a particular time period or a particular portion of the space, has a different room category, room type, division, or department than listed on the device (transaction-based inventory, only) change this using the Survey Departments and Survey Categories sections of the Room Survey form. See Surveying Rooms with Multiple Category and Department Assignments.
    requires further text notation enter comments about the room in the Survey Comments field.
    requires notation in the form of a picture

    capture an image of the room using the Photo button in the top left corner.

    Once the image is captured, the system prompts the auditor to attach it to the survey. The system then updates the Documents button at the bottom of the from to show that a photo is attached. For more information, see Viewing Documents and Saving Photos as Documents.

    requires notation in the floor plan drawing. For example, you want to indicate on the drawing a room that has no department assignment. add notes about it directly to the floor plan drawing by using the redline feature. This entails:
    1. Selecting the Redline button to access the floor plan for the current item.
    2. Using the redline tools (located on the left-hand side of the drawing) to add notes to or mark up the floor plan.
    3. Saving the changes. The system prompts you for the room to which to attach the floor plan, saves the floor plan with edits as a PNG file, and stores this in the Survey Redline field of the room record. You can view the PNG file using the Documents button (shown above).
    4. If the surveyor finds they need to note additional information for this item, they can use the Documents button to access the PNG file. When the system displays the PNG file, it includes the redline tools so that the surveyor can further notate the floor plan drawing.
  2. Once the auditor is satisfied that the data on the form matches the conditions in the room, they tap Complete in the upper right corner.
  3. At any time during the survey, the auditor can run the Sync Survey action to upload to the server their survey changes and documents to date. The system will update information displayed in Survey plan type when you sync.
  1. When the auditor has visited all rooms on this floor (that is, when all rooms on the floor plan or room list are highlighted in orange), they choose the Close Survey action. The system then:
Copyright © 1984-2019, Archibus, Inc. All rights reserved.