Archibus Cloud / Foundations / Background Data
Define Room Categories and Room Types
To track the major purpose of a room and to specify whether it is occupiable by personnel, you must assign the room a room category and optionally refine the category with a For example, on your floor plan you designate areas as holding vertical penetrations, offices, circulation areas, conference rooms, and so on by assigning each area a room category and room type.
Use the Background Data / Define Room Types task (ab-ess-def_rmtype.axvw) to initially establish your room categories and room types, and edit these classifications as needed.

Once you define room categories and room types, you will assign them to rooms using the Space Console. Taking the time to clearly designate rooms according to room category is an important step in developing your space inventory because:
- The Room Category table holds the Occupiable? field. This field tags a room as housing employees and is used by many views and procedures, such as move procedures that find available space for a department or employee based on if a room's category is occupiable. Generally speaking, it is a “best practice” to categorize your space in room categories to take advantage of accurate occupancy information.
- The Room Category table includes the Super Category field, which classifies an area as Usable, Vertical Penetration, Service Area, or Other. This is important for calculating a floor or building's area statistics, which are presented by space reports.
Before entering room types in the database, there are a few decisions to make based on practices at your site:
- Is classifying your rooms by room category is sufficient, or do you want to further classify room categories according to room type?
- For example, in the sample HQ database, the Laboratory room category is further divided into room types, such as Dry Lab and Wet Lab.
- When creating a room using the Background Data / Define Rooms task, you must specify both a room category and a room type; that is to say, Room Type is a required field. However, if your site does not need the further classification of room type, for each room category, you can create one room type that has the same properties as the room category. You can then choose this room type when creating a room.
- Does your site comply with an industry standard, such as OSCRE or GSA? If so, you can use the task's buttons to import a set of room categories and room types that are based on industry standards. For information, see To use industry-standard room categories later in this topic.
This topic has the following sections:
Tip: When working with the Define Room Types task, you can take advantage of several actions, such as exporting data and changing the displayed fields. For details, see Working with Archibus Forms.
Note: For information on the Update Room Capacities button, see Setting Room Capacity based on Room Type.
Tip: When working with the Space Console to assign room categories and room types to rooms on the floor plan, you may find that you want to edit the properties of these items, such as change the highlight color. Rather than return to this view to make the edits, you can edit these items directly from the Space Console. On the Space Console's Room Categories tab, use the Add New and Edit features.
To see a category's room types
- Load the Background Data / Define Room Types task.
- The left panel lists all the room categories in your organization.
- Click on a room category
- The right panel lists the room types assigned to the selected room category, as well as a total of the area for the room types of the selected room category.
- To return to the complete lists of room categories and room types, click Show All in the Room Types panel.
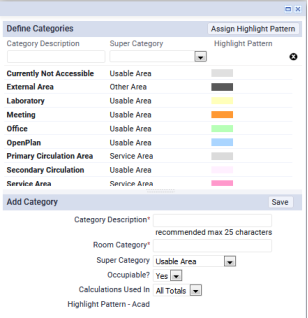
To edit a room category
- Load the Background Data / Define Room Types task.
- The left panel lists all the room categories.
- Choose the Edit button in the upper right corner.
- The system displays a form listing the room categories. Click on a room category.
- The bottom of the form lists the values for the room category. Complete the values as follows:
| Category Description |
Enter a descriptive name. |
| Room Category |
Enter the value that uniquely identifies this category. This value, combined with Room Type Code values, will identify types assigned to this category. |
| Super Category |
Indicates to the system that areas of these categories are , , or . In the Space Console, managers can highlight a drawing by super-category for an overview of how the floor is divided into Vertical Penetration, Service, and Usable Area without the details of the categories and types within these super-categories. Choose from the available values:
- Vertical Penetration -- If the room category will be assigned to areas representing vertical penetration, choose this value from the drop-down list. You will want to set Occupiable? to No.
- Service Area -- If the room category will be assigned to areas representing service areas, choose this value from the drop-down list. Depending on operations at your site, a service area can be either or .
- Usable Area -- If the category does not represent vertical penetration area or service area, you will want to complete this field with Usable Area. Set Occupiable? to Yes.
- Other-- used by sites following IFMA or BOMA standards. See IFMA and BOMA Standards for information.
|
| Highlight Pattern - Acad |
This is the color by which you will highlight in floor plan drawings rooms of this category. Each category should have a its own color so that you can clearly distinguish the rooms of each category on highlighted floor plans.
There are two methods for setting the highlight pattern:
- Complete the Highlight Pattern - Acad field. Choose the Pick Color button to access a form for choosing a highlight color. The form offers many options for highlight patterns; typically, you will want to set a pattern of solid and then choose a solid color. If you have fewer than eight categories, you can set the color by choosing one from the Color: Name option. Otherwise, click a color on the True Color option and choose a color from the popup. When creating a new room category, you must first save the room category. Once you do so, the Pick Color button appears.
- Have the system automatically assign it. You can have the system automatically assign highlight colors to your room types and your room categories. Use the Assign Highlight Pattern button (available on the Edit form) to replace the existing highlight patterns with system-generated patterns. You can then change these assignments if necessary by editing the Highlight Pattern - Acad field.
Once you set a color, the Edit Category form lists the color's AutoCAD number in the Highlight Pattern - Acad field. When you save the Define Categories form, the highlight color displays next to the category.
For more information on highlight colors, see Defining Highlight Patterns.
|
To create a new room category
- Load the Background Data / Define Room Types task.
- The left panel lists all the room categories.
- Click the Edit button in the upper right corner.
- The system displays a form listing the existing room categories, and a section for creating a new room category.
- Complete the form according to the above table.
- In order for the Pick Color button to appear for setting the highlight pattern, you must first save your record. Then, you can assign the highlight pattern using the Pick Color button.
To use industry-standard room categories and types
If your site follows industry standards such as GSA or OSCRE, you can import a set of room categories and room types that follow these standards. For information on the provided industry-standard types, see Importing Industry-Standard Room Categories and Types.
- Delete all the records in the Room Types and Room Categories tables. To do this, select the room category to delete and click the Edit button. On the pop-up form, click Delete to delete the room category. Any room types assigned to this room category (shown in the right pane) will also be deleted.
- In the upper left pane, choose the Import Room Categories and Types button.
- Select a button such as OSCRE or GSA, and the form lists an explanation of this standard in the left pane. In the right pane, the form lists all the room categories and room types that will be imported.
- Click Import to import this set of standards into your project.
- Typically, you will not want to change these industry-standard records. However, if necessary, you can change the default highlight patterns of the imported records.
To edit a room type
Room types further classify room categories, such as the Laboratory room category having Dry Lab and Wet Lab room types. As mentioned above, if your site does not require this type of classification, for each room category, create a room type that has the same properties as its room category.
- Load the Background Data / Define Room Types task.
- Select the room category to which the desired room type belongs.
- The view displays the assigned room types in the Room Types panel,
- Click anywhere on a Room Type record.
- The system displays an edit form listing the values for this room type.
- Complete the values as follows:
| Description |
Enter a descriptive name. |
| Room Type Code |
Enter the value that when combined with Room Category Code uniquely identifies this room type. |
| Room Category |
This will be filled with the room category that you selected in the left pane. If you wish to change the room category, click the field and choose a room category from the list of existing room categories.
If you don't see the room category in the list, you can create it using the Room Categories panel on the left.
|
| Highlight Pattern - Acad |
This is the color by which you will highlight in floor plan drawings rooms of this room type. Each room type should have a its own color so that you can clearly distinguish the rooms of each room type on highlighted floor plans.
If you will highlight by room category or by super category only, you can leave this field blank.
There are two methods for setting the highlight pattern:
- Complete the Highlight Pattern - Acad field. Choose the Pick Color button to access a form for choosing a highlight color. The form offers many options for highlight patterns; typically, you will want to set a pattern of solid and then choose a solid color. If you have fewer than eight types, you can set the color by choosing one from the Color: Name option. Otherwise, click a color on the True Color option and choose a color from the popup. When creating a new room type, you must first save the room type. Once you do so, the Pick Color button appears.
- Have the system automatically assign it. You can have the system automatically assign highlight colors to your room types. Use the Assign Highlight Pattern button to replace the existing highlight patterns with system-generated patterns. You can then change these assignments if necessary by editing the Highlight Pattern - Acad field.
Once you set a color, the Edit Room Type form lists the color's AutoCAD number in the Highlight Pattern - Acad field. When you save the Edit Room Type form, the highlight color displays next to the type.
For more information on highlight colors, see Defining Highlight Patterns.
|
To create a new room type
- Load the Background Data / Define Room Types task.
- In the Room Categories pane, choose the room category to which you want to add this room type. Or, click Show All in the Room Types panel to see all room types regardless of the room category to which they are assigned.
- Click the Add Room Type button in the upper right corner of the Room Types pane.
- Complete the resulting form as directed in the above table. The Room Category Code will be pre-filled with the room category that you selected. You can change this value if you wish.
- In order for the Pick Color button to appear for setting the highlight pattern, you must first save your record. Then, you can assign the highlight pattern using the Pick Color button.
To delete a room type or room category
- Load the Background Data / Define Room Types task.
- In the Room Categories pane, click the room category you want to delete;
- To delete a room category, click the Edit button. In the resulting form, click Delete. All room types assigned to this room category will also be deleted. Confirm that you want to delete the record.
- To delete a room type, click the room category to which the room type you want to delete belongs, and click the room type you want to delete.
- In the resulting Room Type form, click the Delete button.
To model open space with workstations
Your facility may have open plan with individual workstations. The OPEN PLAN and WORKSTATION room categories in the sample HQ database can be used for this situation. You can develop similar room categories for your own data, or find corresponding categories in the industry-standard set that you imported. For information on how to work with these categories, see Open Plans with Workstations.
| Copyright © 1984-2020, Archibus, Inc. All rights reserved.
|