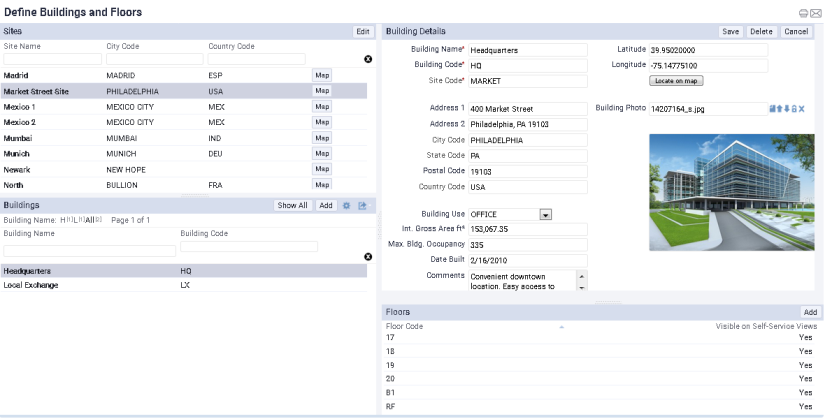
Space is typically organized by sites, which house buildings, which in turn house floors, which in turn can house rooms.
Sites group together multiple buildings located in a contiguous area, such as a Market Street site that contains three office buildings. If your company wants to report on and organize space inventory according to a buildings located in the same area, you will want to develop sites. If you do not have multiple buildings located in the same area, you likely will not need the site level. In this case, there is no need to develop sites, as buildings can exist independently of sites.
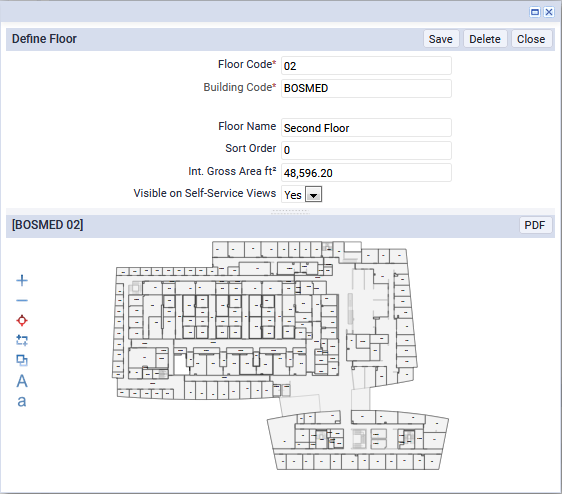
Floors, on the other hand, cannot exist independently of buildings. A floor is identified by its unique combination of Building Code and Floor Code, such as HQ-17 for the 17th floor in building HQ.
Once you define your sites, buildings, and floors in the database, you can connect them to CAD floor plans.
Use the Background Data / Define Buildings and Floors task (ab-ess-def-bl-fl.axvw) to work with your buildings and floors.
This topic has the following sections:
Tip: When working with the Define Buildings and Floors task, you can take advantage of several actions, such as exporting data and changing the displayed fields. For details, see Working with Archibus Forms:
If your organization does not track sites, you can create a placeholder site record with minimal values, such as NO SITE. You can then choose this record for the Site Code field in the Buildings table.
| Field | Explanation |
|---|---|
| Site Name | Enter a descriptive name for the site. |
| Site Code | Enter a unique value, such as Market, that describes this site and uniquely identifies it. |
|
Country State City |
Click on the ellipses buttons to choose an existing value. For information on completing fields for which you choose existing values from a database table, see Completing Validated Fields. |
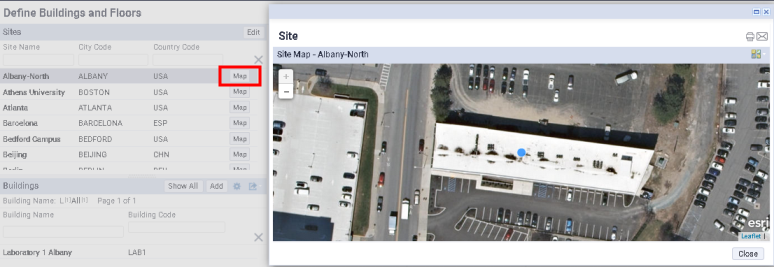
To set up a site map, you must complete the Longitude and Latitude fields of the Buildings table for the buildings located on this site, as described below. If you do not complete these fields, the Map button shows a map using the lowest level of the geographic information of the site. For example, if you specified only a state for the site, and not a city, the map shows the state. If you specified a city, it zooms to the city.
| Field | Explanation |
|---|---|
| Building Name | Enter a descriptive name for the site. |
| Building Code | Enter the value that uniquely identifies this building. The value that you enter will be used as part of the identifier for floors and rooms in this building. For example, a value of HQ for the Headquarters building contributes to the identifying values for floors (HQ-17) and rooms (HQ-17-101). |
| Site Code |
Enter the site on which this building is located. You must complete this field. If your organization does not track sites, you can create a placeholder Site record and then select it for this field. If you have selected a site in the left panel, the field is completed with this value. You can change this if you wish. |
|
Country State City |
Click on the ellipses buttons to choose an existing value. For information on completing fields for which you choose existing values from a database table, see Completing Validated Fields. |
| Building Use | Choose a value that describes how this building is used. |
| Internal Gross Area | Enter the internal gross area of the building (doesn't include walls). |
| Max Building Occupancy | For your reference, enter the maximum number of occupants of this building. |
| Date Built | Enter the date the building was constructed to use as a reference. |
| Comments | If necessary, enter general comments about the building. |
| Latitude/Longitude |
If you are creating a new building, these fields become available once you save the record. The Site panel's Map button uses this information to present a site map with building markers. Other reports, such as the Locate feature for service requests, also use this information. There are a few ways to complete these fields:
To use the Locate on Map button:
Note: Geocoding processes are often approximate. They compute coordinates by interpolating street addresses along lengths of road which might not be the location you want to specify. Additionally, some addresses return no valid results at all, not even acceptable approximations. For these reasons, you might want to override and refine the geocoded results by using the Locate on Map button. |
| Building Photo |
If you are creating a new building, this field becomes available once you save the record. Upload a photo of the building in this document field. For details on document fields, see Using the Document Management System |
Floors are identified by the values of the Building Code field plus the Floor Code field, such as JFK-01 for floor 01 in building JFK.
| Field | Explanation |
|---|---|
| Floor Code | Enter a value for this field that when combined with the Building Code will form a unique value, such as 01. |
| Building Code | Will be completed with the name of the building that you selected, |
| Floor Name |
Enter a description of this floor. |
|
Sort Order |
For use with stack plans, the sort order determines the order in which the stack plan presents floors. The stack plan sorts first by this field and then by the Floor Code value; thus, if this field does not have a value, fields are sorted by the Floor Code. |
| Internal Gross Area | If you are not depicting your floor in a CAD drawing, you can manually enter the size of the floor in this field. The Space calculations will use the value that you enter. If you are developing this area in a CAD drawing, the system will complete it with the size of the internal gross area. |
| Visible on Self-Service Views | Determines if the Archibus Workplace or kiosk displays this floor. |
| Copyright © 1984-2020, Archibus, Inc. All rights reserved. |