![]()
![]()
The exported files will be in the following folder: "C:\Users\Public\Archibus\projects\users\afm\dt." Notice, there is a folder containing the image files, as well as a .csv file:
Some Archibus tables include image files (for example, eq.survey_photo_eq, bl.bl_photo, afm_redlines.html5_redlines, activity_log.doc4 ). This topic describes exporting and importing those files using Data Transfer.
Note: For general information about Data Transfer, see Data Transfer Overview.
When importing new images, the record that contains the image is not updated unless a field has been modified. If you are importing an image that has the same name as the original image file, the new image is not recognized as being a change. For this reason, in the examples given below, the Option 2 field is exported and modified to ensure that the record is updated. Any field can be used for this purpose, as long as you are not using the field, so that modifying it does not cause problems.
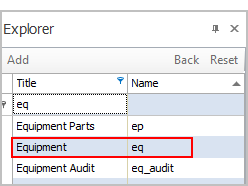
This procedure uses the example of transferring an image out of the Equipment (eq) table.
![]()
![]()
The exported files will be in the following folder: "C:\Users\Public\Archibus\projects\users\afm\dt." Notice, there is a folder containing the image files, as well as a .csv file:
This example uses the “eq” table to demonstrate the process for transferring image files into Archibus. You may opt to transfer the data and images in via the Database Update Wizard, or by data transferring using Smart Client or Web Central. Both methods are described below.
Required files include
Note: The version of the image file may need to be changed. If you are importing document files that do not currently exist in the database, then all versions of the images should be "1" (for example, survey_photo_eq^745361111494^1^ahu.jpg). If there is an existing document (photo) in the database, the version must match the latest version in the afm_docvers table. In the example just given, if after the import, the latest version number is 2, you would need to change the image file name from "survey_photo_eq^745361111494^1^ahu.jpg" to "survey_photo_eq^745361111494^2^ahu.jpg".
The CSV file must be named the table name (for example, "eq.csv"), and the folder containing the images must be the table name (for example,. "eq").
![]()
The Data Transfer Wizard appears.
The Server File field fills in with the name of the csv file you moved in step 2.
Click Begin Transfer.
![]()
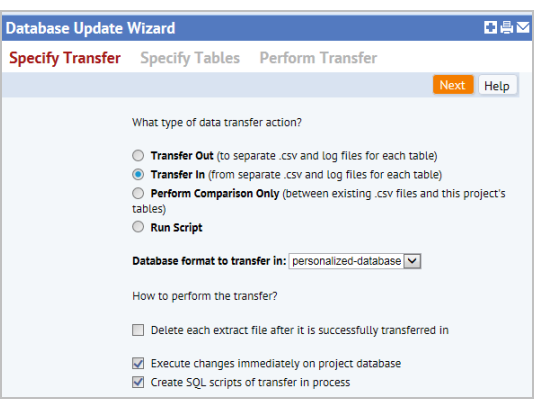
The “Transfer In” action of the Database Update Wizard may also be used. to transfer in the image files.
Archibus System Administration/ Add-In Manager / Run Database Update Wizard.
The Database Update Wizard appears.
| Copyright © 1984-2020, Archibus, Inc. All rights reserved. |