The Navigator organizes the data development and reporting tasks of a particular facilities management business area. Use the Navigator to access the data development tasks, reports, charts, and floor plans required for your particular role in the organization.
The Navigator is available in Web Central, Smart Client, and the Smart Client Extension for AutoCAD, although the appearance varies in each program. In all programs, it presents a hierarchy for accessing data and tasks.
Within each environment, the Navigator displays a set of tasks unique to that environment. For example, the Smart Client Navigator focuses on data entry, and the Web Central Navigator includes both data entry and reporting tasks. Similarly, the Navigator in CAD includes common CAD commands and tasks for working with asset symbols.
Administrators can customize the content of the Navigator by working with the tables that define the Navigator, such as afm_ptasks. For information, see Navigator Tables (System Management Help).
This topic has the following sections:
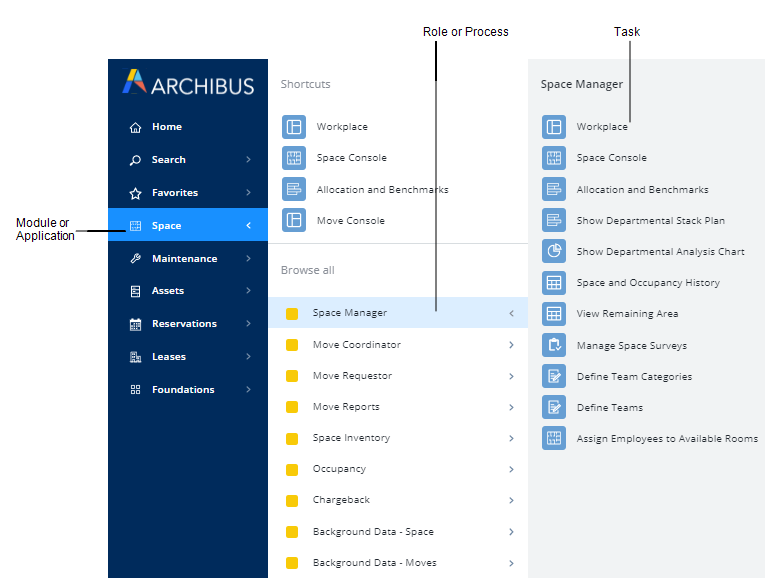
In Web Central, the Navigator resides in the side-bar navigation panel, which also houses a Search feature and Favorites list.
You move through the hierarchy by selecting items from slide-out drawers.
Note: As an alternative to the Navigator, Web Central offers the Accessibility Navigator, which presents tasks in a manner that is consistent with the requirements of assistive software, such as with keyboard-only controls and text-based input and output. The Navigation option of My Profile command (available from the User menu) determines whether you receive the Accessibility Navigator or the default Navigator.
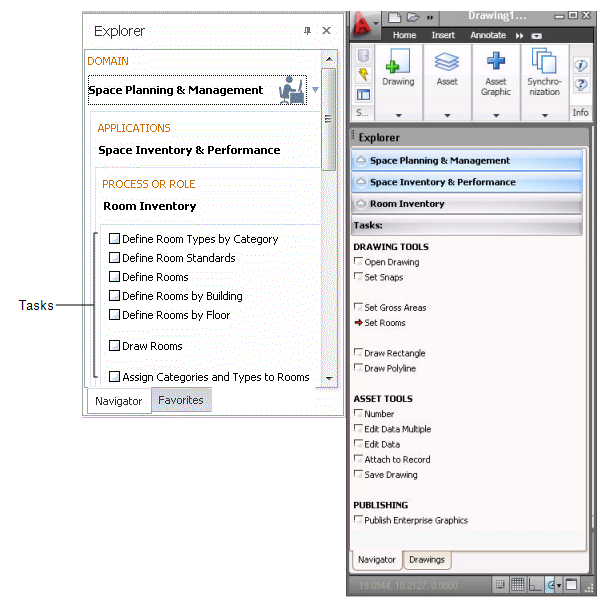
In Smart Client and the Smart Client Extension for AutoCAD, the Navigator appears as a tab within the Explorer window. You drill down vertically through applications and processes (roles) to reach tasks.
In the Navigator in CAD, note that tasks do not load views; instead, the Navigator presents as tasks the asset commands and CAD commands that you will find convenient for working with asset symbols in CAD plans. For example, the Navigator for the Room Inventory process lists commands for working with polylines and converting them to asset symbols.
When you work with the Navigator, you move through the following hierarchy:
The Navigator provides a structure for developing and presenting data in an organized, easy-to-follow manner, based on your role within the company. Typically an administrator will configure the Navigator so that it presents only tasks that are appropriate to your role within the organization. For example, the Navigator in the Smart Client Extension for AutoCAD presents only tasks for the CAD specialist role, such as tasks for setting drawing layers, highlighting drawings, and generating enterprise graphic files.
The above image of the Navigator in Web Central illustrates the use of roles:
Your Navigator typically include different processes and tasks than that of your co-workers. This approach helps you focus on just the tasks required for your job or role, providing an efficient environment for data development and management.
Note: The Navigator in Web Central minimizes mouse clicks when you are assigned only one process or one task. If you are assigned only process, the Navigator displays a panel with your tasks as soon as you select the module; since you have only one assigned process, the Navigator does not need to display the list of processes. For an example of this, sign in as AFM-CLI. Likewise, if you are assigned only one task, the Navigator immediately loads the task when you select the module. For an example, sign in as AFM-CLI and select the Maintenance module.
To access a particular task, drill down through the Navigator and click on the application or module, the process (or role), and then the task. If you have only one application or process, the program will select it automatically for you. Clicking on a task loads the form or report you need; this is also known as a view into the data. For information, see Loading Tasks (Views) from the Navigator.
Once you load a task from the Navigator, you can reclaim the screen space that the Navigator occupies.
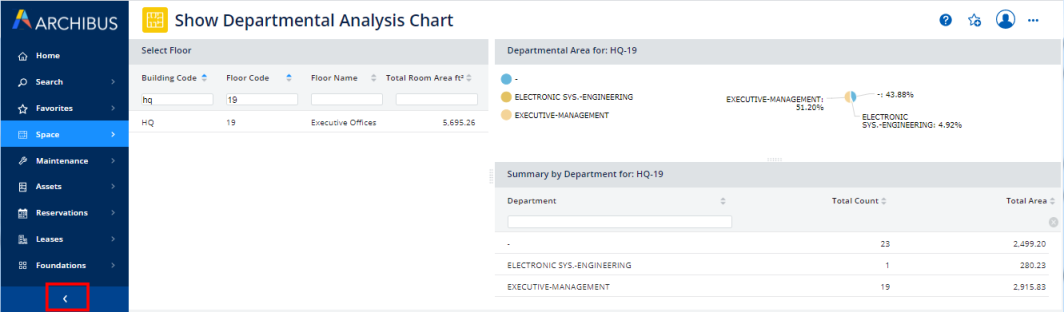
Once you select a task, the Navigator loads the view, collapses the Task drawer and Process drawer, but retains the side-bar navigation panel. For example, in the below image the user moved through the Navigator to select the Space / Space Manager / Show Departmental Analysis Chart task.
You can minimize the side-bar navigation panel using the "less than" symbol (<) located at the bottom of the side-bar navigation panel.
You can hide the Explorer window, which houses the Navigator, by click the "x" button in the upper right corner of the Explorer pane.
Redisplay it by choosing the Show button from the Navigator ribbon.
From the Role or Process level, you can access help topics specific to this role or process. For complete information, see Using the Help System.
| Copyright © 1984-2020, Archibus, Inc. All rights reserved. |