Archibus Cloud / Maintenance / Preventive Maintenance
Maintenance / Preventive Maintenance / Maintenance Manager
Defining PM Schedules
After you define your general PM procedures and assign these procedures to locations and equipment, as maintenance manager, you must set the schedule, such as weekly, daily, or monthly, for executing the procedure on each specific equipment item or location. By defining the interval at which to perform this work, you enable the Archibus system to use a scheduling routine to automatically generate work orders for all upcoming work due within a period that you specify.
Note: For a discussion of the concepts involved in scheduling and more information on the fields presented by this form, see Understanding the Scheduling Options. For details on the exact calculations run by the scheduling routine, see Understanding the Scheduling Routine.
Note: Once you generate a schedule dates and review them in the PM Planner, you may find problems with the overall schedule and may want to make changes to the schedule. Directly from the PM Planner view, you can edit the details of the underlying PM schedule by invoking its Edit button, which presents a modified version of the Define PM Schedules view. You can also use the Copy button to create new PM Schedules directly from the PM Planner.
This topic has the following sections:
- Working with the Define PM Schedules View
- Working with Multiple Items and Schedules
- Working with Equipment Systems
- Entering Basic Information
- Reviewing Compliance Contract Information
- Entering the Schedule
- Completing and Reviewing Other Information
- Creating New PM Schedules by Copying
- Next Steps
Working with the Define PM Schedules Task
To define PM schedules, run the Define PM Schedules task (ab-pm-def-sched-mpsl.axvw), which presents a list of equipment and locations with their assigned procedures in the left frame.
Since locations and equipment can have multiple assigned procedures, the system lists the unique equipment-procedure and location-procedure combinations. For example, if equipment item AHU15 has two assigned procedures, you will see AHU15 listed twice in the list, once with each assigned procedure.
Note the use of bold font in the equipment-procedure and location-procedure combination lists:
- If a combination does not yet have a schedule, the system displays it in regular font. Select it, and the right frame presents options for setting the schedule.
- Combinations listed in bold already have schedules. Select one of these items, and its schedule displays in the right frame.
Working with Multiple Items and Schedules
You may wish to enter the same schedule information for a group of related equipment-procedure or location-procedure combinations. For example, for all equipment of a particular equipment standard, you may wish to assign the same schedule for a procedure for checking the air filter.
To edit, view, or assign schedules to multiple procedure combinations, follow these steps.
- (Optional) You may wish to first filter your list of items so that you can see related items, which will likely use the same schedule. For example, you might want to apply the same schedule to all equipment or rooms located on the same floor, all equipment that has the same assigned procedure, and so forth. Or, if you have a series of new items for which you need to schedule maintenance, you might wish to set the No Schedule option to see only items that do not yet have schedules.
- (Optional) Once your items are displayed, you may wish to order them so that certain items are next to each other and easy to locate. For example, you could filter by equipment standard and then sorted by equipment code so that equipment-procedure combinations for the same equipment items are listed next to each other.
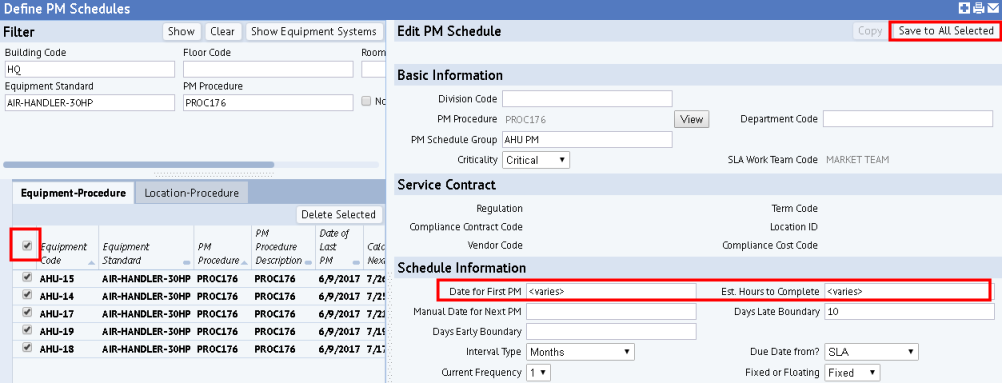
- For the items whose procedures you wish to schedule, select their check boxes in the left frame, or use the check box in the header to select all displayed items (as per below image).
- In the right frame, the system displays information about the schedules of the selected items.
- If you are establishing a new schedule, complete the scheduling options in the right frame and this schedule will be applied to all selected procedure combinations.
- If you are reviewing existing schedules, the system displays the schedule information common to the selected procedure combinations. If the values are not the same, the system displays <varies>. Often, you will want the same schedule for a set of items, so you may want to investigate any value with <varies>.
- If you need to edit a value, enter your change and select the "Save to All Selected" button. Your change will be applied to all procedure combinations that are selected (have checks in their check boxes).
Working with Equipment Systems
If you have organized your equipment into equipment systems, you can schedule maintenance for your equipment items in terms of their systems. You follow the same procedures for defining PM Schedules for equipment that is part of an equipment system as you do for equipment that is not part of a system; the only difference is that you access the equipment items in terms of their equipment systems. You define a schedule for the equipment items of a system, not the system as a whole.
Defining PM Schedules in terms of an equipment system allows for a more holistic approach to planning that increases efficiency and minimizes disruption. If there are exceptions, however, independent component planning is also needed.
Another example is if a system is scheduled to go offline, then maintenance work for its components can sometimes be deferred until the system goes offline. This allows for minimal interruption of the organization’s normal daily use of that equipment. The maintenance manager can see when equipment system will be taken offline and then plan to do the maintenance on the individual components at this time.
To schedule equipment in terms of its equipment system, select the Show Equipment Systems button to have the view display the Equipment Systems panel.
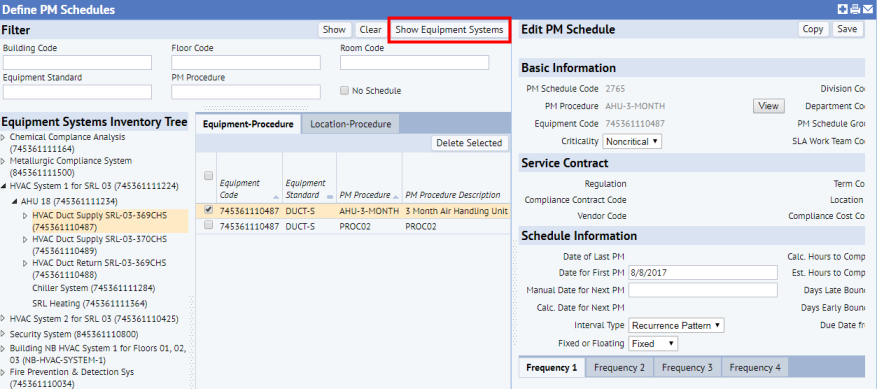
The Equipment Systems Tree acts as a filter on the list of PM Schedules. When you select a node in the tree, the grid is automatically filtered on PM Schedule records that contain an asset that is part of the selected tree.
Editing Basic Information
Once you work through the view to select the equipment and its PM Schedule, you can review and edit information about a particular schedule. The Edit PM Schedule form is organized into panels so that you can easily locate information.
The top portion of the form, Basic Information, lists the PM Procedure and its equipment and location and holds basic information. The system completes the SLA Work Team field with the value obtained from a nightly job that performs SLA lookup for all PM Schedules.
Note that you can use View button to access the underlying PM Procedure.
Edit the fields as necessary.
| Field | Explanation |
|---|---|
| Division/Dept | Complete these fields, if you wish to associate this schedule with a division or department for the room or equipment being serviced. The system does not automatically complete these fields with the division and department to which the room or equipment item is assigned |
| SLA Work Team |
The system completes this from a nightly job that performs SLA lookup for all PM Schedules. Validates on work_team.work_team_id. This field is not editable. |
| PM Schedule Group | If you wish, specify a PM Schedule Group. If a set of PM schedules have the same scheduling group code and come due on the same day, you can assign these schedules to the same work order. See Defining PM Schedule Groups. |
| Criticality |
Set the criticality of this schedule. For schedules involving equipment and equipment systems, you may want to consult the Criticality field of the equipment or equipment system and set this field to the same value. |
Reviewing Compliance Contract Information
If you have established compliance service contracts using the Compliance application and assigned them to the underlying SLA, you can review the contract for an equipment or location in the Service Contract portion of the form. Examining the contract information can be helpful when making planning decisions.
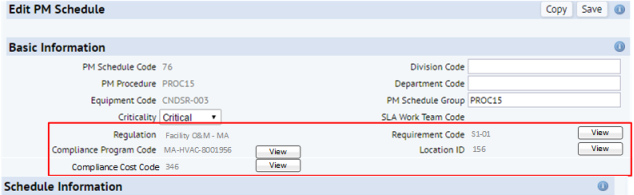
For information, see Associating Contracts with Preventive Maintenance.
Entering Scheduling Information
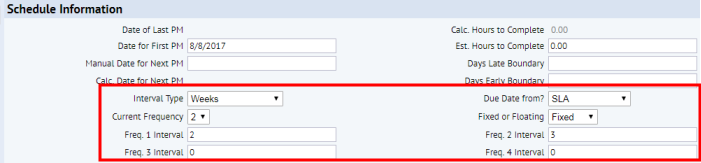
The Schedule Information section of the form specifies the schedule.
Defining the Start Date and Schedule Format
Complete these fields:
| Field | Explanation |
|---|---|
| Date for First PM | Enter the date on which the job is to be first executed. |
| Manual Date for Next PM |
If you wish to temporarily stop a defined schedule, use the Manual Date for Next PM field to specify a date for performing the job; the scheduling routine will generate dates beginning with this date.
|
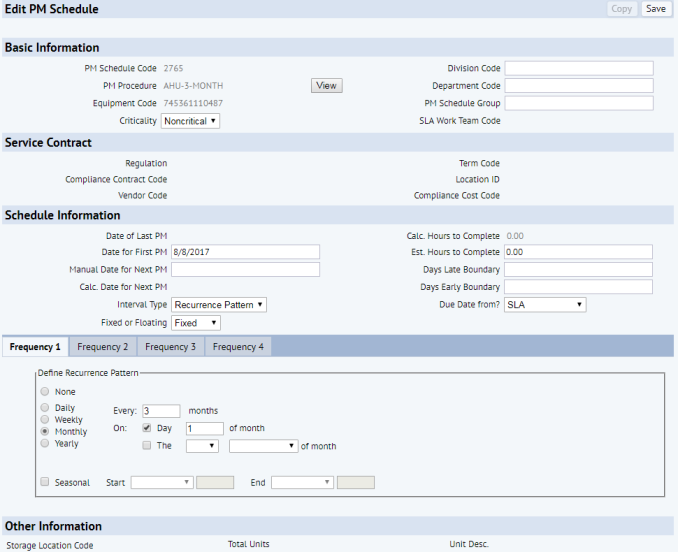
| Interval Type |
The default is Recurrence Pattern. With this value, the system presents four Frequency tabs so that you can define up to four recurrence patterns for the PM Schedule. The above image shows the form displaying these tabs; they are described below. You can also choose time intervals (Days, Weeks, Months, Quarters, Years) and non-time interval measurements (Miles, Hours, Meter, Manual). For example, choose Meter if the schedule is to be assigned to an equipment item and you want to schedule maintenance according to the equipment's meter reading. With these options set, the form does not display the Frequency tabs, but displays the following fields in the form. See below for information.
|
| Fixed or Floating |
This field, combined with the interval, determines how the system should generate the next due date. Choose: |
| Estimated Hours to Complete | If you wish to enter an estimated time for completing this task, you can do so in this field. |
|
Days Late Boundary Days Early Boundary |
If Due Date From? (below) is set to PM Schedule, the scheduling routine uses these fields to set the Work Request due date and overrides the SLA's Time to Complete setting. This provides you with more flexibility and control over PM Scheduling. You can change the To Do date of a PM job, but the Due Date will remain, and not be extended by the SLA. Complete these fields to provide a date range within which work can be executed. These fields are useful if you are thinking of PM due dates in terms of ranges rather than specific dates. For example, suppose an annual a PM job for a boiler inspection for a school needs to be done in the summer when classes are out. It is not critical that the job be done at the beginning, middle, or end of the summer; it just needs to be done sometime between July 1 and August 30. For Days Early Boundary, the idea is that it doesn't make sense to perform a job too early because the prior job for that schedule was just done recently. The scheduling workflow rule uses these values to determine the values for |
| Due Date From? |
Specify whether the SLA or the PM Schedule controls the schedule due date for work requests for this PM Schedule. If this field is set to PM Schedule, the scheduling routing uses the Days Late/Early Boundary fields (above) to determine the work request due date. |
After you complete the scheduling pattern, the system completes the following information in the Schedule Information section of the form. Also see Understanding the Scheduling Routine.
| Field | Explanation |
|---|---|
| Date of Last PM |
The system automatically completes this field with the completion date of the last work request completed for this schedule. The system updates this value whenever PM work is planned, generated, completed, moved, or cancelled. |
| Calculated Date of Next PM |
The scheduling routine examines the schedule definition and the date range you provide and completes this field. |
| Calculated Hours to Complete |
Based on the value for "Standard Units per Hour" for this procedure and the units for this particular equipment item or location (as defined in Total Units at the bottom of the form), the scheduling routine calculates how long this task should take and displays the value in this field. The system determines the Calculated Hours to Complete value using this calculation: PM Schedules Total Units / PM Procedures Units per Hour For example, if your carpet cleaning procedure calls for clean 300 square feet of carpet per hour, the routine would calculate a value of .33 hours (100/300) hours for cleaning the carpet of a 10x10 room. |
Overwriting the Generated Dates
If you want to ignore the generated schedule dates, you have two options:
- Specify an Interval Type of Manual and then use the Define PM Schedule Date by PM Schedule task to define when the work should be performed.
- Complete Manual Date for Next PM, as described above.
Non-Recurrence Pattern Schedules (Miles, Hours, Meter, Manual, Days, Weeks, etc.)
If you are not using a recurrence pattern, you need to specify the frequency at which to execute the job.
First, in the Interval Type field choose any interval except Recurrence Pattern. For example, you can set Miles, Hours, Meter if you want maintenance performed when the equipment passes a certain threshold; or you can choose a time-based interval such as Weeks, Months, or Quarters.
You can provide multiple frequencies and then choose one to implement. This feature provides flexibility in scheduling by allowing you to provide different levels of maintenance according to the availability of resources or the season. For example, in the below image, maintenance will be executed every 3 weeks because the Frequency 2 setting (3 weeks) is the Current Frequency value.
If you want to run a job on the same schedule throughout the year, set the frequency in the Frequency Interval 1 field and set Current Frequency to 1.
Complete these fields:
| Field | Explanation |
|---|---|
| Current Frequency |
If the Interval Type is not Recurrence Pattern, the form presents this field so that you can specify the Frequency Interval that the scheduling routine uses to set the schedule. For example, if you have established two frequencies, the Frequency 1 and Frequency 2 fields (described below), use this field to specify which one is currently in effect. If you have only one frequency interval, this will always be set to 1. |
| Frequency 1, 2, 3, 4 Interval fields |
If the Interval Type is Recurrence Pattern, the form does not present these fields, but instead presents the Frequency tabs. |
Using a Recurrence Pattern
You may wish to set up a recurring pattern, such as every Wednesday or yearly every June 1. In this case, set Interval Type to Recurrence Pattern. The form then hides the Frequency 1-4 Interval fields and the Current Frequency fields and replaces them with the Frequency tabs. Note that you complete only the Frequency 1 tab, unless you want to provide seasonal recurrence patterns, as described below.
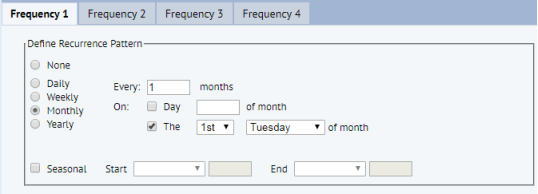
Some of the possible recurrence patterns do not make sense for a floating schedule. For example, if a recurrence pattern set for a specific day of the week, or a specific day of the month/year, then this is likely meant to be a fixed schedule which does not depend on the previous work order date. Therefore, the view checks that the Fixed or Floating selection is appropriate for the recurrence pattern. If you select any of the following options, the view presents an error message instructing you that the Fixed or Floating field should be set to Fixed.
- Weekly, if one or more of the days checkboxes is checked.
- Monthly, if one of the On checkboxes is checked.
- Yearly
Seasonal Schedules
Some PM jobs are dependent on the season; for example, you may need to fertilize trees and bushes once a month from May and through September. As another example, you may want to change the oil in your lawn-mowing equipment once a month during April and May and every 15 days during June, July, and August. In this case, you would set up Frequency 1 with a monthly interval from April 1 through May 31, and Frequency 2 with a frequency of every 15 days from June 1 through August 31.
For a seasonal recurrence pattern, each frequency must have a seasonal date range.
Completing and Reviewing Other Information
Completes these fields, located in the Other Information section at the bottom of the form
| Field | Explanation |
|---|---|
| Storage Location Code |
Any scheduled PM Procedure that includes parts generates work requests with those parts assigned. The system must also associate those assignments with a part from a particular storage location. The storage location you enter for the schedule determines which location is used for parts when defining PM schedules. This field is required even if the PM Procedure does not include parts because the maintenance manager might add parts to the PM Procedure after creating the PM Schedule |
| Total Units |
Each procedure defines the unit measurement and number of units you can process in an hour, such as cleaning 300 square feet of carpet per hour. For each particular schedule, complete Total Units with the number of units required for this particular equipment item or room. For example, for a mopping or vacuuming task, set the Total Units equal to the square footage of the room; for a task of changing an equipment item's filter, set Total Units to 1. The routine uses this to determine Calculated Hours to Complete |
| Unit Description | Complete Unit Description with the same value as the procedure's Unit Description. |
| Comments | If you wish to enter a comment about this particular item's units, you can do so in this field. |
The Other Information section displays the following information:
| Field | Explanation |
|---|---|
| Meter Reading on Last PM |
|
| Number of Open Work Orders - |
Holds the number of open work orders to which this schedule is assigned. The system updates this value whenever PM work is planned, generated, completed, moved, or cancelled. |
When you click the Save button, the view saves your entries and also runs the calculation for Calculated Hours to Complete.
Creating New PM Schedules by Copying
You can create a new PM Schedule record by copying the current record.
Click the Copy button (located in the upper right corner of the Edit PM Schedule panel. The system creates a new record with an auto-numbered value for PM Schedule Code, and displays the new record in the form. The new record has some of the same values as the source record; you can edit these values as necessary and then complete the remaining fields.
Next Steps
- With the schedule defined, you can now have the system calculate the work due for a specified time period by running the Define PM Schedule Dates by PM Schedule task .
- You can review all of your schedules by running the View PM Schedules task and the PM Planner task.
- You can generate work orders for a specific time period by running the Generate PM Work Orders task.