 .
.The Equipment Team Support form appears.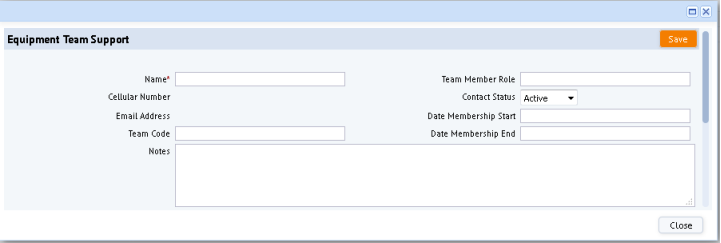
Name. Click the ellipsis in the Name field to access the tabbed form to select the employee, contact, or vendor you want to add as a support member. Use the smart search filter at the top of each tab to locate the employee, contact, or vendor. Once you locate the name, click on it to add it to the form. 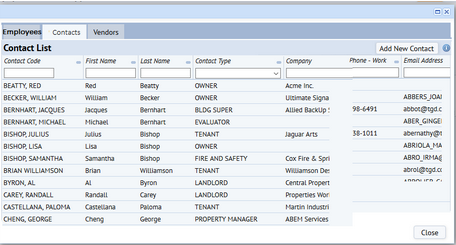
When selecting employees, vendors, and contacts to add them to the team, you might notice that a particular party does not yet exist in the database and that there is no record for you to choose. For your convenience, you can create employees, contacts, and vendors directly from this view. Use the Add New Contact, Add New Employee, or Add New Vendor button, located in the upper right corner, to create a new party. For information on how to complete the fields on these forms, see Employees table, Contacts table, Vendors table.
Cellular Number and Email Address: These fields fill in with the information entered for the selected employee, vendor, or contact. You can also manually enter this information, if needed.
Team Member Role. Enter a brief description of the role the team member has for this equipment,
Contact Status. Setting the team member status ensures that users have access to current contact information. By default, this field is set to Active, but you can select Inactive, Archived, or Removed when the team member is no longer active.
Date Membership Start / Date Membership End. If participation on the team is limited to a specific time frame, select those dates here. If participation is on-going, you can leave these dates blank.
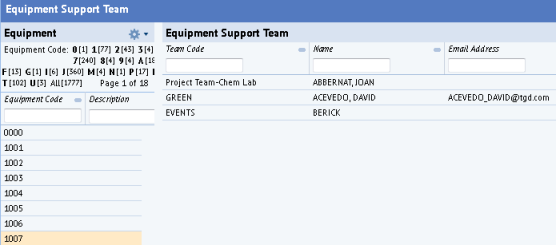
Team Code. Select the team to which you are assigning this person.
- If the person is already associated with a team and you want the person in this team associated with the equipment item, choose the team from the Team Code field.
- It the party has not been previously associated with a particular team, you can make the association now by choosing the team from the list.
- If desired, you can leave this field blank. The party will still be associated with the equipment item.
- Suppose a person is on two different teams and you want both their team associations to be associated with the equipment item. In this case you can assign the person to the equipment item two times and choose a different value for Team Code each time.
Notes. Enter any information about this team member's involvement with the equipment.