Organizing your equipment into equipment systems helps you locate and manage your items. Many enterprises have more than a million assets, which can make locating a particular asset difficult. One way to effectively manage a list of assets this is to group them hierarchically. There are two fundamental organizing principles relating to managing facilities assets:
The Equipment Systems Console presents your equipment assets in terms of their equipment systems and shows the dependencies between assets. Use this console to review equipment systems and their assemblies and components, as well as edit the properties of equipment items.
When you first load the Equipment Systems Console, the view:
You can change this default selection by:
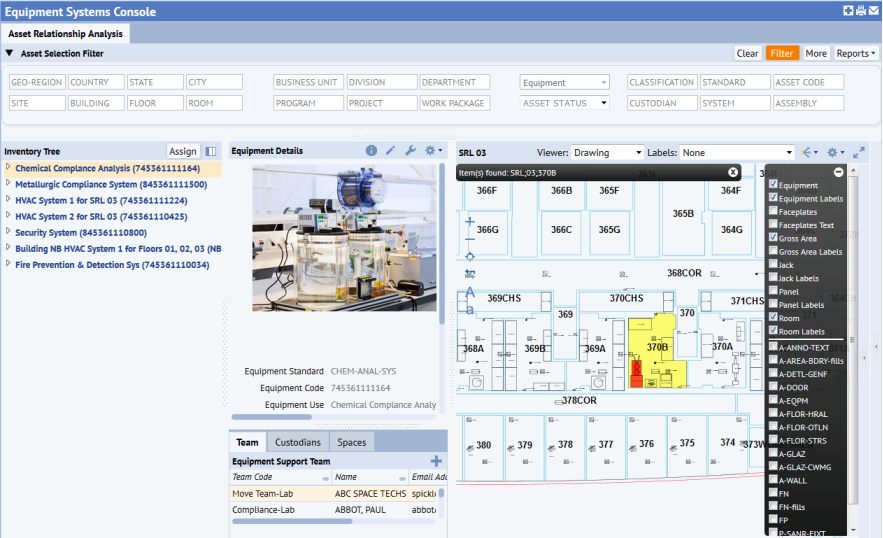
When you open the Equipment Systems Console, it displays the Asset Relationship Analysis tab, shown above. From here, you can click the Assign button in the Inventory Tree panel to open the Asset Relationship Assignment tab. You can switch between the two tabs to perform the following tasks:
| Tab | Tasks |
|---|---|
| Asset Relationship Assignment | |
|
Both tabs |
|
You can access the Equipment Systems Console from the following locations on the Process Navigator or home page:
Note: Also see Control the layout of the Asset Relationship Assignment tab.
You can configure the number of panels to display in the Equipment Systems Console and their position within the Console.
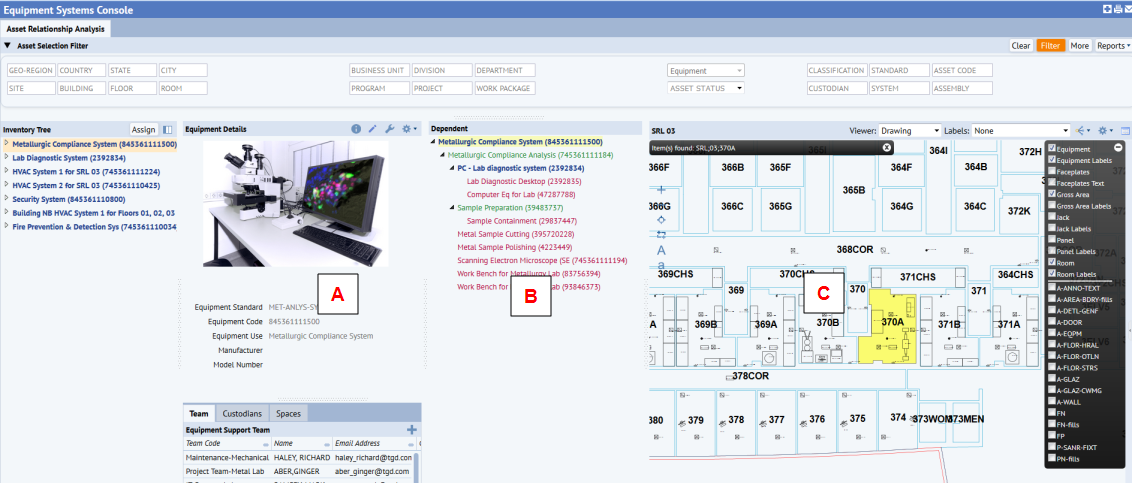
For the Asset Relationship Analysis tab, the leftmost section of the Equipment Systems Console shows the Inventory Tree. You can hide this panel if necessary. You control the information to display in Panels A, B, and C by using the Display Options menu. The Console always displays Panels A and B; you can optionally include Panel C.
For the Asset Relationship Assignment tab, the Console displays:
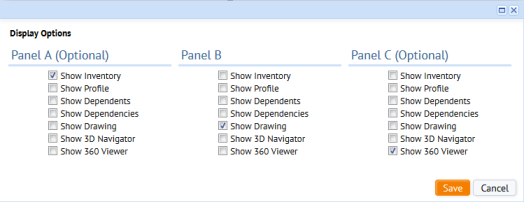
To set display options:

| Option | Shows ... |
|---|---|
| Show Inventory |
The Inventory panel displays the same values as the Inventory Tree. Use this panel to compare multiple parts of the equipment listed in the tree. For example, if two items are far enough apart inn the tree that vertical scrolling is difficult, you can use the Inventory Tree panel and the Inventory panel to compare them. Also, the same asset can be represented in multiple parts of the inventory tree; therefore, it is helpful to display two views of the inventory when creating or editing or copying another part of the tree. |
| Show Profile |
|
| Show Dependents |
The assets that depend on this asset for their functioning. You can use the dependents and dependency trees for an uncluttered reference when you have complex systems. You can collapse, expand, and scroll the inventory tree without selecting an asset and compare the inventory tree with the selected dependency and dependents in the display panels. |
| Show Dependencies | The assets that the selected asset is dependent upon |
|
Show Drawing |
The floor plan drawing for the floor on which the selected item is located. |
| Show 3D Navigator | 3D Navigator |
| Show 360 Viewer | 360 Viewer |
Use the Filter at the top of the view to locate equipment and equipment systems in the Inventory Tree according to location, department assignment, status, custodian, and so on.
Once you set a filter, it is passed to the Console's other tabs and all panels (System Assignments, Unassigned List and Inventory Tree) are refreshed with these values.
Once you make a selection from the filter, you may want to work with just these items. If so, you can hide the filter, which creates more room in the console. Use the triangle-shaped button in the upper right corner of the filter header to hide and display the filter.
Different stakeholders view assets differently; the installer and maintenance crews have a functional perspective on the equipment, while the enterprise resource planning and project teams want to know how the asset supports business processes. To accommodate these different perspectives, you can develop different system hierarchies for different stakeholder groups. When you create an equipment assignment, you give it a stakeholder type. The Filter in the Equipment System Console, includes the Stakeholder Type field. You can use this field to restrict the console to show only hierarchies defined for that stakeholder group.
The Equipment Systems Console's Inventory Tree and Systems Assignment list (on the Asset Relationship Assignment tab) display the equipment systems and their hierarchies. Click on an equipment system to see its components and assemblies. The color of the text indicates the item's role within the equipment system:
You can also review relationships by activating the Dependents and Dependencies panels, using the Display Options form, described below.
When reviewing the list of equipment systems and components, you can check the icons to see if an equipment item has a floor plan, 360 movie, or 3D enterprise graphics. You may need to expand the Inventory Tree to see these icons.
![]()
Depending on the active tool in the Viewer, when you click on an item, its movie, floor plan, or 3D enterprise graphic (if available) displays in the Viewer. The Console informs you if it cannot find a floor plan, 3D image, or movie for the equipment item you selected. You can also check the icons listed next to each equipment item in the Inventory Tree to see if has a floor plan, movie, or 3D enterprise graphics.
| Equipment with this icon ... | ... can be viewed in: |
|---|---|
|
|
floor plan |
|
|
3D Navigator |
|
|
360 Viewer |
Use the Viewer drop-down menu, located beneath the filter, to choose the tool that the Console's viewer pane shows.

Note that if you do not have licenses for the 3D Navigator or 360 viewer, the Console informs you when you select these options.
| Option | Description |
|---|---|
| Drawing | Shows the floor drawing in the panel. For information on working with floor plans, see Working with Drawings. |
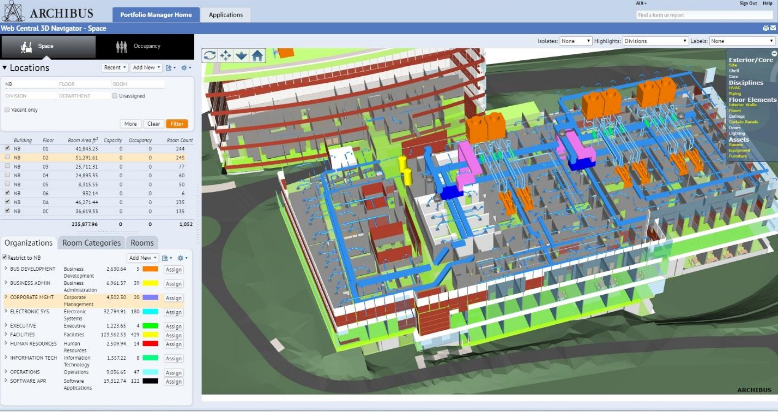
| 3D Navigator |
If you have a license for the 3D Navigator and have published Revit equipment plans to 3D enterprise graphics, use this option to view your equipment in 3D. |
| 360 Viewer |
If you have a 360 movie for the selected equipment, shows the movie using the 360 Movie viewer in the panel. |
Tip: In the sample HQ project, the HVAC system in building NB (the NB-HVAC-SYSTEM 1 equipment system) has 3D enterprise graphics and a 360 movie and is handy for exploring these features.
When viewing the equipment details of an item, you may want to see its location on the floor using either the floor plan or the 3D Navigator.
Both tabs of the Equipment Systems Console include the Equipment Details panel that summarizes information for the equipment, and includes a picture if one is associated with its equipment standard.

To review a summary of equipment data, click the "i" (Information) icon in the Equipment Details pane. The Console presents the non-editable Equipment Profile.
To access complete details for the equipment, click the pencil button. The Console presents a tabbed form for editing equipment details. For information on completing the fields, see Adding Equipment.
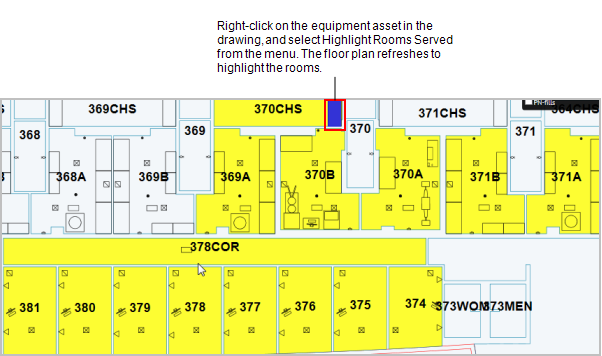
You can highlight the rooms that contain equipment served by the selected item. You can access the Highlight Rooms Served command from the following:
| From this pane ... | ... access the Highlight Rooms Served command using |
|---|---|
| Equipment Details | Gear icon |
| Floor plan |
Gear icon Right click on the asset |
| 3D Navigator |
Gear icon Right click on the asset |
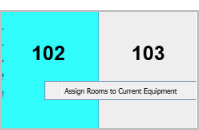
For example, the below shows the rooms on the current floor that contain equipment serviced by the selected equipment item. If using the 3D Navigator, the command highlights rooms on all floors in this building that contain related equipment.
There are two ways to add the rooms that are served by an asset.
From the Equipment Details pane:
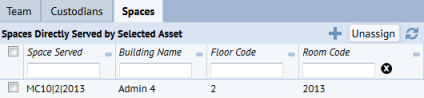
Note: If you need to see the spaces served by the asset's dependencies, you can generate the "All Spaces Served by Selected Asset and its Dependents" report.
From the drawing:

The pane refreshes to list the room you just added.
You can assign members to the equipment support team by selecting from vendors, contacts, or employees.
To assign team members:
The team member and their contact information appears in the list.

To update team member information:.
You can click on a team member in the list to access its edit form.
You can assign custodians to equipment items using the Custodian tab.
To edit custodian information, click on the custodian to access an edit form.
Your planning or disposal project, or your analysis of equipment dependencies, might involve the need to:
For example, if your analysis determines that you should do preventive maintenance for an item that is affected by another asset that needs to be taken off line, you can create the action for that work from the console. To handle situations such as these, you can create the following types of actions for an asset. If you need to have a license for the application, that is noted below.
Note: The Create Waste Disposal Activity appears only if the asset is equipment.
| Copyright © 1984-2019, ARCHIBUS, Inc. All rights reserved. |