
From some Web views you can export the data in the view to an Excel file by using the Export to XLS feature.
The export routine writes data directly to the XLS file, using a human-readable format, so that:
Exporting to this format can be the most convenient way to get data into your spreadsheet because it uses downloaded email message format (MIME format), and can open directly in your spreadsheet just like an email attachment.
Note: You can also export data to Excel using Data Transfer. See Data Transfer Overview and Importing and Exporting Data: Overview.
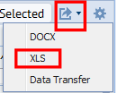
The Export to Excel command is available from some Web Central views.
Views that support this feature present the Export to Excel command in one of two formats:
In addition to the views that automatically provide the Export to Excel feature, a system integrator can customize views to include the XLS action. You can see a sample view at Technologies / System Integrator Views / Parts for Reports / Report with DOC, PDF, Excel, and Data Transfer actions.
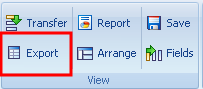
From the Smart Client, invoke Export to XLS feature by selecting the Ribbon's View / Export command from any grid view once the view is loaded:
The following images shows the Export command on the Smart Client Ribbon:
The Export to XLS action processes data from the main table in the view plus any standard table in the view. For example, if your view includes fields from the Rooms and Room Standards tables, the visible fields of data from these two tables will be exported.
The action respects restriction sets that you make withe Smart Search console and filters. For example, you can restrict the view to records of a certain department and then export only these records to an Excel file.
Tip: When you export to Excel using a view that has a restriction set, the data meeting the restriction is exported. For this reason, exporting to Excel can be useful if your restriction includes too many records to show on the screen; using the export feature enables you to see all the records meeting the restriction in the exported XLS file.
The command writes the view's current table to an Excel file. (See above discussion for about the records and fields included in the export.)
A dialog asks if you want to open or save the Excel file.
| Copyright © 1984-2020, Archibus, Inc. All rights reserved. |