The PM Planner offers several options for controlling the information that it displays. Also see Filtering the PM Planner.
Note: When examining the PM Planner, keep in mind that the counts and statistics on the left side of the PM Planner are based on a set date range of PM Schedule Dates; they are not based on the weeks that are currently displayed in the weekly calendar.
You can scroll the PM Planner both vertically and horizontally.
Mouse over the bottom of the PM Planner to access the horizontal scroll bar; mouse over the right side of the PM Planner to access the vertical scroll bar.
If you have a smaller monitor, you may notice that the right arrow of the calendar is not visible upon initial load, so that you are unable to scroll the calendar forward. Use the horizontal scroll bar at the bottom of the view to display the complete calendar. You can also display fewer fields or show 12 weeks instead of 16.
You can display cost and labor information in the PM Planner by setting the Show Costs and Show Labor option, located on the gear icon on the right side of the PM Planner. With these options set, the PM Planner displays the following tabs:
When not showing the financial and labor information, the PM Planner displays the content of the Weekly Planner tab directly in the frame below the filter and does not display the Weekly Planner tab.
For information on working with the Financial Impact and Labor Analysis tabs, see Analyze Labor Requirements and Costs.
Since you might define thousands of PM Schedules and it can be difficult to work with a list of all you PM Schedules, the PM Planner includes a Group By option, you can organize the PM Schedules by your desired attribute, such as Equipment Standard or Work Team. As another example, suppose your company integrates Compliance Surveys with PM and wants to analyze their use of service contract providers. You can group by Service Contract Provider to see exactly which work they are handling.
You can expand a grouping to see all the PM schedules and schedule dates within that group, and then manage the individual PM Schedule Dates for those schedules.
When you organize the PM Schedules by a grouping, the PM Planner provides statistics for those groupings so that you have high level information before drilling in. For example, in the below image, PM Schedules are grouped by Equipment Standard. You can see the statistics and summary of work for each equipment standard. For information on the statistics and statuses presented by the PM Planner, see Examine Statistics and Counts by Grouping.
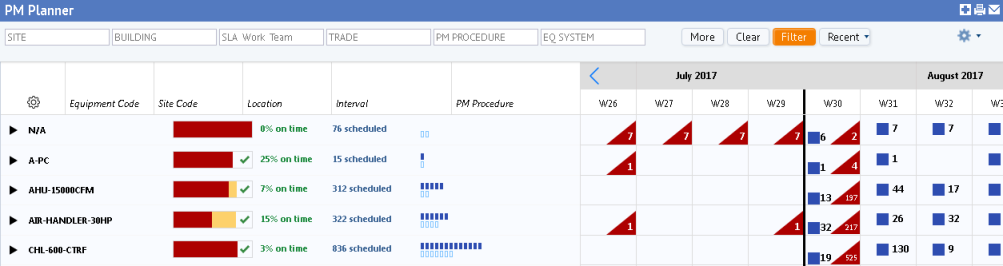
Note: In the Group By drop-down menu, Service Contract and Service Contract Provider are available if you have a license for Compliance. Grouping by these fields is appropriate if you have developed compliance service contracts and associated them with the underlying SLA.

Use the gear icon to access these commands for controlling the display of the PM Planner:
| Command | Description |
|---|---|
| Set Fields | Display and hide fields from the PM Schedules table that are displayed in the left-hand side of the PM Planner when you expand a grouping. |
| Display 16/12 Weeks | Toggle the calendar (right-hand side of the PM Planner) between displaying 12 weeks and 16 weeks. |
| Copyright © 1984-2019, ARCHIBUS, Inc. All rights reserved. |