Working from the Reservations application, you can use the Workplace Services / Reservations / Reserve Rooms and-or Resources / Create New Resource Reservation task when you want to reserve only resources and do not need to also reserve a room. You can create resource reservations for either a one-time or a recurring schedule. This topic describes both reserving resources for a single date, and as a recurring reservation.
If you are reserving a room along with the resource, use the Workplace Services / Reservations / Reserve Rooms and-or Resources / Create Room Reservation task. This task enables you to reserve the room and the resource from one screen. By reserving the room and resources together, you can manage them together. For example, if you need to cancel the room, you cancel the resource in the same operation. See Create a Room and Resource Reservation.
If this is a conference call reservation, resources must be reserved for each of the reservations for the conference call. (Conference call reservations include reservations for different locations that are linked together.) See Editing a single linked reservation.
You can create a resource reservation to reserve:
The resources that are shown depend on the information you enter in the filter, your user role, and how the resources is defined. For more information, see the below sections:
Note: The only type of resource that you do not have to reserve is a fixed resource, such as a projection screen, which always remains in a room. The fixed resource is always included when reserving that room. You can use the filter to see only rooms that have a fixed projector.
This topic contains the following information:
When creating a resource reservation, you have a choice about how to specify the time. The method you use depends on how flexible you are about the time you need the resource.
In addition, for the general user (including the AFM user), the following variables determine whether a resource will appear after you conduct your resource search. Consult your business process owner for information on how these variables have been defined. For information on defining these variables, see Define General Resources.
Note: Restrictions vary based on your role. For information, see Understanding User Roles.
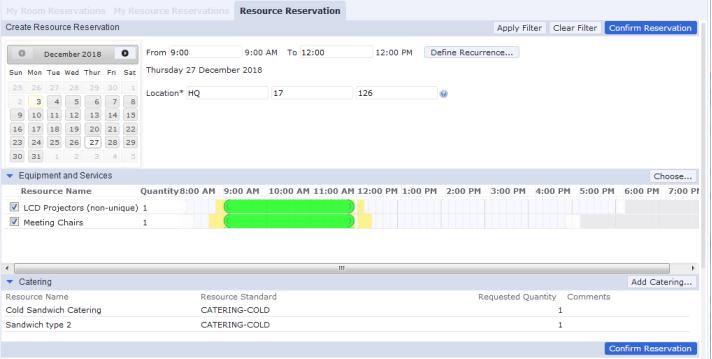
You can use the graphical timeline to specify a time period (start time and end time) for a resource. To select a time period in the timeline, you click and drag your mouse over the time period. When you click and drag, the From and To fields in the Filter fill in with the start and end time for the resource reservation.
The time period for the resource that you selected is highlighted by green and yellow. For detailed information on using the timeline, see Using the Reservations Timeline.
When working from the Reservations application, you can set up a recurring reservation for a resource, as you can also do for rooms. You set up a recurring resource by clicking Define Recurrence... in the filter of the Create Resource Reservations form. The application then opens a dialog in which you can enter the recurrence pattern. The recurrence pattern is applied to the filter, so it determines the resources that are shown in the Equipment and Service form; if a resource is not available for even one of the recurrence dates, it is not shown in the results.
As with all reservations, if you do not enter a From and To time in the Filter, the application shows all resources matching the criteria you enter, and shows the existing confirmed reservations for the resource. This enables you to assess what is the best time to set up your recurring reservation based on the available time slots.
After you define a recurrence pattern, a description of the pattern is shown on the filtering panel below the time filter.
The steps to create a recurring resource reservation are included in the below procedure.
To avoid performance issues, the application uses the following to limit the number of occurrences for recurring reservations. The application uses the most restrictive limit of all the limits that apply.
If there is no end date or 'maximum occurrences to create' entered for the reservation, the application uses the most restrictive between 999 and the MaxRecurrencesToCreate activity parameter value.
If a recurring reservation has a large number of occurrences, the system might time out when creating the reservation. In this case, you get the following message:
"Saving reservation failed. Reservation creation has timed out.
Save appointment without reservations?" OK/Cancel"
To resolve this, contact your ARCHIBUS Administrator to reduce the maximum number of occurrences that can be created. You should also delete the appointment to cancel all orphaned reservations.
Reservations Plugin for Outlook. When working from the Reservations Plugin for Outlook only, if you try to save a recurring reservation that has a number of occurrences that exceeds the MaxRecurrencesToCreate application parameter, or that has no end date entered, you get the message: "Continue without reservation?"
This issue does not occur when working from the Reservations application.
The following procedure describes creating a resource reservation for a single date or as a recurring reservation.
The selections you make in the filter affect the equipment and services that are shown; only equipment and services that are available for the criteria you select are shown in the Choose Equipment and Services form.
Note: There is a limit of 500 occurrences applied to recurring reservations.
Note: When you add equipment and services on a recurring basis, these resources are added for all the occurrences. To add a resource to a single reservation, you would edit the single occurrence to add the resource. See Editing Recurring Reservations.
The Choose Equipment and Services form shows the equipment and services, such as chairs, IT support, projectors, and IT cables that are available based on the criteria entered in the filter, and the other factors affecting availability as described above. If the resource is not available in the list and you have entered a From and To time, remove these times from the filter to see how this affects availability, or select a different day from the calendar.
The selected equipment and services are shown in the Equipment and Services timeline.
When you create a time on the timeline for the resource, the check box for the resource becomes selected.
If you selected multiple resources, simply select the check box for the second resource and it will be shown in the timeline using the same time as the first resource. If needed, you can adjust this time.
The From and To fields in the Filter fill in with the selected times.
If you select additional resources from the Equipment and Services form by repeating steps a through c, the application automatically adds these resources to the timeline for the same time frame you specified for the first resource. You are able to adjust this if needed.
The Equipment and Services Details pane shows details for the selected resource. Click Close to dismiss the window.
The Add Catering form appears showing the available catering resources. See the above sections of this topic that describe how the application determines availability.
The Create Resource Reservation form appears. The catering resource is added for the time you specified for the meeting. If you have not yet specified a time, the available time defined for the catering resource is shown.
Note: If you are changing the time from AM to PM, or from PM to AM, be sure to enter the AM or PM as part of the time.
To finalize the reservation, you must confirm it.
The Confirm Reservation form appears. The total cost is calculated, and the requestor's division and department are used by default for the chargeback, but this can be changed.
Click Submit.
When you submit a room or resource reservation (from Web Central), or save the reservation (from the Plug-In), the availability of the room or resources, for all dates, is checked again; if the room or resource is not available, an error message - "The room (or resource) is not available" - is shown and the process is aborted.
The My Resource Reservation form appears with the reservation in the list.
Note: The ARCHIBUS Extension for Exchange is not used for resource-only reservations. For resource-only reservations, the email doesn’t show the list of dates, and also no ics files are generated. This applies to both single and recurring resource-only reservations.
| Copyright © 1984-2019, ARCHIBUS, Inc. All rights reserved. |