
The tabbed Add Equipment form, Equipment Details form, and Define Equipment form are used to add and edit equipment in several Archibus applications. These forms enable you to enter comprehensive information for equipment.
This topic has the following sections:
Before adding equipment records, you can develop the following tables, which validate fields in the Equipment table. With this information developed, you can associate this information with the records you create by choosing from existing values in the validating tables.
You can access the tabbed equipment form from the following locations:
Building Operations / Preventive Maintenance / Business Process Owner - Maintenance / Define Equipment
Note: You can also add equipment from the Smart Client's Real Estate Portfolio Management / Strategic Financial Analysis / Background Data / Define Equipment task. Although this task presents a grid view, you can use the Smart Client's Select Fields action to show the fields you want to work with in the grid. The 'Procedure: Adding equipment' section of this topic describes the fields.
If you are using the Strategic Financial Analysis application, you should create the inventory listing of buildings, properties, capital projects, and capital equipment items for which you want to analyze costs.
The Strategic Financial Analysis application does not assign costs directly to projects or equipment. For many metrics, the application assigns the project or equipment cost to the building or property, and sums the total project and equipment cost for that building or property. For this reason, if you are going to include capital projects or capital equipment in the analysis, you will use the Forecast Capital Costs action When you run the Forecast Capital Costs action, the application includes costs for the asset you select. See Project and Equipment Costs.
Working from the Proposed Project Console, you can add equipment and furniture that does not yet exist in your inventory as requirements for the project. For these proposed assets, when you are ready to add them to your inventory, you can use the Select Equipment or Furniture from Requirements button to copy data from the asset requirements table (eq_req_items) to the Equipment (eq) or Tagged Furniture (ta) table when creating the new record.

The Select Equipment from Requirements or Select Furniture from Requirements action buttons are found on the General tab of the Add Equipment or Add Furniture forms. See Adding new equipment or furniture by copying its data added as a requirement.
The Select from Requirements action links the new equipment or furniture record with the copied asset requirements record. The record copies the Asset Plan ID for the requirement to the Equipment Code or Furniture Code fields, unless you have already entered an Equipment Code or Furniture Code for the asset. In this case, the Equipment Code or Furniture Code is not overwritten.
Location information, the organizational units the asset is assigned to, and the manufacturer and model are some of the data that is copied. If needed, you can edit the data after it is copied.
Note: The Manufacturer and Catalog # are not included in the data that is copied from the requirement to the furniture record when you use the Select Furniture from Requirement action to add the new asset record.
You might want to print labels for your equipment items that contain QR codes of the Equipment Code value. This enables users to scan the QR code with their phone and use Archibus Workplace to report a maintenance issue on this item. For information, see Using QR Codes with Archibus Workplace (Concept)
Use the Print QR Labels button, located at the top of the Equipment pane of the Define Equipment view (ab-eq-edit.axvw), to access the Print QR Labels form. For details, see Create QR Code Labels for Rooms and Equipment.
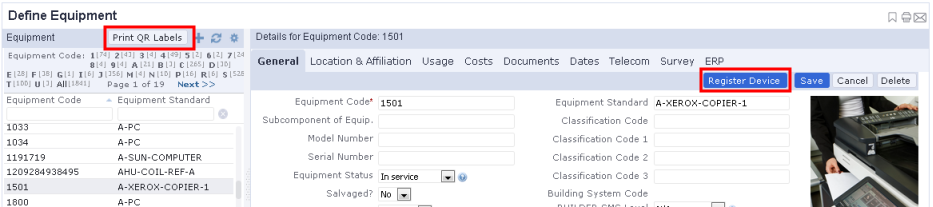
As discussed in Using Archibus Workplace on a Kiosk, your site may wish to running Archibus Workplace in kiosk mode on a centrally-located machine in the lobby or conference room, as well as a tablet. Once you decide the locations for your kiosks, you can set up Archibus Workplace in kiosk mode on these machines using the Register Device button (shown above) of the Define Equipment view.
In order for an equipment item to be set as a kiosk it must have an Equipment Standard of KIOSK-LOBBY or KIOSK-CONFERENCE. For details, see Defining Equipment as Kiosks.
To enter equipment information:
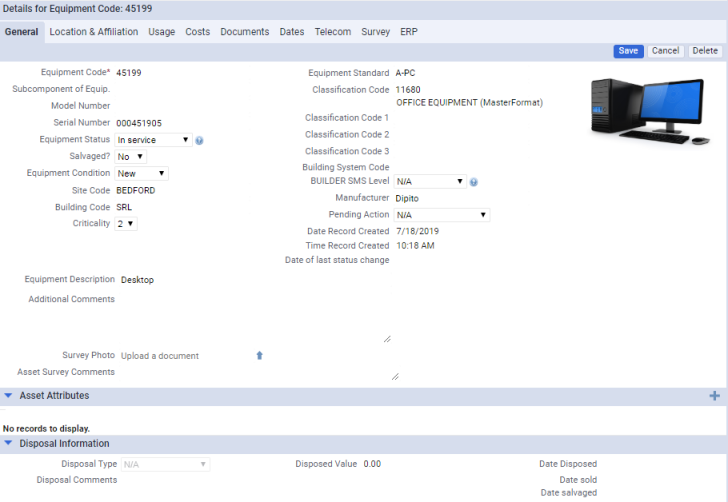
Equipment Code -- Use this field to uniquely
identify the equipment item.
This is a required field as it is used to uniquely identify the equipment.
Subcomponent of Equipment -- If the equipment item is a component of a larger equipment item, enter the top-level equipment item's Equipment Code in this field. Top level equipment assemblies should reference their own equipment code in this field. Leave this field blank if the equipment does not have subcomponents.
Manufacturer / Model . This information is useful when tracking warranty information, or for locating equipment if the manufacturer announces a recall or safety warning
Serial Number -- If the equipment has a serial number, record it in this field.
Equip. Status -- This list field provides several values for documenting how an equipment item is currently being used, such as whether it is in storage, being repaired, salvaged, or in use.
Salvaged? -- If you decide to get rid of old equipment but still want to track it in the database, use this field to document that the equipment is salvaged and no longer being used. Note that even if this value is set to Yes, the program's calculation routines act on this equipment item.
Equipment Condition -- Select the value that best describes the current condition of the equipment as New; Excellent; Good; Fair; Poor; or Bad. The condition of an asset is a key factor in optimization analysis.
Criticality -- Enter a whole number from 1 to 9 to indicate the degree of importance this asset has for your organization's mission. You determine the meaning you want to assign to these numbers. For example, you may want to provide a high rating for production equipment that has an expensive down-time cost. The application uses the criticality number on the Mission Support Analysis section of the Asset Lifecycle's Optimization tab.
Equipment Standard-- Enter the type of equipment item by choosing from the predefined equipment standards.
Classification Code, Classification Code 1, 2, 3-- Use these fields to assign classifications from different classification standards to an asset. Your site might track multiple classification standards per asset. For example, during the design and construction phase of a project, engineers and bid managers might use Master Format or Omniclass to classify an asset. After the building project has been handed off to the building owner or operator, asset managers might use UNIFORMAT II to manage the asset during its lifecycle. When completing the fields, you can choose only a classification from the classification standard that is associated with that classification field. If a standard is not associated with a classification field, there will be no available values from which you can choose. For information on how classification standards are associated with these Classification Code fields, see Working with Multiple Classification Standards
Complete as many Classification Code fields as appropriate for tracking classifications at your site. Since classifications can be organized in a hierarchy, for each classification field, you can drill down to the appropriate level of classification for this asset.
Building System Code -- If this equipment is part of an equipment system that is associated with a building system, the field displays the building system. This field is not editable. For information on associating equipment systems with building systems, see Define Equipment Systems (Asset Relationship Assignment tab).
BUILDER SMS Level -- This field appears only if you have a license for Archibus Extensions for BUILDERTM SMS. This field reports on the BUILDERTM SMS level of this asset, such as Component, Section, or Section Detail. For information, see BUILDER™ SMS Hierarchy.
Pending Action -- If the equipment is being disposed of, select the disposal action here. Otherwise, keep the selection at N/A to indicate that this equipment is not being disposed of. If you mark the asset for evaluation or for disposal, you can work with it int he Asset Disposal Console.
Date Record Created / Time Record Created -- The system generates the date and time when the record is created.
Date of Last Status Change -- The date that this asset's status most recently changed.
Survey Photo -- . Upload a photo that you took as part of your assessment survey. You must save the record before the Check In New Document button appears. This button enables you to select and upload the photo.
Additional Comments / Description -- Enter any other information you want to store for this equipment.
Asset Survey Comments -- Enter any comments that are pertinent to an asset assessment survey you are doing.
Asset Attributes -- Use this section to store additional information about an equipment item. This section lists any additional attributes defined for the current asset. You can also enter new asset attributes by clicking the "+" button and completing the resulting form. If you wish to store additional types of information not available in the form, you can define the type of information that you wish to store by developing an asset attribute standard. The asset attribute standard will then be available for you to complete in this section. For information, see Define Asset Attribute Standards.
Disposal Information -- Review disposal information entered from the Asset Disposal Console, or enter that information here.
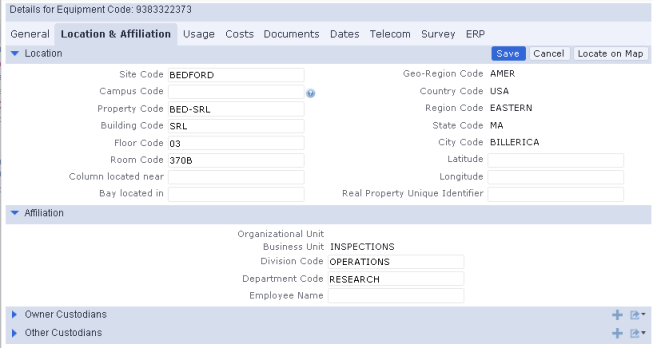
campus) table. This is the site location in BUILDERTM SMS. Note that the Extensions for BUILDERTM SMS connectors import the values for the validating Campuses table. If you are not working with BUILDERTM SMS, you typically want to retain this field as empty and track the area on which your buildings reside with sites.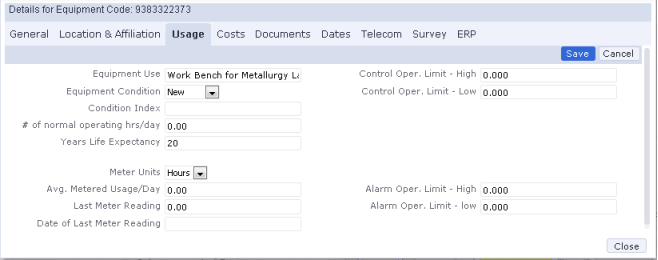
Equipment Use: Describe how the equipment is used, such as SERVER or PERSONAL COMPUTER.
Equipment Condition: Select a value to describe the condition of the equipment: new, good, fair, or poor. If you set this value on the General tab, it is updated here, and vice versa.
Condition Index. This field is used in conjunction with BUILDERTM SMS. The Condition Index fields are calculated in Builder SMS and sent to Archibus. The data is transferred only from BUILDERTM SMS to Archibus; it is not transferred from Archibus to SMS. For information, see Condition Index (BUILDERTM SMS).
# of Normal Operating Hours /day: If you do not want to use the Equipment Schedules table to document the use of equipment, record equipment use in this field. This field is handy for recording the use of non-production equipment and production equipment that runs the same hours every day. The application uses this value to calculate the Annual Utilization Rate - Equipment shown on the Optimization tab of the Asset Lifecycle Console.
Years Life Expectancy: Enter the life expectancy in years. The Equipment Replacement Analysis report uses this data.
Meter Units: Use this field to document the units that the equipment's meter measures use: miles or hours.
Last Meter Reading / Date of Last Meter Reading: If you are have implemented meter-based preventive maintenance, manually complete these fields with the same values you enter for the corresponding fields of the Work Requests table.
Average Metered Usage/Day. Complete this field with the average use per day so that the program's scheduling routine can determine upcoming preventive maintenance according to meter-based scheduling.
Control Operating Limit - Low / High: If your equipment includes monitoring sensors, use these fields to record the boundary conditions for normal operation of the parameter being monitored.
Alarm Operating Limit - Low / High: Use these fields to record the operating condition limits which should not be exceeded under any conditions.
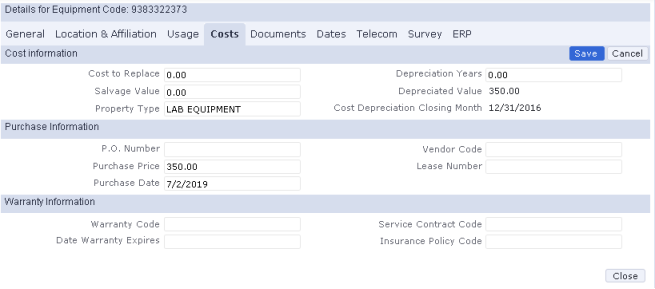
Cost to Replace: Use this field to document the cost of replacing this item. The Building Operations and Asset Management domains use this in its Equipment Replacement Analysis report.
Salvage Value: Enter the value of the asset at its expected useful lifetime (the salvage value).
Property Type: Select the classification that determine how depreciation values are calculated. Property Types are defined as background data for the Asset Management / Asset Portal / Depreciation process. Complete this field if you intend to track depreciation.
Deprecation Years. The number of years over which the equipment is depreciated. You can manually enter this value, or the application can complete it if you are using the Asset Management's Depreciation features to calculate depreciation.
Depreciation Value (cost_dep_value): The value of the equipment after depreciation is calculated. The application completes this with the value it determines when calculating depreciation.
Note: If you import data into the Depreciated Value (eq.cost_dep_value) field, as long as the property type field is empty, this value will not be overwritten with the calculated depreciation value.
Cost Depreciation Closing Month (date_dep_closing_month) -- This read-only field presents the report log closing date and is completed by the system when the depreciation calculation is run. It lets you know when the Depreciated Value was updated on tagged furniture or equipment. The user sets the Closing Month date (dep_reports.last_date)with the Define Depreciation Logs task.
In the Purchase Information section:
In the Warranty Information section:
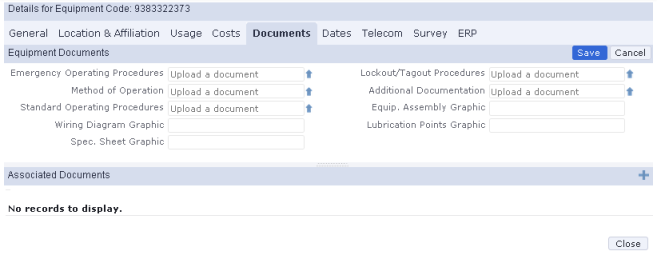
Use the Document Management System to upload these documents:
Complete these graphic fields with the file name of the graphic. Reports can then display the graphic. The graphic file must be located on the project path in order for a report to display it.
Associated Documents panel. In addition to using the Document Management System to associate documents with the equipment item, you can associate reference documents.
This section lists any reference documents you have associated with the equipment standard of this equipment item, or with the equipment item itself.
To associate reference documents with this equipment item, use the "+" button to access a form for selecting the document. For information, see Managing Reference Documents.
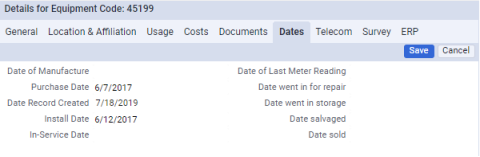
Date of Manufacture. The date the equipment was made. The Building
Operations domain compares this value to the system date to determine
an equipment item's age.
Purchase Date. Use this field to document the date you purchase an item. Note that depreciation calculations use the Install Date and not this date to determine depreciation expenses.
Install Date: The date the equipment is installed, and the date at which depreciation starts.
In-Service Date: Date the equipment was placed in-service, as opposed to the date when the equipment was installed. Entering the In-Service Date for an equipment asset is important as the application uses this date to dynamically calculate the Equipment Age (yrs).
Date of last meter reading. Enter the most recent meter reading.
Date went in for repair. If the equipment goes in for repair, enter the date here.
Date went in storage: If the equipment is placed in storage, enter the date here.
Date salvaged. If you enter Yes for Salvaged? (on the General tab), complete this field with the date you considered the equipment item salvaged.
Date sold. Enter the date you sold the equipment.
Date Record Created. The system generates the date and time when the record is created.
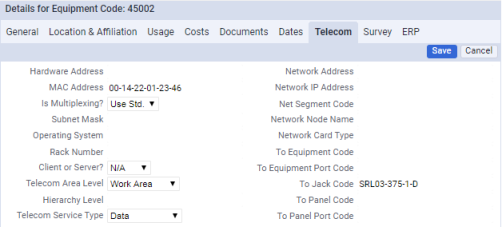
Hardware Address. The actual address of the equipment item, usually assigned
by the manufacturer.
MAC Address. The media access control address (also called physical address ) It is typically assigned to the device by the manufacturer, and is a unique network address for a device. This field is brought into Archibus using the connector import files used by the Reconcile Enterprise Data task of the Enterprise Asset Management application. See MAC Address.
Is Multiplexing? Specifies whether the item is multiplexing and, like telecom hierarchy levels, overwrites the assigned equipment standard’s multiplexing status. The values are "Yes" and "Use Standard." When this field is set to "Use Standard," the system consults the equipment item's standard to determine if the item is multiplexing.
Subnet Mask. If the equipment item is part of a net segment (subnet), and your site uses subnet masks, use this field to record the equipment’s subnet mask. All equipment items belonging to the same network segment should have the same value for this field. (In the IP addressing schema, a subnet mask is a set of bits whose values are used to more easily identify a network segment.)
Operating System. The equipment’s operating system.
Rack Number . Use racks to precisely document the location of an equipment item within a room. Validated by the Racks table.
Network Address. The address that the network uses for this equipment item.
Client or Server? Defines elements that are clients or servers. If an item is neither, complete with N/A.
Telecom Area Level. Specifies the telecom area level for the item, and overwrites the assigned equipment standard’s telecom area level.
Hierarchy Level. Defines the telecom hierarchy level for the equipment item. Hierarchy levels are usually defined for devices by specifying a level for an equipment standard ,and then assigning a standard to an equipment item. Use this field when you want to overwrite the assigned standard’s hierarchy level.
Telecom Service Type. Specifies the telecom service type for the item, and overwrites the assigned equipment standard’s service type.
Network Address. The address that the network uses for this equipment item.
Network IP Address. The IP (Internet Protocol) address for the equipment item.
Net Segment Code. The subnet or net segment on which the equipment resides. This is validated by the Net Segments table.
Network Node Name. The name by which this equipment is referenced in the network.
Network Card Type. The type of card (Ethernet, Token Ring, etc.) the device uses.
To Equipment Code. The equipment on your network to which you want to connect this telecom asset.
To Equipment Port Code. The equipment port on your network to which you want to connect this telecom asset.
To Jack Code. The jack in your network to which you want to connect this telecom asset.
To Panel Code. The panel in your network to which you want to connect this telecom asset.
To Panel Port Code. The panel port in your network to which you want to connect this telecom asset.
Last Survey Update From. When the supervisor closes out a survey, the program uses this field to document the survey from which the system updated the Equipment table. Validated by the Disposition Surveys table.
Survey Photo. When field assessors perform surveys, they can capture an image of an equipment item using the Photo button. Once the image is captured, the system prompts the auditor to attach it to the survey. This photo is stored in the Survey Photo field. From the Space Book Mobile app or the Asset & Equipment Mobile app, a supervisor or other user, can use this photo to review the conditions of the equipment.
Asset Survey Redline. When a field assessor is performing a survey, the surveyor can use the Redline button to access the floor plan with the redline tools. The system saves the floor plan with redlines as a PNG file and stores this in the Asset Survey Redline field for the item.
Asset Survey Comments. Enter comments for the equipment while performing a survey,
Source System ID. When using the connectors to load enterprise data into Archibus, the system populates this field with the source system used (for example, Oracle, Maximo, SAP). Having both the Source System ID and the Source Record ID enables bi-directional updates if they are needed. These fields are also helpful when reconciling data between two systems.
Source Record ID. When using the connectors to load enterprise data into Archibus, the system populates this field with the primary key for the record for a particular processing of the Archibus connectors using the particular source system (for example, Oracle, Maximo, SAP, etc.) Having both the Source System ID and the Source Record ID enables bi-directional updates if they are needed. These fields are also helpful when reconciling data between two systems.
Source Status. The status of the record after the connector processes the data: such as inserted or updated.
Date Last Updated From Source System / Time Last Updated From Source System. The date and time the record was last updated with data from your other enterprise systems using Archibus connectors.
Source Feed Comments. Comments entered when this record was updated using Archibus connectors.
Note: To restrict the list using the Smart Search console, enter data in the text boxes under the column headers, and press Enter on your keyboard to set the restriction. See Smart Search Consoles.
The Edit Equipment form appears.
To delete equipment records:
The Equipment pane shows the selected record.
A message appears asking you to confirm the deletion.
The equipment record is removed from the database.
| Copyright © 1984-2020, Archibus, Inc. All rights reserved. |