Developing Locations (Sites, Buildings, Floors)
The first few levels of the Archibus are Sites, Buildings, and Floors. Space is typically organized by sites, which house buildings, which in turn house floors, which in turn can house groups or rooms. This topic discusses how to develop the first few levels of the space hierarchy.
With the tasks for developing location data, you can enter new data or edit existing data. When editing existing data, you can use the filter console, located at the top of the view, to limit the display of the locations to only those containing the value you enter in the filter console. For information on the filter console, see Using Filter Consoles
The Define Locations view uses a drill-down selection list to present the levels of location data. For information on working with this, see Using Drill-Down Selection Lists.
Note: This topic provides general information on developing the space hierarchy using the Define Locations (ab-sp-def-loc-rm.axvw) view. Help topics for several applications that require this background data may link to this topic. The specific fields to complete and tasks may vary for each application.
Note: For information on the fields in the ERP panel of the Define Locations view, see Enterprise Resource Planning.
Step 1: Develop Sites (Optional)
Sites group together multiple buildings located in a contiguous area, such as a Market Street site that contains three office buildings. If your company wants to report on and organize space inventory according to a buildings located in the same area, you will want to develop sites. If you do not have multiple buildings located in the same area, you likely will not need the site level of the space hierarchy.
Suppose a site is divided between two cities; for example, the city line crosses through the site so that the site contains two buildings in one city (Bedford), and a third building in another city (Billerica). There are two ways to address this situation; you can choose the one that works best for your reporting needs.
- You can create two Site records with the same prefix, such as Bedford 1 (whose buildings are located in Bedford) and Bedford 2 (whose buildings are located in Billerica). Each Site record will complete its City Code with the city in which its particular buildings are located. The "Bedford" prefix lets you associate these two sites.
- Have one site (Bedford) which lists Bedford as its city. Each Building record lists the city that it is located in, which may be different than the city that the site is located in.
Note: Some views might require you to develop sites in order for data to be rolled up or displayed correctly. For example, when using some map views, such as the Waste Management Map by Site Locations, you select from a drill-down list of locations that require sites in order to view the rollup of waste amounts by status for each site. Also, in the Real Estate Portfolio Management domain, to have portfolio items appear in all key performance indicator charts grouped by geographic location, you should develop the entire geographic hierarchy. That is, you should enter the Country, Region, State, City, and Site Codes. See Developing Geographic Data.
To define your sites:
- In the Navigator,
choose the Define Locations task (
ab-sp-def-loc.axvw). This task is available from several locations on the Navigator.
- If necessary, review the existing sites by using the restriction console and tree hierarchy to view the list of sites.
- Click the Add New button and in the resulting pop-up dialog, choose Site.
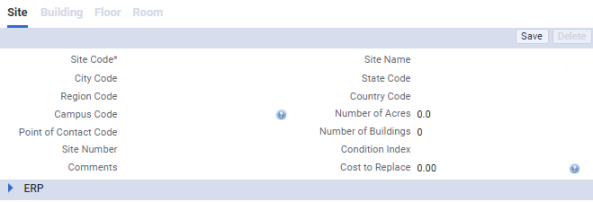
- In the right pane, complete the following site information:
- Site Code -- Enter a unique value, such as Market, that describes
this site.
- Site Name -- Enter a descriptive name
for the site.
- City/State/Region/Country -- Click on the ellipses buttons to choose an existing value, or type a new value into the box.
- Site Number -- Site Number and Site Name are often the description of a site, especially for government buildings and secured facilities. This field is used with BUILDERTM SMS.
- Campus Code -- This field is validated by the Campuses (
campus) table. This is the site location in BUILDERTM SMS. Note that the Extensions for BUILDERTM SMS connectors import the values for the validating Campuses table. If you are not working with BUILDERTM SMS, you typically want to retain this field as empty and track the area on which your buildings reside with sites.
- Number of Acres -- Enter the number of acres on which this site is located.
- Point of Contact Code -- Choose a value from the validating Contacts table to specify the contact for this site.
- Number of Buildings -- Enter the number of buildings located on this site. Note that you must update this value as you add buildings to the site; the system does not automatically update it for you.
- Condition Index -- This field is used in conjunction with BUILDERTM SMS. The Condition Index fields are calculated in Builder SMS and sent to Archibus. The data is transferred only from BUILDERTM SMS to Archibus; it is not transferred from Archibus to SMS. For information, see Condition Index (BUILDERTM SMS).
- Comments -- Enter comments about this site.
- Cost to Replace -- The Site PRV (Present Replacement Value) from BUILDERTM SMS is written to this field. If you are not using BUILDERTM SMS, you can enter the replacement value of the site in this field.
- Site Photo - If your company uses the Archibus Space Book and other mobile apps, you can complete this field with the name of a bitmap image representing your site. The mobile apps will include this image in site lists that they present.
- Detail Drawing -- If you are creating a site plan, enter the name of the drawing that houses your site plan, such as
acampus-bl.dwg or us-pa-campus.dwg. For information, see Draw Buildings on a Site Plan.
- Click Save in the upper right corner to save your data.
- (Optional): You may want to develop a (also known as a campus plan) that depicts your land and the location of the buildings on it. This is particularly useful for working with applications in which you can drill down by a site plan, such as the Space Book mobile app. For information, see Draw Buildings on a Site Plan.
Step 2: Develop Buildings
- In the Navigator,
choose the Define Locations task (ab-sp-def-loc.axvw).
- If necessary, review the existing buildings using the restriction console and tree hierarchy .
- In the tree view in the left pane, select the site in which this building is located. If you are not tracking sites, choose "No Site."
- Click the Add New button and in the resulting pop-up dialog, choose Building.
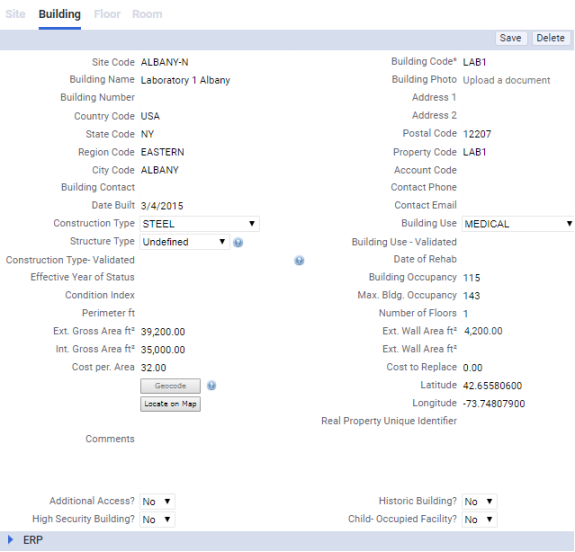
- In the right pane, complete the following
fields:
- Site Code -- Will be completed with the name of site that you selected, or with "no site."
- Building Code -- Enter a unique value, such as TOWER
- Building Name -- Enter a descriptive name for the building,
such as Tower.
- Building Number. Building Number and Building Name are often the description of a building, especially for government buildings and secured facilities.
- Building Photo - If your company uses the Archibus Space Book mobile app, you can complete this field with the name of a bitmap image representing the building. The Space Book app will include this image in building lists that it presents.
- Address 1/Address 2/Postal Code. Complete these fields with the street address and postal code of the building.
Note: When viewing buildings on map views, the City and State Codes are used together with the street address (Address 1 field) to calculate the latitude and longitude so that the building can be placed on the map. Enter full words rather than abbreviations for the address. For example, enter "Street", not "St." See Working with Map Views.
- City/State/Region/Country. Click on the ellipses buttons to choose an existing value, or type a new value into the box.
- Property Code. If you are tracking , you can choose the property on which the building is located from the list of existing properties.
- Account Code. For financial purposes, you may wish to associate the building with an . Click on the ellipses buttons to choose an existing value, or type a new value into the box.
- Building Contact/Contact Phone/Contact Email. Use these fields to document the party to contact concerning the building. For example, you can enter the facility manager in charge of this building; if you lease the building, you might enter the landlord’s name. For Building Contact, enter new values, or choose a value from the Contacts table.
- Date Built. Enter the date the building was constructed to use as a reference.
- Construction Type. Select the type of construction from the list. You can generate reports by construction type, for example, you can filter the Energy Consumption by Location report by construction type. Also, if you enter the Construction Type and Building Use for your buildings, the Energy Consumption Over Time report helps you evaluate if the building's activity or building materials are contributing to consumption values.
- Building Use. Select the building's primary use from the selection list. You can add reference documents for buildings having the same use. Also, you can generate reports to group data by building use, such as when generating the Utility Metrics report.
- Building Age. Enter the age of the building. Note that the system does not calculate this based on the Date Built value.
- Date of Rehab. Enter the date that the building was renovated, if applicable.
- Condition Index. This field is used in conjunction with BUILDERTM SMS. The Condition Index fields are calculated in Builder SMS and sent to Archibus. The data is transferred only from BUILDERTM SMS to Archibus; it is not transferred from Archibus to SMS. For information, see Condition Index (BUILDERTM SMS).
- Building Occupancy / Maximum Building Occupancy. Complete these fields with the current and maximum building occupancy. These values are used in calculations; for example they are used to calculate the Occupancy Rate for the building shown in the Property Abstract report.
Note: If you are leasing out some areas of a building, the Building Occupancy number should include the headcount for both the areas you are leasing and the areas you are occupying. That is, the Building Occupancy number should include both the Emp. Headcount as well as the occupancy of any leased and subleased areas of the building. Entering the number in this way ensures that calculations, such as the Vacancy Rate in the Global Portfolio Dashboard, more accurately reflect the building's capacity.
- Number of Floors. Enter the number of floors for this building.
- Internal/External Gross Area. Enter the overall gross areas in these fields.
- External Wall Area. The system calculates this as the difference between the External Gross Area and Internal Gross Area.
- Cost per Area. Use this field to record the cost of 1 square meter or 1 square foot of the building (depending on the area measurement standard you are using). Typically, an accountant in your organization will determine the cost of one square foot of area and provide you with this figure. This cost figure can be derived from a combination of the cost of rent, construction, maintenance, building insurance, and other factors. The Cost Per Area is used to calculate the Cost Per Employee benchmark shown in the Building Abstract report.
- Cost to Replace. The Site PRV (present replacement value) from BUILDERTM SMS is written to this field. If you are not using BUILDERTM SMS, you can enter the replacement value of the site in this field.
- Building Value. Enter the fair market value of the building only; do not include the value of the land on which it is located.
- Real Property Unique Identifier. Sites, such as the Federal Government, use a Web Service for assigning and looking up Real Property Unique Identifiers enterprise-wide. Archibus provides the non-validating Real Property Unique Identifier (grp_uid) field in the Properties, Buildings and Equipment tables for deployments looking to link US Federal Registry assets to Archibus asset inventory tables.
- Latitude/Longitude. See the below discussion on Geocode and Locate on Map for information about completing these fields. Or, if you know the coordinates, you can enter them yourself.
Fields for Extensions for BUILDERTM SMS
If you have a license for the Extensions for BUILDERTM SMS, the Building form includes the following fields, since BUILDERTM SMS tracks this data:
- Effective Year of Status
- Building Use Validated
- Construction Type-Validated
- Perimeter
- Structure Type
- Additional Access?
- High Security Building?
- Historic Building?
- Child-occupied Facility?
Note that the Extensions for BUILDERTM SMS connectors import the values for the tables that validate on the Construction Type Validated and Building Use Validated fields.
- Geocode. To calculate the coordinates for this building from the street address, ensure that the Address 1, City, and State fields are completed, save the record, and click . If there are already values for the building's Latitude (bl.lat) and longitude (bl.lon), the Geocode button is disabled. If needed, to change the location, you can use the Locate on Map action.
-
Locate on Map. Geocoding processes are often approximate. They compute coordinates by interpolating street addresses along lengths of road which might not be the location you want to specify. Additionally, some addresses return no valid results at all, not even acceptable approximations. For these reasons, as an alternative to geocoding, you might want to override and refine the geocoded results by clicking on the map to locate the object.
To define a location directly on the map:
- Click Locate on Map.
The Locate Asset pop-up window appears. The application plots the existing location (specified by latitude and longitude), if available, or else presents the map so that you can zoom and pan to the location of the site or building shown in the form.
- On the Locate Asset Map, click the point on the map where you want to define the location.
The application plots a different color marker (for example, yellow versus the default red circle) where you click.
- If needed, zoom in to further inspect the location.
- If you are not satisfied with the new location, click again. The first yellow marker is erased, and the application plots a new marker where you most recently clicked.
- Once satisfied with the marker placement, click Save Location to confirm the placement, The application updates the Latitude and Longitude values in the edit form above with the new coordinates.
- Click Save, The new location data is saved to the appropriate table,
- (Optional): You may want to represent your buildings with asset symbols on a (also known as a campus plan). This is particularly useful for working with applications in which you can drill down by a site plan, such as the Space Book mobile app. For information, see Draw Buildings on a Site Plan.
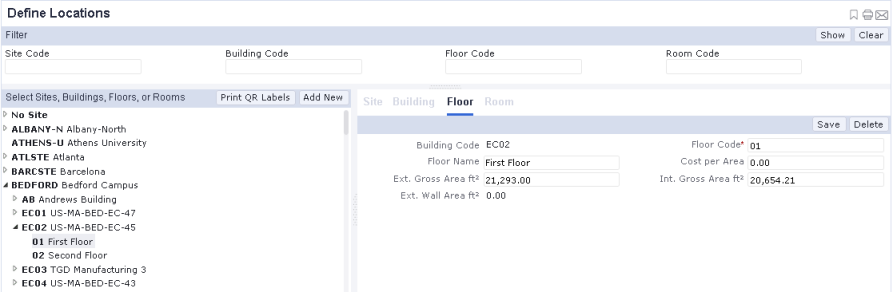
Step 3: Develop Floors
Floors are
identified by the values of the Building Code field plus the Floor Code
field, such as JFK-01 for floor 01 in building JFK.
To enter your floor information in the database:
- Choose the Define Locations task (ab-sp-def-loc.axvw).
- If necessary, review the existing floors using the restriction console and tree hierarchy .
- In the tree view in the left pane, select the building in which this building is located.
- Click the Add New button and in the resulting pop-up dialog, choose Floor.
- In the right pane, complete the following
fields:

- Site Code -- Will be completed with the name of site that you selected, or with "no site."
- Building Code-- Will be completed with the name of the building that you selected.
- Floor Code -- Enter a value for this field that when combined with the selected Building Code will form a unique value, such as 01.
- Floor Name -- Enter a descriptive name for the floor.
- Cost Per Area -- Enter the cost of one unit of this floor, such as the cost of one square foot or one square meter. The Space domain uses this value to internally charge departments for their use of space on this floor.
- Exterior Gross Area/Interior Gross Area -- If you are not depicting your floor in a CAD drawing, you can manually enter the size of the floor in these fields. The Space calculations will use the values that you enter. If you are developing these areas in CAD drawings, the system will complete them with the size of the gross area asset symbols.
- Ext Wall Area feet --
- Standard Area per Employee -- Enter the typical amount of area used by an employee situated on this floor.
- Sort Order -- For use with , the sort order determines the order in which the stack plan presents floors. The stack plan sorts first by this field and then by the Floor Code value; thus, if this field does not have a value, fields are sorted by the Floor Code.
- Click Save in the upper right corner.
To develop a floor plan:
Often, sites wish to have a floor plan so that they can graphically see the location of accidents, maintenance issues, risk issues, and so forth. In this case, users purchase the Space Inventory & Performance application and use CAD to depict develop floor plan drawings. The floor plan can then be used with other Archibus applications.
If you want to depict your floor in a CAD drawing, see Draw Gross Areas (Space Inventory & Performance). Once you develop the floor outline, you can add vertical penetration, service areas, and rooms.
Step 4: Develop Rooms
For information, see Developing Locations (Rooms).
If you have developed a floor plan in CAD, you can add room to the plan.
You may want to print QR Code labels for your rooms, using the Print QR Code Labels button at the top of the Select Sites, Buildings, Sites, and Floors pane. For information, see:
Step 5: Publish the CAD Plans
When satisfied with your floor plans, publish them as so that you can view them in Web Central views.
| Copyright © 1984-2020, Archibus, Inc. All rights reserved.
|