Real Estate Portfolio Management / Lease Administration
Add/Edit Form - Basic
Use the Add/Edit Form - Basic to enter basic lease data quickly. For example, if you have a number of new leases that you need to get into the system, this task enables you to quickly establish lease records that you can further develop at a later point. After saving lease information, you can associate documents or add base rent costs for the lease.
Using the Add/Edit Form - Basic, you can also add or edit the location information required by your real property portfolio. The location information you can add includes geographical regions, countries, regions, states, cities, sites, properties, or buildings.
From the Add/Edit Form - Basic task, you can add lease information using a lease template if you have defined templates. See Defining Lease Templates. The following procedure for Entering Leases includes instructions for optionally using a template.
Note: To enter complete lease details, use the Add/Edit Complete task, or the Add/Edit Wizard. For information on the differences between tools, see Overview of Tasks for Editing Leases.
This topic includes the following sections:
Adding Location Information
Working from the Add /Edit Form - Basic task, you can add or edit location information, including Countries, Regions, Sites, Cities, Sites, Buildings, and Properties.
To enter geographical information (Geographical Regions, Countries, Regions, States, Cities, or Sites):
- Select the Add/Edit Form - Basic task.
- Click Add/Edit Locations, and then select Add Geographical Locations from the menu.
The form for adding geographical locations appears. See Developing Geographic Data.
To enter properties:
- Select the Add/Edit Form - Basic task.
- From the Leases in a Property tab, click Add/Edit Locations, and then select Add/Edit Properties from the menu.
The form for adding properties appears. See See Defining Properties.
To enter buildings:
- Select the Add/Edit Form - Basic task.
- From the Leases in a Building tab, click Add/Edit Locations, and then select Add/Edit Buildings from the menu.
The form for adding buildings appears. See Defining Locations.
Add/Edit Form - Basic When Using the Archibus Enhanced Global Feature Set
Add/Edit Form When Using the Archibus Enhanced Global Feature Set
If you have enabled the Archibus Enhanced Global Feature Set, the cost fields in the Add/Edit Form - Basic are shown using your , and area fields are shown using the User Display Unit of Measure field (Metric or Imperial) entered in your User Profile.
Excluding a Lease from VAT Payments
If the contract for a lease specifies that the tenant is exempt from paying any VAT tax for costs associated with the lease, you can set the VAT Excluded? flag for the lease to Yes. This means that the system sets the VAT Percent to 0.00 for all costs assigned to this lease, and you are not able to enter a VAT Amount Override or VAT Percent Override for a cost associated with this lease. You set the VAT Excluded? field when entering lease information. This field is available only if you have enabled the Archibus Enhanced Global Feature Set.
Entering Leases Using the Add/Edit Form - Basic
To enter lease data using the basic form:
- Select Lease Administration / Lease Portfolio /Add / Edit Form- Basic.
- Do one of the following:
- To add a lease for a building, select the Leases in a Building tab.
- To add a lease for a property, select the Leases in a Property tab.
- Expand the drill-down selection list to select the building or property you are adding a lease for.
- Click Add New at the top of the drill-down selection list.
The Add New Lease panel appears.
- Enter the Lease Code, the unique identifier for the lease.
If the Lease contract indicates that the tenant is exempt from paying any VAT tax for costs associated with the lease, you can set the VAT Excluded? flag for the lease to Yes. This means that the system sets the VAT Percent to 0.00 for all costs assigned to this lease, and you are not able to enter a VAT Amount Override or VAT Percent Override for a cost associated with this lease. This field is available only if you have enabled the Archibus Enhanced Global Feature Set.
- To enable for a lease, select the Index Costs checkbox. This checkbox must be enabled or the application does not perform indexing calculations. See Lease Indexing: Overview.
- Optionally, to enter lease information using a template:
- Click Use Template.
The Select Lease Template dialog shows a list of your lease templates.
- Select a template from the list.
The program copies the information entered for the template to the new lease record you are entering. You can add additional information or change the template information using the following steps.
Note: If you have enabled the Archibus Enhanced Global Feature Set, and change the VAT Excluded? value for the lease template, the change is effective for any new costs you create for a lease that uses the template. Changing the VAT Excluded? value does not change the VAT amounts and percents used by the costs that are copied when using the template.
- Enter the following fields:
| Lease Code | The unique identifier for the lease. |
| Description | Enter a brief description that helps identify the lease. |
| Date Start and Date End for the lease | These dates are used with Assume Renewal for KPI Calculations to determine whether the area associated with the lease's suites is included in key performance indicator charts that aggregate estimated area for specific time frames. These dates are also used to determine when to issue an alert that the lease is up for renewal. The lease Date End is not required to save the lease information, and the lease is considered even if you do not enter this date. However, if you don't enter the Date End, alerts that warn of lease expiration cannot be issued for this lease, and the lease will be included in KPI charts for all future dates. |
| Lease/Sublease | The Lease/Sublease field is used to provide breakdowns for the area used by your tenants and the area available to your organization in the key performance indicator charts for portfolio items by If you select Sublease, the Parent Lease field becomes active. When working from the Add/Edit Wizard, this field is system-generated based on whether you selected Own or Lease for the portfolio item on the Ownership tab, and whether you selected Add New in the Leases for Which We Are the Land lord, or Lease for Which We are the Tenant section of the screen. |
| Parent Lease | If the Lease/Sublease field specifies that the record describes a sublease, select the Lease Code of the parent lease using this field's Select Value button. |
| Landlord/Tenant | Defines whether this record describes the lease from the tenant’s or landlord’s point of view. When working from the Add/Edit Wizard, this field is system-generated based on whether you have selected to create a lease or a sublease. |
| Lease Signed? | By default, this is set to Yes. This field must be set to Yes in order for the lease to be considered , but select No if the lease transaction is not yet completed. If set to No, the area for this lease is included in pipeline breakdowns when is shown in charts. |
Landlord Name / Landlord Contact | Enter this key information for leases for which you are the tenant. You can review this lease information in reports, such as Leases by Landlord Name, Lease Details, and Lease Abstract. |
Tenant Name / Tenant Contact | Enter this key information for leases for which you are the landlord. You can review this information in reports, such as Leases by Tenant Name, Lease Details, and Lease Abstract. |
- Click Save.
The Documents and Base Rent panels appear.
Associate a Document with the Lease
The Documents panel appears on the Add/Edit - Basic Form after you save the general lease information.
To associate a document using the Add/Edit Basic form, in the Documents panel:
- Click Add New at the top of the Documents panel.
The Add Document dialog box appears.
- Enter or select the following required fields:
Document Name: Enter or select a name for the document.
Description: Enter details, such as tenant or landlord obligations for utilities and services.
- Optionally, enter or select the Classification for the document, such as Contract. Entering a classification helps to organize your documents.
- Click Save.
- To attach the document, click the Check In Document button next to the Document field
 . This button appears after you save the document name and description.
The Check In New Document dialog box appears.
- Click Browse.
The dialog to locate and select the file appears.
- Locate and select the file, and click Open.
The Check in New Document dialog box appears. The name Archibus uses to store the file appears under the Browse button.
- Optionally, enter a description of the document and set the document lock status. By default, the status is unlocked. The goal of locking documents is to prevent two or more people from
editing the same document at the same time, which results in two or more
different branches of changes. Typically, you lock documents as part of
the check out procedure and unlock documents when you check them in.
- Click OK.
The Document field now has the document management buttons. 
See Using the Document Management System.
- Click Save on the Add Document dialog box.
- To add another document, repeat this procedure.
Add Base Rents
The Base Rents panel appears on the Add/Edit - Basic Form after you save the general lease information.
To add base rents using the Add/Edit - Basic form, in the Base Rents panel:
- Click Add New at the top of the Base Rents or Recurring Costs tab to define a
The Add Recurring Cost form appears.
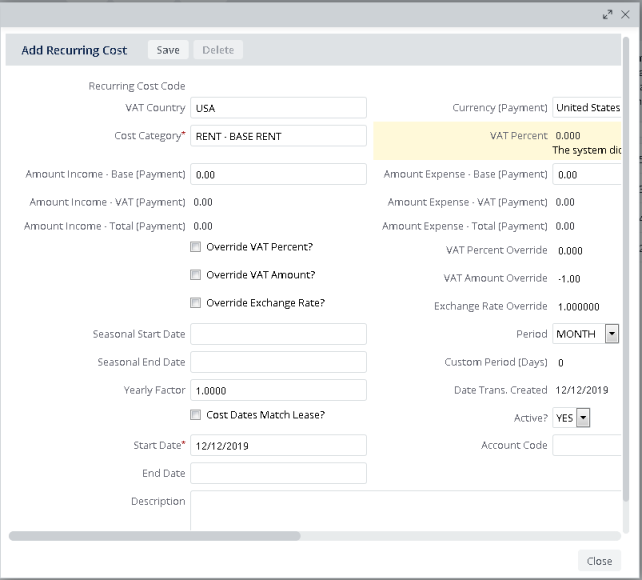
- Complete the following fields:
| Cost Category |
By default, the category is Rent - Base Rent. To add different recurring costs, click the Select Value button by the Cost Category field. The Select Value - Cost Category dialog appears. Select a cost category and cost class from the list. Use the Smart Search feature to filter the list if needed. |
|
VAT and Multicurrency fields
|
When using the Archibus Enhanced Global Feature Set, enter the Amount Income - Base (Payment) or Amount Expense - Base (Payment) fields as using the . The program will calculate the and for you.
The Cost Category is used with the to get the default VAT percentage to use for this cost, unless an override is entered for the cost or for the lease using the Override VAT Percent? and related fields.
|
|
Amount - Income
Amount - Expense
|
When the Archibus Enhanced Global Feature Set is not enabled, for each record, complete either the Amount - Income or Amount - Expense field.
T
These two fields record the amount of the transaction for the time frame indicated in the Period field. For example, if you pay a quarterly utility bill, enter the amount in Amount-Expense and complete Period with "Quarterly."
|
| Period |
This field defines the interval between payments. Choose MONTH, QUARTER, YEAR, or CUSTOM.
|
| Custom Period (Days) |
If you choose CUSTOM for the Period field, complete this field with the number of days for the custom period. For example, enter 45 for a 45-day period.
|
| Active? |
Only recurring costs with Active? set to Yes are included in the Lease Net Income by Month or Year reports.
The Cost Administration / Cost Administrator / Cost Wizard task uses this field to evaluate whether the recurring cost record should be used by the Schedule action to generate . The default is YES. If you currently do not wish the recurring costs to be used in calculations, but want to retain it for future use, set this field to NO.
Note that the Leases module works only with .
|
| Start Date |
Enter the date that the recurring cost takes effect.
|
| End Date |
Enter the date that the recurring cost ends. If this field is left blank, then the recurring cost is scheduled to continue indefinitely. |
| Cost dates match lease? |
Select this field, and the form completes Start Date and End Date with the Start Date and End Date of the lease. If the cost will recur throughout the lease, use this field as a quick way to accurately complete the Start Date and End Date fields. |
|
Seasonal Start Date
Seasonal End Date
|
These fields model seasonal costs that enable you to generate a more accurate monthly cash flow.
If you are modeling a seasonal cost, you should specify a Seasonal Start Date and a Seasonal End Date.
For example, for a winter lease cost you can specify a Seasonal Start Date of November 15, 20XX and a Seasonal End Date of March 15, 20XX (where XX is any year you choose—the year has no effect, as the Start Date you enter for the cost determines when the recurring cost begins to take effect).
|
| Yearly Factor |
A yearly increase or decrease to factor into the cost beginning from the Start Date. For instance, you can model a 10% yearly increase in lease costs by entering a yearly factor of 1.10. If you enter a value of .75, the lease cost is defined to decrease 25% per year.
|
| Account Code |
Complete this field if you wish to assign lease costs to . You can select from the accounts that have been defined using the Define Accounts task. |
| Description |
Enter a description for the expense or income modeled by this recurring cost record. |
| Lease Code |
This is the code for the lease you selected. The system automatically completes this.
|
| Recurring Cost Code |
After you save the cost record, the system completes this field with a unique identifier for this cost. |
| Date Trans. Created |
The system completes the value with the system date for the time that your created the record. |
- Click Save.
| Copyright © 1984-2020, Archibus, Inc. All rights reserved.
|